The CDN LTL Freight Quotes app retrieves your negotiated LTL rates, takes action on them according to the app settings, and displays the results as shipping options in the Shopify checkout process. CDN Logistics offers a wide range of transportation services that include LTL, regional, long-haul, expedited, temperature-controlled, dedicated, dry-van, air-ride and flatbed services. The application retrieves your negotiated CDN LTL freight rates, takes action on them according to the application settings, and displays the result as shipping charges in the Shopify checkout process.
CDN Logistics picks up LTL freight shipments from limited areas of California, Indiana, Illinois and Wisconsin. Click here to access a list of areas from which the company originates service. If you don’t have a CDN Logistics account and would like one, contact them at 800-240-3525, or request one online.
Basic Plan $20/month
Retrieves your negotiated LTL freight rates.
Supported origins: Limited areas of California, Indiana, Illinois and Wisconsin.
Supported destinations: United States.
Customize the text used to label quotes displayed to shoppers.
Elect to display the carrier’s transit time with the rate estimate.
Define multiple warehouse locations.
Identify products that drop ship from vendors.
Compatible with Shopify Locations.
Basic option for residential delivery.
Basic option for lift gate delivery.
Mark up quotes by a dollar amount or percentage.
Assign products and variants a shipping weight, freight class and optionally dimensions.
Access to a built in density calculator.
Dynamic presentation of parcel and LTL freight rates with the installation of compatible apps from Eniture Technology
Standard Plan $25/month
Everything in the Basic Plan, plus…
Automatic detection of residential addresses allows the carrier’s residential delivery fee to be automatically included in quotes.
Option to require lift gate delivery when a residential address is detected.
Allow customers to choose between a standard option for LTL freight and one that includes lift gate delivery.
Do not display rates if a post office box is detected.
Support for products that ship hazardous material.
Advanced Plan $40/month
Everything in the Standard Plan, plus…
Offer options for in-store pick up and local delivery.
Current version: 1.0
Requirements
A Shopify account with the Real-Time Carrier Shipping feature enabled. The feature is standard on the Advanced Shopify subscription package. It can be added to other packages by contacting Shopify customer service.
A CDN Logistics account number.
Your username and password to CDN Logistics’ online shipping system.
FAQ’S
How do I get this application?
This application can only be installed from the Shopify App Store. Click here to locate the app in the Shopify App Store and then click the GET button to install the app. You must have the Shopify store owner credentials to perform the installation.
How do I get a CDN Logistics account number?
Call 800-240-3525 or request one online.
Where do I find my CDN Logistics username and password?
Contact CDN Logistics’ customer service or the CDN Logistics account manager assigned to your account.
Why are the shipment charges I received on the invoice from CDN Logistics different than what was quoted by the plugin?
Common reasons include a difference in the quoted versus billed shipment parameters (weight, dimensions, freight class), or additional services (such as residential delivery) were required. Compare the details of the invoice to the shipping settings on the products included in the shipment. Consider making changes as needed. Remember that the weight of the packing materials is included in the billable weight for the shipment. If you are unable to reconcile the differences call CDN Logistics’ customer service for assistance.
Why do I sometimes get a message that a shipping rate estimate couldn’t be provided?
There are several possibilities:
The most common reason is that one or more of the products in the shopping cart did not have its shipment parameters (weight, dimensions, freight class) adequately populated. Check the settings for the products on the order and make corrections as necessary.
The city entered for the shipping address may not be valid for the postal code entered. A valid City+State+Postal Code combination is required to retrieve a rate estimate and Shopify does not perform this level of address validation. Contact us by phone (404-369-0680) or email (support@eniture.com) to inquire about solutions to this problem.
Your shipment exceeded constraining parameters of CDN Logistics’ web service.
The CDN Logistics web service isn’t operational.
Your CDN Logistics account has been suspended or cancelled.
You are attempting to get a quote from or to an address that CDN Logistics doesn’t service.
There is an issue with the Eniture Technology servers.
Your subscription to the application has expired because payment could not be processed.
There is an issue Shopify’s servers.
How do I determine the freight class for my product(s)?
The easiest thing to do is to contact your CDN Logistics representative and ask for assistance. However, the official source is the National Motor Freight Classification (NMFC) directory maintained by the National Motor Freight Transportation Agency (NMFTA.org). You can purchase a hard copy of the directory or obtain an online subscription to it from their web site.
How does the density calculator work?
The density calculator will calculate a freight class by performing a calculation using the product weight and dimensions as inputs. In most cases the returned freight class will match the product’s (commodity’s) freight class as recorded in the National Motor Freight Classification (NMFC) directory. However, this is not always true and in the event there are differences, the freight class recorded in the National Motor Freight Classification (NMFC) directory takes precedence. An incorrectly identified freight class can result in unexpected shipping charges and even fees. You are solely responsible for accurately identifying the correct freight class for your products. If you need help doing this, contact your CDN Logistics representative for assistance.
User’s Guide
To use these instructions you must be logged in to Shopify as the store’s administrator, or with a login that has administrative privileges.
Setting up the application to display LTL freight quotes consists of the following steps:
Other information contained in this guide:
1. Prepare Shopify to use the application. |
Return to top. |
You must have the Third-party calculated shipping rates feature on your Shopify plan to have live carrier quotes displayed in the checkout process. It is standard on the Shopify Advanced plan and can be added to other Shopify plans by calling Shopify Customer Service at 888-746-7439. (Learn more)Navigate to the Settings>Shipping page. Click on the Manage rates link for the General shipping rates in the Rates at checkout section.

In the General shipping profile, locate the shipping origin from which you want the app to provide quotes.

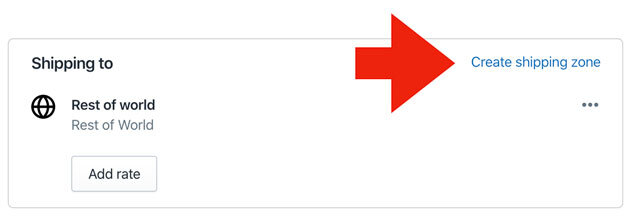
If the only shipping zone you have is Rest of world, click on the Create shipping zone link and then enter a zone name (i.e. “Domestic”).
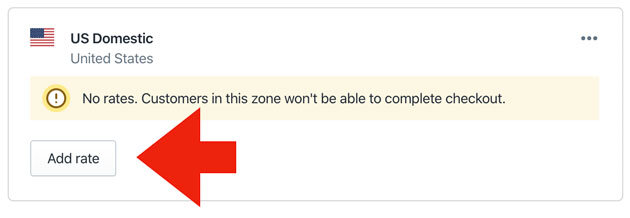
Locate the shipping zone for which you want to app to provide quotes. Click the Add rate button.
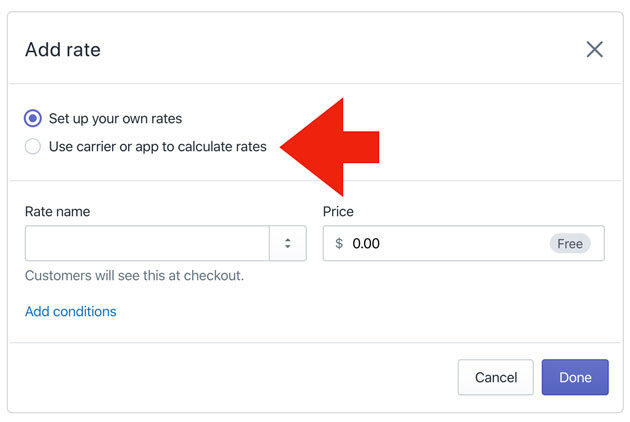
Select the option Use carrier or app to calculate rates.
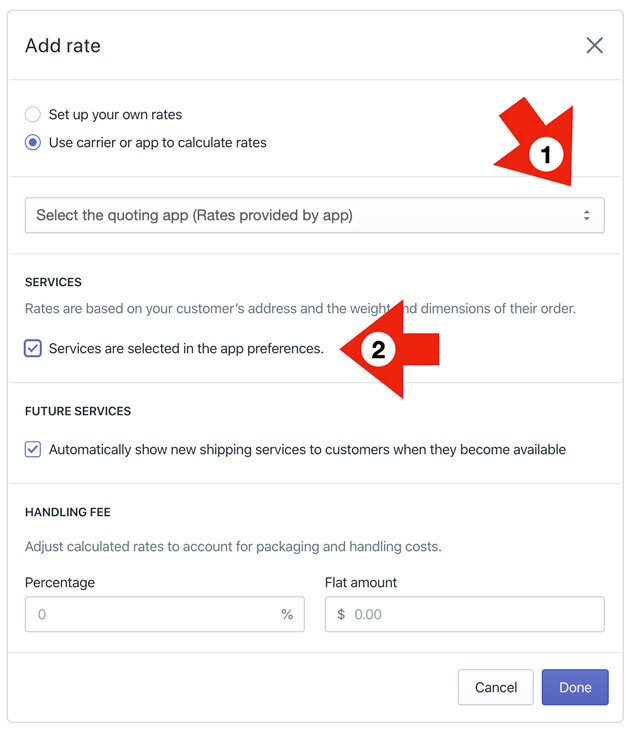
It may take a moment for Shopify to retrieve the list of apps capable of providing shipping quotes for your store. After it has, the appearance of the Add rate page will be similar to the image below. Perform the following actions:
- Select the app from the drop down list.
- Enable the Services are selected in the app preferences setting. If this setting isn’t available to enable, don’t be concerned. Click the Done button at the bottom of the page and continue on to the next step.
- Click the Done button at the bottom of the page.
Repeat the steps above to enable the app for any other shipping zone. You should only enable the app in shipping zones that the app is capable of returning quotes for. Check the Features tab for origins and destinations that the app supports.
3. Choose the desired plan. |
Return to top. |
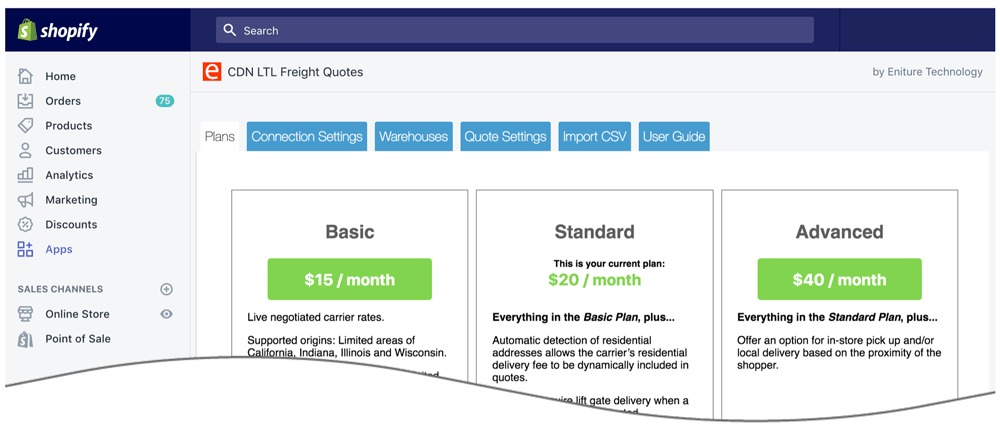
Begin by selecting Apps from the Shopify menu. Locate the entry for the CDN LTL Freight Quotes app and click on the app name to access the app preferences.

The Plans page is used to confirm the plan you are currently subscribed to, see the features offered on each plan, and to perform upgrades or downgrades according to your needs. The plan you’re currently subscribed to will have This is your current plan above the monthly subscription rate. To change plans, click on the desired plan’s monthly subscription rate. You must be signed into Shopify with the Store Owner credentials to change plans.
3. Connect the application to the CDN Logistics web service. |
Return to top. |
You will be delivered to the Connection Settings page. Enter the information prompted for, then click Save Settings. After the settings have been saved, click Test Connections. You will see a success message if your credentials validated. If not, correct them and try again.
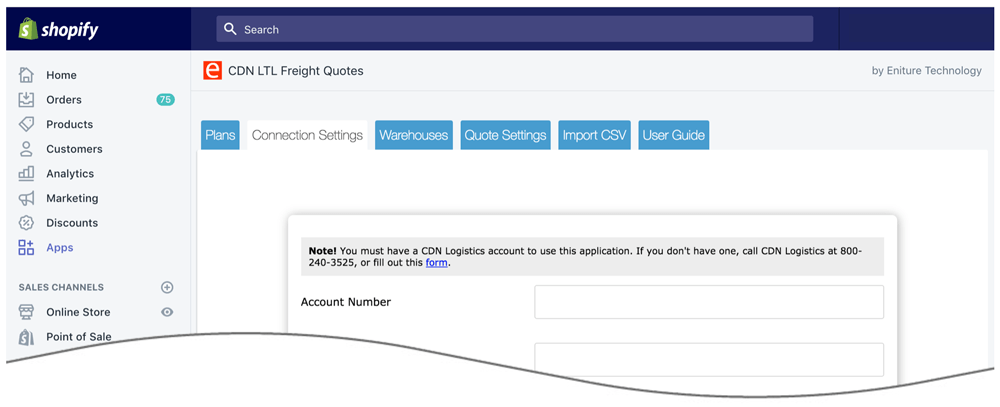
| CDN Logistics Account Number | Your CDN Logistics account number. If you don’t have one please contact CDN Logistics to obtain one. |
| CDN Logistics Username | The username issued to you by CDN Logistics to access their online shipping system located at customco.com |
| CDN Logistics Password | The password associated with the provided username. |
4. Identify your warehouse and drop ship locations. |
Return to top. |
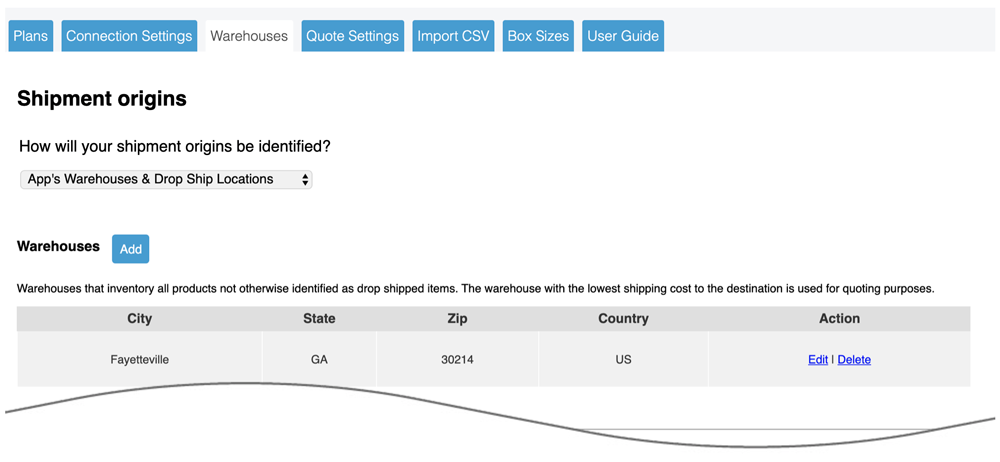
You can choose to use the app’s warehouse and drop ship functionality, or Shopify’s Locations feature to determine the shipment origins for orders placed on your store. Make your selection using the drop-down field labeled, How will your shipment origins be identified?
If you ship from only one location, it doesn’t matter which option you choose. However, your decision will matter if you ship from more than one location.
The app’s functionality assumes than an unlimited amount of inventory is available from each stocking location. The app has two types of stocking locations: warehouses and drop ship locations. If multiple warehouses exist, the one closest to the ship-to address is used as the ship-from location. This approach minimizes the estimated shipping costs and, if you have the setting enabled, presents your shopper with quicker estimated delivery dates. When an item is assigned to a drop ship location, it always ships from there.
Shopify Locations introduces the ability to do inventory tracking at multiple locations. Shopify Locations may be a good option for you if:
- You have visibility to the inventory levels at all your shipping locations.
- You will maintain accurate inventory counts in Shopify.
- You have items that can ship from more than one location, but not all locations.
Be aware that Shopify’s selection of the ship-from location isn’t influenced by its proximity to the ship-to address. Instead, you’ll list your locations in the order in which you want Shopify to look for available inventory. Once Shopify finds it, that location (or locations) becomes the ship-from address even if the next one on your list is across the street from the ship-to address and has enough inventory to fulfill the order. To get a better understanding of how Shopify Locations identifies the ship-from location, look over the example in Shopify’s Help Center.
If you choose to use Shopify Locations, you’ll lose visibility to how the app built the shipping quote when Shopify determines that more than one location is needed to fulfill the order. This occurs because Shopify makes individual shipping rate requests for each location and doesn’t provide enough information to relate each of them back to the same order. The section in this document titled, What you see, has examples of the information normally captured with an order. This information will be missing when Shopify Locations is used, and more than one location is used to fulfill the order.
Click the Add button in the appropriate sections to add warehouse and drop ship locations. Warehouses should have a complete inventory of all products not otherwise assigned to a drop ship location. If you have more than one warehouse defined, the warehouse closest to the shopper will be used to retrieve shipping rate estimates.
Drop ship locations usually represent vendors that supply items that you don’t inventory. These items are shipped directly to your customer on your behalf. An item can be assigned to only one drop ship location. Items not assigned to a drop ship location are assumed to ship from your warehouse(s).
When an order will ship from more than one stocking location (e.g. warehouse and drop ship locations or more than one drop ship location) a single figure will display for the shipping rate estimate labeled “Shipping”. The amount of the quote will be equal to the sum of the cheapest shipping option for each location.
A best practice is to define at least one warehouse, even if all your products are drop shipped. If all your products are drop shipped (you have no warehouses), make the highest volume drop ship location a warehouse. This ensures that shipping rate estimates will still be returned in the event a product was added to your catalog and its drop ship location wasn’t identified.
The locations you identified in Shopify will be displayed on the page when you select Shopify Locations from the How will your shipment origins be identified? drop down. Any changes to your locations will need to be made in Shopify. If you are on the app’s ADVANCED plan you can use the Edit link to enable and manage your in-store pickup and local delivery settings.
4a. In-store pick up settings |
Return to top. |
The Advanced Plan is required to use this feature. If you aren’t on the Advanced Plan the words Advanced plan required will appear adjacent to the settings header, and the fields associated with the feature will be inaccessible.

Click on the text Advanced plan required to upgrade your plan and gain access to the feature. You must be signed into Shopify with the Store Owner credentials to perform the upgrade.
In-store pick up can be offered as an option in the checkout process based the shopper’s postal code or proximity. It will only be offered if the feature is enabled and only one stocking location (warehouse or drop ship location) is involved in providing a quote. The settings for In-store pick up are visible on the page used to add or edit a warehouse or drop ship location.
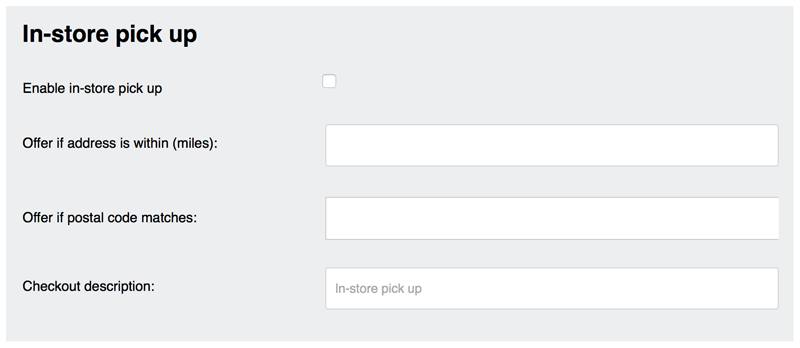
| Enable in-store pick up | Check the box to enable the in-store pick up feature. |
| Offer if address is within (miles) | The distance in miles within which you’d like to offer in-store pick up. The distance is route miles (driving distance). Leave blank if you don’t want to use distance to determine if in-store pick up should be offered. If both distance and postal codes are used as evaluation criteria, in-store pick up will display if either is satisfied. |
| Offer if postal code matches | The postal codes to which you’d like to offer in-store pick up. Enter only the five digit ZIP Code for US addresses. Leave blank if you don’t want to use postal codes to determine if in-store pick up should be offered. If both distance and postal codes are used as evaluation criteria, in-store pick up will display if either is satisfied. |
| Checkout description | The description to use to identify the option in the checkout process. The most obvious candidate is In-store pick up, but you can make it anything you’d like. |
4b. Local delivery settings |
Return to top. |
The Advanced Plan is required to use this feature. If you aren’t on the Advanced Plan the words Advanced plan required will appear adjacent to the settings header, and the fields associated with the feature will be inaccessible.

Click on the text Advanced plan required to upgrade your plan and gain access to the feature. You must be signed into Shopify with the Store Owner credentials to perform the upgrade.
Local delivery can be offered as an option in the checkout process based the shopper’s postal code or proximity. It will only be offered if the feature is enabled and only one stocking location (warehouse or drop ship location) is involved in providing a quote. Local delivery can display as a free option or have a charge associated with it. Other shipping options provided by the app can be suppressed when local delivery is to be offered. The settings for Local delivery are visible on the page used to add or edit a warehouse or drop ship location.
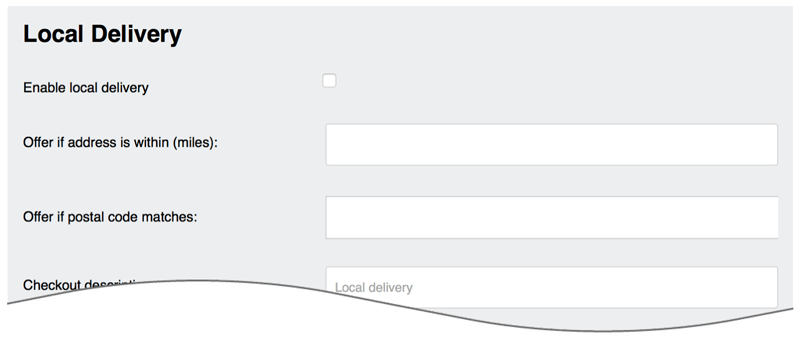
| Enable local delivery | Check the box to enable the local delivery feature. |
| Offer if address is within (miles) | The distance in miles within which you’d like to offer local delivery. The distance is route miles (driving distance). Leave blank if you don’t want to use distance to determine if local delivery should be offered. If both distance and postal codes are used as evaluation criteria, local delivery will display if either is satisfied. |
| Offer if postal code matches | The postal codes to which you’d like to offer local delivery. Enter only the five digit ZIP Code for US addresses. Leave blank if you don’t want to use postal codes to determine if local delivery should be offered. If both distance and postal codes are used as evaluation criteria, local delivery will display if either is satisfied. |
| Checkout description | The description to use to identify the option in the checkout process. The most obvious candidate is Local delivery, but you can make it anything you’d like. |
| Local delivery fee | Enter the amount to charge for local delivery. Leave blank to offer local delivery for free. |
| Suppress other rates | Check the box to show only the option for local delivery when the criteria for doing so (distance or postal code) is met. Leave unchecked to have local delivery offered in addition to the shipping options normally displayed by the app. |
5. Choose the desired quote settings. |
Return to top. |
On this page you will choose the settings that will affect every LTL Freight Quote your shopper sees. Enter the information prompted for, and then click on the Save Settings button at the bottom of the page.
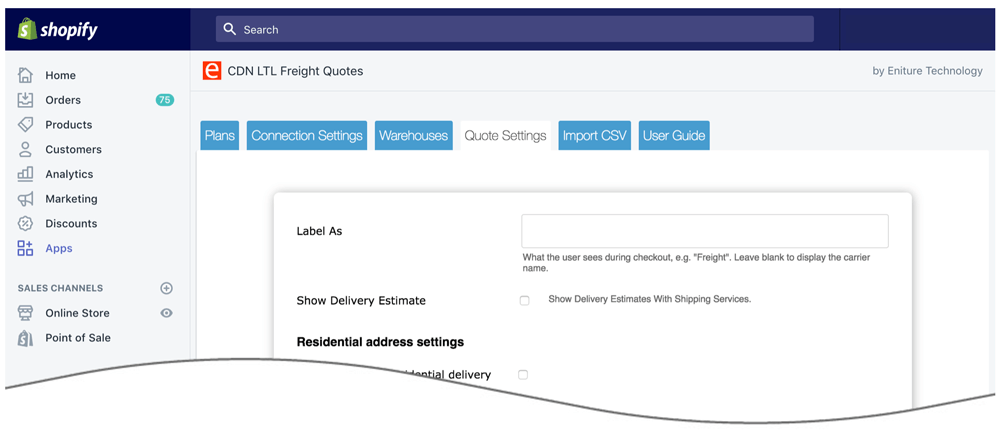
| Label As | Identify how you want the quote labeled in the checkout process. A common choice for this field is “LTL Freight” or “CDN Logistics”. If left blank quotes will be labeled “Freight” |
| Show Delivery Estimate | When checked, the carrier’s estimated transit time will be displayed. |
| Always include residential pick up | When checked, the quote will always include the carrier’s residential pick up fee. |
| Always quote residential delivery | When checked, the quote will always include the carrier’s residential delivery fee. |
| Automatically detect and quote residential delivery | The Standard Plan or higher is required to use this feature. If you aren’t on the Standard Plan or higher the words Standard plan required will be displayed. Click on the Standard plan required text to upgrade your plan and gain access to the feature. You must be signed into Shopify with the Store Owner credentials to perform the upgrade.
Each order’s shipping address is referenced against a USPS database to determine if it is a residential address. If it is, the freight quote will automatically include the carrier’s residential delivery fee. |
| Default unconfirmed address types to: | Displays only if the Automatically Detect and Quote Residential Delivery setting is enabled. Select Residential or Commercial. In rare cases the plugin my be unable to confirm the address type. This occurs when a match for the address can’t be found in the USPS database. Invalid addresses are the most common reason for this. In extremely rare cases an address may be valid, but the match found in the USPS database has a low confidence metric. Choose how you want addresses treated in these cases. |
| Always include lift gate pick up | When checked, every quote will include the carrier’s lift gate pick up fee. |
| Always quote lift gate delivery | When checked, every quote will include the carrier’s lift gate delivery fee. |
| Offer lift gate delivery as an option | The Standard Plan or higher is required to use this feature. If you aren’t on the Standard Plan or higher the words Standard plan required will be displayed. Click on the Standard plan required text to upgrade your plan and gain access to the feature. You must be signed into Shopify with the Store Owner credentials to perform the upgrade.
When checked, an additional option will be presented to the shopper that will include the lift gate delivery fee. The shopper will be able to choose between options that exclude or include lift gate delivery. |
| Include lift gate delivery when residential delivery is detected | The Standard Plan or higher is required to use this feature. If you aren’t on the Standard Plan or higher the words Standard plan required will be displayed. Click on the Standard plan required text to upgrade your plan and gain access to the feature. You must be signed into Shopify with the Store Owner credentials to perform the upgrade.
When checked, if a residential delivery address is detected the lift gate delivery fee will be included in the shipping rate estimate. In such cases, the option to Offer lift gate delivery as an option will be suppressed, even if enabled. Enabling both the Offer lift gate delivery as an option setting and the Include lift gate delivery when residential delivery is detected setting allows commercial customers to choose whether or not lift gate service is needed while always requiring it for residential customers. |
| Handling Fee / Mark Up | Increases the amount of each returned quote by a specified amount prior to displaying it/them in the shopping cart. The number entered will be interpreted as dollars and cents unless it is followed by a % sign. For example, entering 5.00 will cause $5.00 to be added to the quotes. Entering 5.00% will cause each quote to be multiplied by 1.05 (= 1 + 5%). |
| Do not return rates if the ship to address appears to be a post office box | The Standard Plan or higher is required to use this feature. If you aren’t on the Standard Plan or higher the words Standard plan required will be displayed. Click on the Standard plan required text to upgrade your plan and gain access to the feature. You must be signed into Shopify with the Store Owner credentials to perform the upgrade.
When enabled the app will not return quotes when it detects that the address is a post office box. The identification of a post office box is performed by text string matches to “PO Box”, “P.O. Box” and a number of other probable representations. This method is not infallible or guaranteed. It will not interfere with the presentation of shipping methods by other apps. |
6. Enter the product shipping parameters. |
Return to top. |
Repeat these instructions for every product that you want to ship LTL freight. Select Products from the Shopify menu. Locate the product on the list and choose it by clicking on it. You will be delivered to the product’s details page. Click the More actions button at the top of the page to reveal the installed apps and select the app from the list.
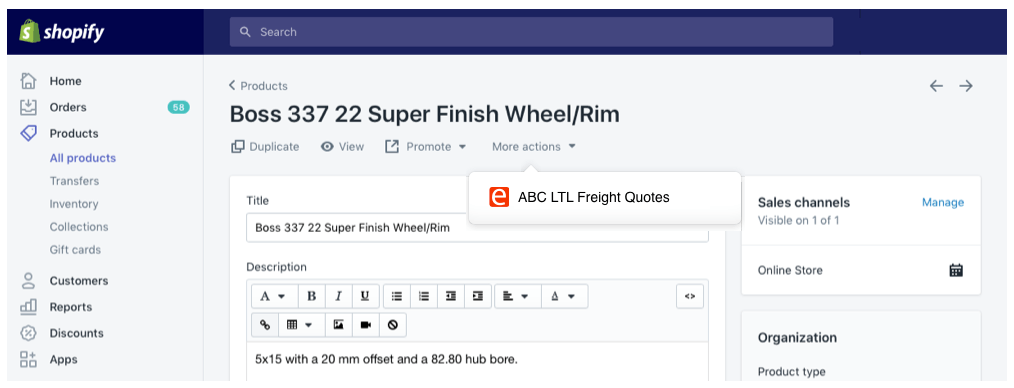
You’ll be delivered to a page on which you will enter the product’s freight class, weight and dimensions. Enter the information prompted for, and then click the Save & Return button at the bottom of the page to return to the product’s Shopify product details page.
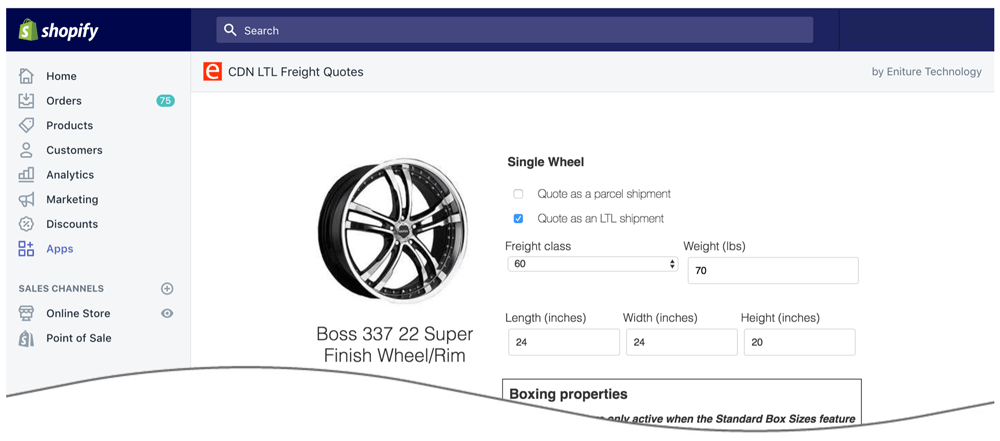
| Quote as an LTL shipment | Check this checkbox if you want this product to be quoted as shipping LTL freight. |
| Other Shipping Option(s) | Eniture Technology has other shipping quote apps for LTL freight and parcel modes of transportation. If you have any others installed, they will appear in this area of the page. |
| Freight Class | Select the product’s freight class from the drop down list. You may also select Density Based from the list, which will calculate freight class on the fly using the product’s weight and dimensions. The density based calculation will return the correct freight class in most, but not all cases. You are solely responsible to identify the correct freight class of your product(s). If you need assistance, contact your XPO Logistics representative or refer to the National Motor Freight Classification (NMFC) directory published by the National Motor Freight Transportation Agency (NMFTA.org). |
| Weight | Enter the weight of the product in pounds. Fractions should be rounded up to the next whole number. It should include the weight of any packaging materials that may be required to ship the product, such as cardboard, pallets and shrink wrap. |
| Length | Enter the length of the product in inches. Fractions should be rounded up to the next whole number. It should include any incremental inches added by packaging materials that may be required to ship the product. |
| Width | Enter the width of the product in inches. Fractions should be rounded up to the next whole number. It should include any incremental inches added by packaging materials that may be required to ship the product. |
| Height | Enter the height of the product in inches. Fractions should be rounded up to the next whole number. It should include any incremental inches added by packaging materials that may be required to ship the product. |
| Boxing Properties | You may see a group of settings enclosed in a box labeled Boxing Properties. These settings are used by Eniture Technology’s Small Package Quotes apps for FedEx, Purolator, Unishippers, UPS and Worldwide Express. These apps are engineered to work in concert with the LTL Freight Quotes apps to ensure that the correct type of rates (parcel and/or LTL freight) are offered to shoppers. You can ignore these settings when provisioning the LTL Freight Quotes app. If you’d like to explore the Small Package Quotes apps, click this link. |
| Hazardous Material | The Standard Plan or higher is required to use this feature. If you aren’t on the Standard Plan or higher the words Standard plan required will be displayed. Click on the Standard plan required text to upgrade your plan and gain access to the feature. You must be signed into Shopify with the Store Owner credentials to perform the upgrade.
Check this checkbox if this item must be identified as hazardous material. When checked, the carrier’s hazardous materials fee will be included in the quote if this item is present in the cart. |
| Drop ship this product | Check this box if this item is drop shipped from a location other than your warehouse. |
| Drop ship location | Select the drop ship location from the drop down. These locations are defined on the Warehouses tab in the app settings that was described in step 3. |
What your customer sees. |
Return to top. |
Once you’ve completed the preceding steps, your Shopify store is ready to begin quoting LTL freight. Any time one or more products in the shopping cart are flagged as shipping LTL freight, all of the products are assumed to ship LTL freight as this will be more economical than splitting the shipment between two or more shipping methods. In the absence of a freight class, as may be the case for products not set up to ship LTL freight, the application will take advantage of any available information to ensure the return of an LTL freight quote if at all possible. To ensure the best possible outcome, it is highly recommended that the freight class, weight and dimensions be entered for every product you sell, even if they are not defaulted to ship LTL freight.
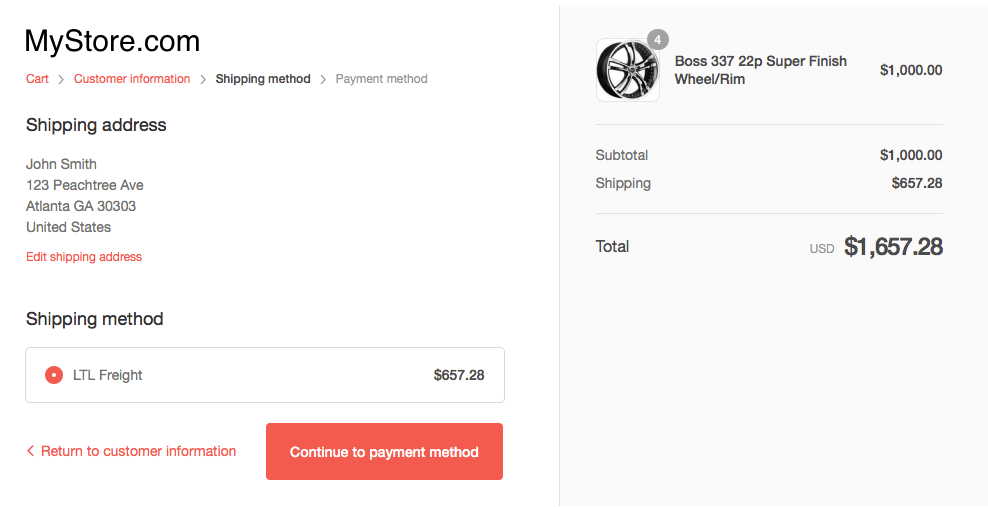
When LTL rates are displayed, the exact presentation will depend on the options selected in the Quote Settings.
Updating products with the Import CSV Utility. |
Return to top. |
You can use the app’s Import CSV utility to enter or update the product shipping parameters. This method can be more time efficient than navigating in and out of the app’s user interface, particularly if you have a lot of products. (View the 5 minute instructional video)Navigate to the Import CSV tab in the app preferences.
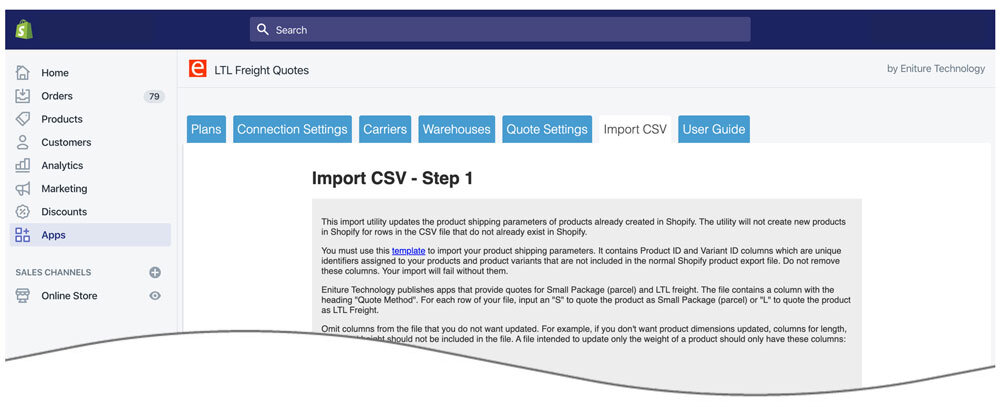
You can’t use the Import CSV utility to create products in Shopify. The products must exist in Shopify prior to downloading the CSV template if they are to be updated.
Click the template link in the second paragraph of the on-screen instructions and provide your email address when prompted. You should receive an email containing the CSV file within a minute or two. The more products you have, the longer it takes to retrieve the data. If you don’t receive the email within 5 minutes, check your junk folder.
Open the CSV file in Excel or a similar application. Each row of the spreadsheet represents one of your products or product variants. Eniture Technology publishes apps that provide quotes for Small Package (parcel) and LTL Freight. The CSV file can be used for both categories of apps. If you have more than one of Eniture Technology’s quoting apps installed, you only need to import the file once
Save a copy of the CSV file as a backup, particularly if you have product shipping parameters already present. You can use the backup file to restore your product shipping parameters to their previous state in the event you make a mistake with your current update exercise.
Columns A and B contain unique identifiers from Shopify. Do not disturb these fields. Columns C through K are provided to help you identify the product/variant that is represented by the row in the file. They aren’t used in the CSV import process. Columns L through Y are relevant to the app and where your focus will be while populating data for use by the app.
We recommend that you delete the rows from the CSV file that relate to products or product variants that you don’t want updated. Doing so will prevent these products from being updated in the event you make a mistake. You can also delete columns that you don’t want updated. For example, if you only want to update product/variant weights, your final CSV file need only contain Column A (Product ID), Column B (Variant ID) and Column N (Weight).
Removing data from a field in columns L through Y has the same effect as removing the data when using the user interface. For example, columns R through V are used to assign a product to a drop ship location. If those columns were populated for a product when you received the CSV file, and you cleared the data from them prior to importing the updated file, the product will no longer be associated with a drop ship location.
| Column | Header | Instructions |
| A | Product id | This column is critical to the import process. Do not remove the column or modify its contents. |
| B | Variant id | This column is critical to the import process. Do not remove the column or modify its contents. |
| L | Quote Method | Required.The default shipping method for the item. If you only have the Small Package Quotes app installed, enter S. If you only have the LTL Freight Quotes app installed, enter L. If you have both apps installed, enter S or L depending on which shipping method would be used if the cart contained only one unit of the item and no other items were in the cart. If left blank, the apps will ignore the product.
S = Small Package (Parcel) |
| M | Freight Class | Required only if the LTL Freight Quotes app is installed. If so, you should enter a freight class on all products, even those that will ship small package (parcel) by default. Small package products can be quoted as part of an LTL shipment depending on the content of the cart. Permitted values are: 50, 55, 60, 65, 70, 77.5, 85, 92.5, 100, 110, 125, 150, 175, 200, 225, 250, 300, 400, 500, Density Based.
If you are unfamiliar with what freight classes and need to populate this column, the knowledge base article What is a freight class? is a good resource to start with. |
| N | Weight | Required. Enter the weight of the item in pounds. You can can enter a value to the thousandths of a pound. For example, enter 1.125 for an item that weighs 1 pound and 2 ounces or 1 1/8 pounds. Column J (Variant Grams) contains what you entered into Shopify to identify the weight of the product. Shopify stores this data in grams. If you’re comfortable with spreadsheet formulas, you can use the data in Column J (Variant Grams) to populate the data in Column N (Weight). The Excel formula for row 2 of the CSV file would be:
=ROUNDUP(J2*0.00220462,3) Once you have the formula entered into Row 2, Column J of your spreadsheet, you can copy it and paste it into all the remaining rows of the spreadsheet. Or use the spreadsheet’s drag-and-fill feature. The weight entered for use by the app does not have to equal the weight entered for Shopify. |
| O | Length | Enter the length of the item in inches. You can enter a value to the thousandths of an inch. For example, enter 1.125 for an item with a length of 1 1/8 inches. Length is always the longest dimension of the item.
Small Package Quotes LTL Freight Quotes
Refer to the section on how to use the user interface to populate the product shipping parameters to determine if you should enter dimensions for items that will ship LTL freight by default. It will indicate if dimensions are required for shipments to certain destinations or the excessive length fee. |
| P | Width | Enter the width of the item in inches. You can enter a value to the thousandths of an inch. For example, enter 1.125 for an item with a length of 1 1/8 inches.
Small Package Quotes LTL Freight Quotes
Refer to the section on how to use the user interface to populate the product shipping parameters to determine if you should enter dimensions for items that will ship LTL freight by default. It will indicate if dimensions are required for shipments to certain destinations. |
| Q | Height | Enter the height of the item in inches. You can enter a value to the thousandths of an inch. For example, enter 1.125 for an item with a length of 1 1/8 inches.
Small Package Quotes LTL Freight Quotes
Refer to the section on how to use the user interface to populate the product shipping parameters to determine if you should enter dimensions for items that will ship LTL freight by default. It will indicate if dimensions are required for shipments to certain destinations. |
| R | Dropship Nickname | If the item will ship from a drop ship location, enter its nickname. Leave it blank if the item ships from one of your warehouses. If the drop ship location wasn’t defined previously, it will be created. Read the knowledge base article Warehouses versus Drop Ship locations if you’re unclear about the difference. |
| S | Dropship ZIP | If the item will ship from a drop ship location, enter its 5 digit ZIP code (US) or 6 character postal code (Canada). If the ZIP code has a leading zero (0), preface it with an apostrophe (i.e. ‘02111). Leave it blank if the item ships from one of your warehouses. If the drop ship location wasn’t defined previously, it will be created. Read the knowledge base article Warehouses versus Drop Ship locations if you’re unclear about the difference. |
| T | Dropship City | If the item will ship from a drop ship location, enter its City. Leave it blank if the item ships from one of your warehouses. If the drop ship location wasn’t defined previously, it will be created. Read the knowledge base article Warehouses versus Drop Ship locations if you’re unclear about the difference. |
| U | Dropship State | If the item will ship from a drop ship location, enter the two character abbreviation for the state or province. Leave it blank if the item ships from one of your warehouses. If the drop ship location wasn’t defined previously, it will be created. Read the knowledge base article Warehouses versus Drop Ship locations if you’re unclear about the difference. |
| V | Dropship Country | If the item will ship from a drop ship location, enter the two character abbreviation for the country. Leave it blank if the item ships from one of your warehouses. If the drop ship location wasn’t defined previously, it will be created. Read the knowledge base article Warehouses versus Drop Ship locations if you’re unclear about the difference.
CA = Canada |
| W | Hazmat | This setting will be operational only if you are subscribed to a plan which includes the feature.
0 = The item isn’t hazardous material. An empty field is the equivalent of entering a 0. |
| X | Ships Alone | This setting will be operational only if you have the Standard Box Sizes feature enabled.
0 = The item can be placed in a box with other items when identifying the packaging solution. An empty field is the equivalent of entering a 0. |
| Y | Vertical Rotation | This setting will be operational only if you have the Standard Box Sizes feature enabled.
0 = The item may not be rotated when identifying the packaging solution for the order. An empty field is the equivalent of entering a 0. |
Save the file as a CSV or Comma Separated Value file. If you are using a Mac, you will need save the file as a Windows Comma Separated (.csv) or MS-DOS Comma Separated (.csv) file, or the import process will not be successful.
To import your populated CSV file, navigate to the Import CSV tab in the app preferences. Click the box to indicate that your file has a header row (if it still does), and then click the Choose File button. Select your file and click the Next button.
On the next page, use the drop down lists on the right to map the column headers in your file to the shipping parameters listed on the left. When the mapping is done, click Next.
You’ll be prompted to provide an email address which will receive an email once the import is done. The email will contain information about the outcome of the import process. The import process typically takes 5 minutes or less. If you don’t receive a notification email within 10 minutes, check your spam folder and make sure the notification email isn’t there. If it isn’t, download the CSV template again. Examine the new file you receive to see if your updates are reflected in the data. If they aren’t, email the CSV file that contains your updates to support@eniture.com.

