
 |
Small Package QuotesFedEx Edition for Shopify |
This version of Eniture Technology’s Small Package Quotes app retrieves your negotiated FedEx parcel rates, takes action on them according to the app settings, and displays the results as shipping options in the Shopify checkout process.
Setup Tutorial & Demo (6:20 min)
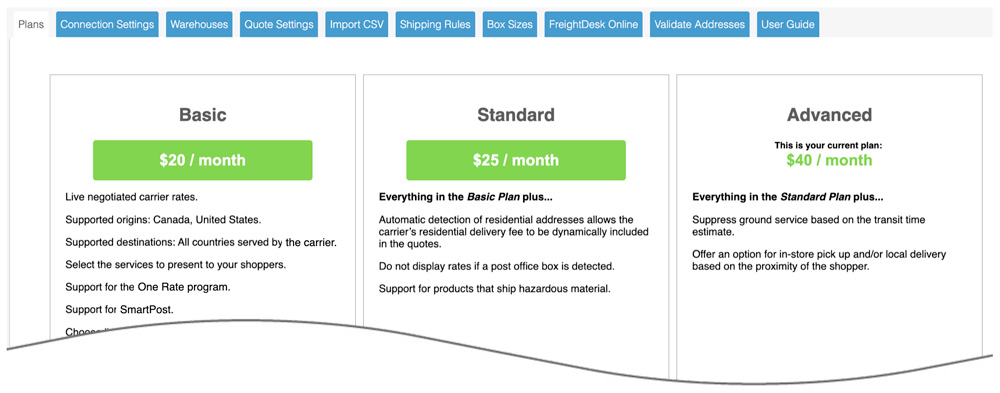
Basic Plan $20/month
Live carrier rates.
Choose list or negotiated rates.
Supported origins: Canada, United States.
Supported destinations: All destinations the carrier provides service to.
Select which services to present to your shoppers.
Capable of providing quotes for the One Rate services.
Capable of providing quotes for SmartPost.
Use the optional Standard Box Sizes feature to retrieve hyper-accurate rates by identifying the boxes and the carrier-provided packaging you inventory. (Required for One Rate service.)
Support for individual items that ship as multiple packages. (Requires use of the optional Standard Box Sizes feature)
Accurately rates shipments according to dimensional weight rules.
Define multiple warehouse locations.
Identify products that drop ship from vendors.
Compatible with Shopify Locations.
Assign products and variants a shipping weight and dimensions.
Basic option for residential delivery.
Embed a handling charge in the displayed rates to recover the cost of packaging materials or other shipping-related expenses. The handling charge can be specified as dollars and cents, or as a percentage of the quoted rate.
Dynamic presentation of parcel and LTL freight rates with the installation of compatible apps from Eniture Technology
Standard Plan $25/month
Everything in the Basic Plan, plus…
Automatic detection of residential addresses allows the carrier’s residential delivery fee to be automatically included in quotes.
Do not display rates if a post office box is detected
Option for quotes to include the Declared Value (Insurance) premium.
Support for products that ship hazardous material.
Specify an order cut-off time and have it reflected in the estimated delivery date.
Extend estimated delivery dates to account for lead times in manufacturing and/or fulfillment.
Identify the days of the week you ship orders and have it reflected in the estimated delivery date.
Advanced Plan $40/month
Everything in the Standard Plan, plus…
Choose to omit ground service from the offered services when the estimated delivery date exceeds a length of time you specify.
Offer in-store pick-up based on the shopper’s ZIP code or distance to the warehouse.
Offer local delivery based on the shopper’s ZIP code or distance to the warehouse.
Identify a charge for local delivery.
Support for products that can be nested when shipped, such as garbage cans or drinking cups.
Current version: 1.0
Requirements
A Shopify subscription with the 3rd Party Calculated Shipping Rates feature enabled. The feature is standard on the Advanced and Plus Shopify subscription packages. It can be added to some other Shopify subscriptions by contacting Shopify customer service.
A carrier provided account number.
A FedEx web services password, meter number and authentication key. Step 2 of the documentation will explain how to obtain these.
FAQs
How do I get this application?
This application can only be installed from the Shopify App Store. Click here to locate the app in the Shopify App Store and then click the GET button to install the app. You must have the Shopify store owner credentials to perform the installation.
How do I get an account number?
Contact them the carrier by phone, or register online.
Where do I find my username and password?
Contact the carrier’s customer service or the account manager assigned to your account.
Where do I get my web service (API) credentials?
Obtaining your web service credentials is done on the carrier’s website and requires a few steps. Refer to Step 2 on the Documentation tab for detailed instructions.
Why were the shipment charges I received on the invoice from the carrier different than what was quoted by the application?
The rates will be the same if the shipment parameters used to obtain the quote are exactly the same as those that were used for the invoice. Compare the shipment parameters in the application with those on the invoice. Pay close attention to the product weight, dimensions, and various accessorial fees like residential delivery. Consider making changes as needed. Remember that the weight of packaging materials is included in the weight of the shipment and that your use of box size may also have an impact on the shipment’s billable weight.
Why do I sometimes get a message that a shipping rate estimate couldn’t be provided?
There are several possibilities:
The city entered for the shipping address may not be valid for the postal code entered. The carrier requires a valid City+State+Postal Code combination to return a rate and Shopify does not perform this level of address validation. Contact us by phone (404-369-0680) or email (support@eniture.com) to inquire about solutions to this problem.
The carrier has restrictions on a shipment’s maximum weight, length, and girth which your shipment may have exceeded.
There wasn’t enough information about the weight or dimensions for the products in the shopping cart to retrieve a shipping rate estimate.
The carrier’s web service isn’t operational.
Your account with the carrier has been suspended or canceled.
Your subscription to the application has expired because payment could not be processed.
There is an issue with the Eniture Technology servers.
There is an issue with the Shopify servers.
User’s Guide
To use these instructions, you must be logged in to Shopify as the store’s administrator or with a login that has administrative privileges. Your Shopify plan must have the 3rd Party Calculated Shipping Rates feature enabled. The feature is standard on the Advanced and Plus Shopify subscription packages. It can be added to some other Shopify subscriptions by contacting Shopify customer service.
Setting up the app to retrieve live, negotiated rates requires the following steps:
Other information contained in this guide:
1. Choose the desired plan. |
Return to top. |
Begin by selecting Apps from the Shopify menu. Locate the entry for Eniture’s Small Package Quotes app and click on the app name to access the app preferences.

The Plans page is used to confirm the plan you are currently subscribed to, see the features offered on each plan, and to perform upgrades or downgrades according to your needs. The plan you’re currently subscribed to will have This is your current plan above the monthly subscription rate. To change plans, click on the desired plan’s monthly subscription rate. You must be signed into Shopify with the Store Owner credentials to change plans.
2. Connect the app to your FedEx account |
Return to top. |
Effective June 1, 2026, FedEx changed its API credential authorization process. Even if you obtained FedEx API credentials using the previous process, you will need to complete the new authorization process to continue to use the FedEx API to connect to your FedEx account. The instructions below are for the new FedEx API authorization process.
Using the Shopify ADMIN menu, select Apps. Choose the app, then click the Connection Settings tab. Follow the instructions below.
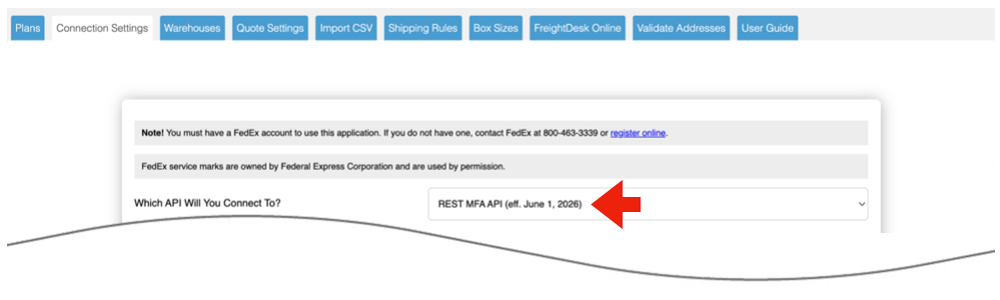
For the Which API will you connect to? setting, select REST MFA API (eff. June 1, 2026). After June 1, 2026, this is the only option supported by FedEx.
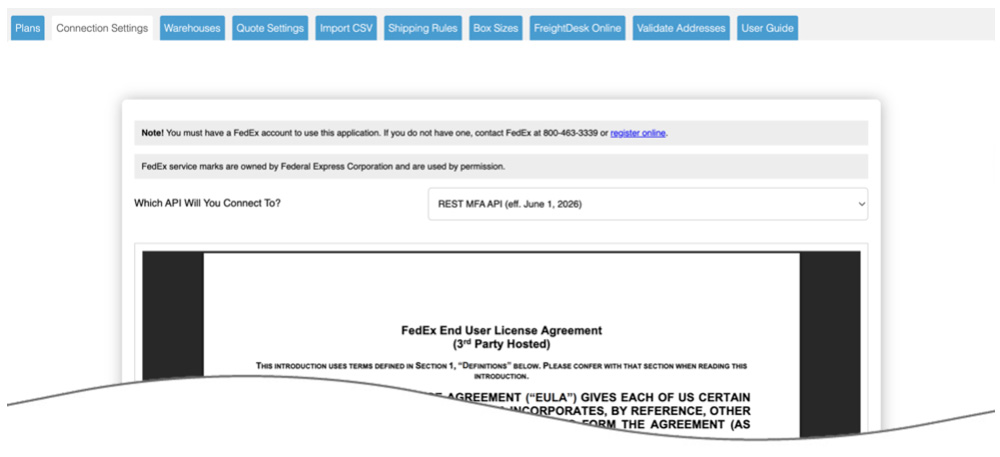
Read and accept FedEx’s End User License Agreement (EULA). To advance to the next step, you must scroll to the bottom of the agreement, check the ‘I accept the terms…’ box at the bottom, and afterward click the Next button to advance to the next step.
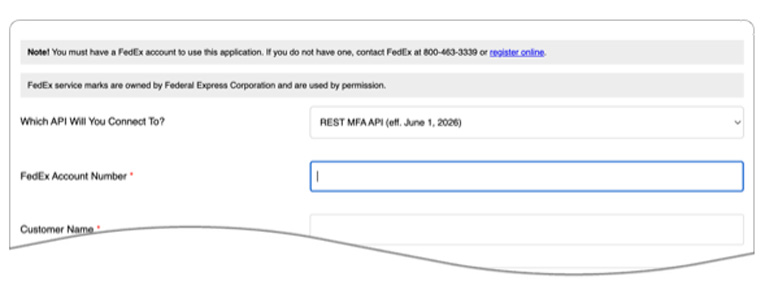
Follow the instructions below to provide your account registration information.
| Which API will you connect to? | The REST MFA API (eff. June 1, 2026) should be selected already. After June 1, 2026, this is the only option supported by FedEx. |
| Account Number | Enter the FedEx account number. |
| Account Name | Enter the account name as it appears on your FedEx invoices. |
| Street Address | Enter the account’s street address exactly as it appears in FedEx’s system, including capitalization and abbreviations. If the street address doesn’t match FedEx’s records exactly, the API credentialing process will fail. |
| City | Enter the account’s city name exactly as it appears in FedEx’s system, including capitalization and abbreviations. If the city name doesn’t match FedEx’s records exactly, the API credentialing process will fail. |
| State/Province | Using uppercase letters, enter the two-character abbreviation for the address’s state or province. For example, enter “GA” for Georgia or “ON” for Ontario. |
| Postal Code | Enter the postal code for the address. Enter the five-digit postal code for U.S. addresses. Canadian postal codes should be entered without the space between the third and fourth positions. |
| Country | Select the country from the drop-down list. |
Click the Next button to advance to the next step.
Choose how you’d like to perform the multi-factor authentication process. There are two methods to choose from:
- Secure code validation – FedEx will provide a PIN for validation by SMS, email, or phone call according to your selected preference. Proceed to the instructions for this if you prefer this method.
- Invoice validation – FedEx will validate your account based on information obtained from a recent invoice. Proceed to the instructions for this if you prefer this method.
Choose one of the following for the delivery method for the secure code PIN:
- SMS – FedEx will text a PIN to the phone number registered for the account.
- Email – FedEx will email a PIN to the email address registered for the account.
- Phone call – FedEx will provide a PIN by calling the phone number registered for the account.
- Invoice number
- Invoice date
- Invoice amount
- Currency
Afterward, click the Validate button at the bottom of the page.
Click the Test Connection button to confirm the connection to the FedEx API. An alert will appear to indicate whether the connection was successful or failed. If it was successful, continue to Step 3.
On occasion, it may be necessary to re-establish the connection to the FedEx API. This may happen due to a change made to the account information in FedEx’s system, such as the physical address, or another reason that causes the Test Connection operation to fail. The Test Connection operation is executed by clicking the Test Connection button on the Connection Settings page. To reconnect your FedEx account, click the Reconnect button. You’ll be redirected to the page that collects your account information. Make any corrections necessary. Click Next to advance to the multi-factor authentication (MFA) step.
Complete the MFA step. Refer to the section previously provided about how to complete the MFA process for instructions.
After completing the MFA process, click the Test Connection button to confirm that the account has been successfully reconnected to the FedEx API.
3. Prepare Shopify to use the app. |
Return to top. |
You must have the Third-party calculated shipping rates feature on your Shopify plan to have live carrier quotes displayed in the checkout process. It is standard on the Shopify Advanced plan and can be added to other Shopify plans by calling Shopify Customer Service at 888-746-7439. (Learn more) Navigate to the Settings>Shipping page. Click on the Manage rates link for the General shipping rates in the Rates at checkout section.
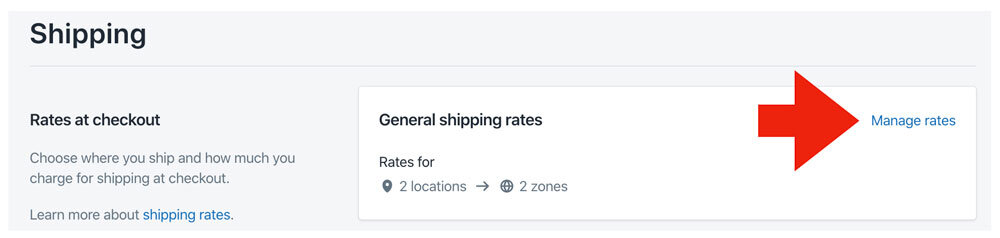
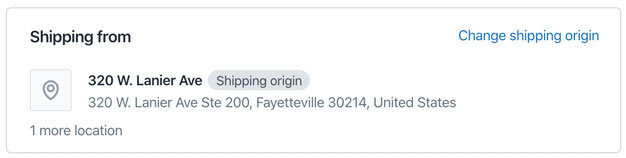
In the General shipping profile, locate the shipping origin from which you want the app to provide quotes.
If the only shipping zone you have is Rest of world, click on the Create shipping zone link and then enter a zone name (i.e. “Domestic”).
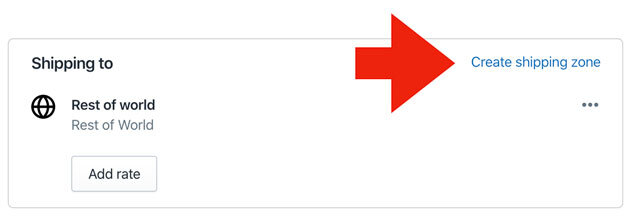
Locate the shipping zone for which you want the app to provide quotes. Click the Add rate button.
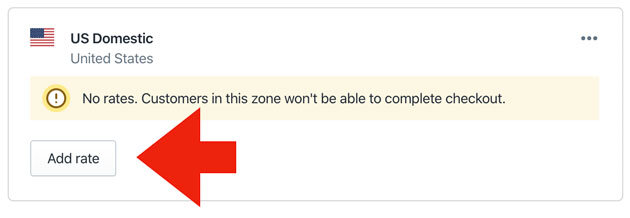
Select the option Use carrier or app to calculate rates.
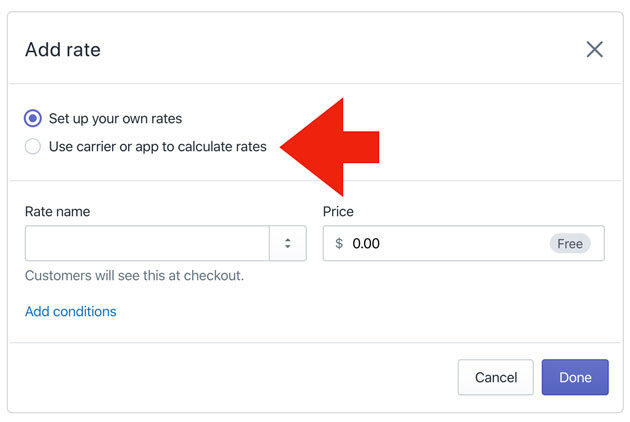
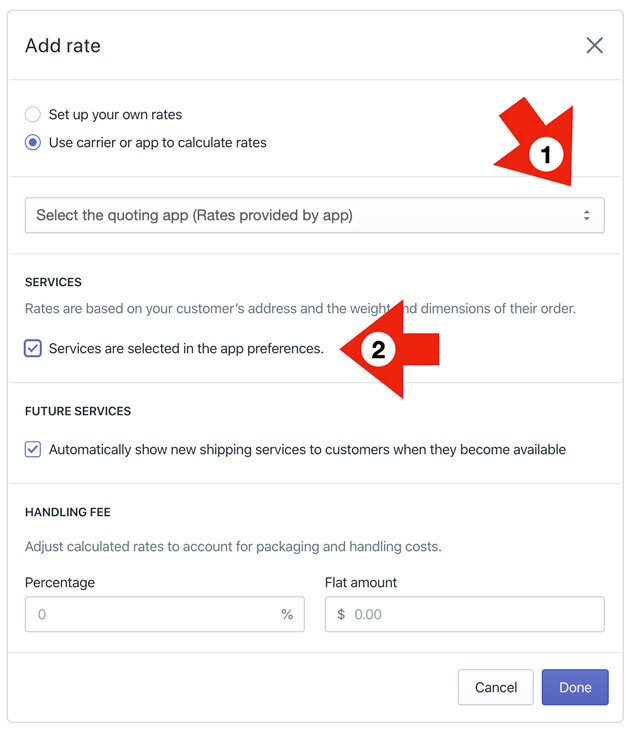
It may take a moment for Shopify to retrieve the list of apps capable of providing shipping quotes for your store. After it has, the appearance of the Add rate page will be similar to the image below. Perform the following actions:
- Select the app from the drop-down list.
- Enable the Services are selected in the app preferences setting. If this setting isn’t available to enable, don’t be concerned. Click the Done button at the bottom of the page and continue on to the next step.
- Click the Done button at the bottom of the page.
Repeat the steps above to enable the app for any other shipping zone. You should only enable the app in shipping zones that the app is capable of returning quotes for.
The app will return rates for the following types of shipments:
- U.S. domestic shipments
- Canadian domestic shipments
- Shipments from the United States to Canada
- Shipments from Canada to the United States
- Shipments from the U.S. to countries serviced by the carrier
- Shipments from Canada to countries serviced by the carrier
4. Identify your warehouse and drop ship locations. |
Return to top. |
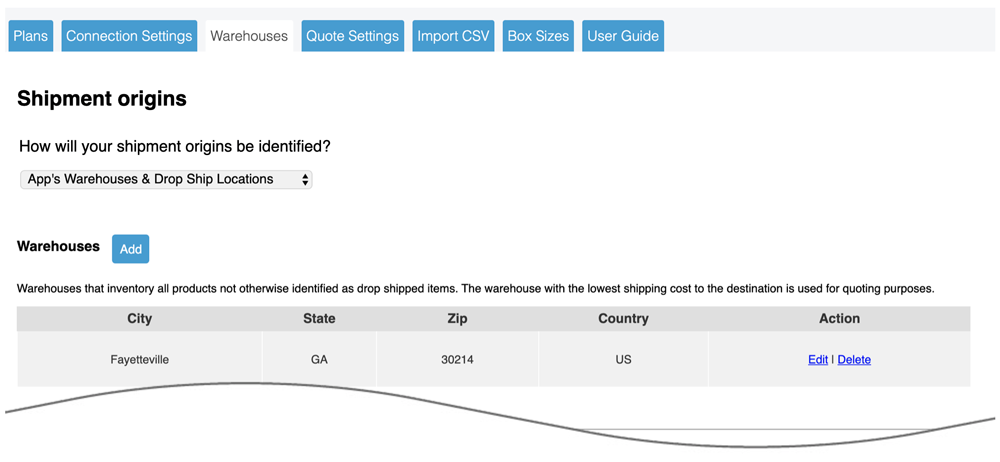
You can choose to use the app’s warehouse and drop ship functionality, or Shopify’s Locations feature to determine the shipment origins for orders placed on your store. Make your selection using the drop-down field labeled, How will your shipment origins be identified?
If you ship from only one location, it doesn’t matter which option you choose. However, your decision will matter if you ship from more than one location.
The app’s functionality assumes that an unlimited amount of inventory is available from each stocking location. The app has two types of stocking locations: warehouses and drop ship locations. If multiple warehouses exist, the one closest to the ship-to address is used as the ship-from location. This approach minimizes the estimated shipping costs and, if you have the setting enabled, presents your shopper with quicker estimated delivery dates. When an item is assigned to a drop ship location, it always ships from there.
Shopify Locations introduces the ability to do inventory tracking at multiple locations. Shopify Locations may be a good option for you if:
- You have visibility to the inventory levels at all your shipping locations.
- You will maintain accurate inventory counts in Shopify.
- You have items that can ship from more than one location, but not all locations.
Be aware that Shopify’s selection of the ship-from location isn’t influenced by its proximity to the ship-to address. Instead, you’ll list your locations in the order in which you want Shopify to look for available inventory. Once Shopify finds it, that location (or locations) becomes the ship-from address even if the next one on your list is across the street from the ship-to address and has enough inventory to fulfill the order. To get a better understanding of how Shopify Locations identifies the ship-from location, review the example adapted from Shopify’s Help Center.
If you choose to use Shopify Locations, you’ll lose visibility to how the app built the shipping quote when Shopify determines that more than one location is needed to fulfill the order. This occurs because Shopify makes individual shipping rate requests for each location and doesn’t provide enough information to relate each of them back to the same order. The section in this document titled, What you see, has examples of the information normally captured with an order. This information will be missing when Shopify Locations is used, and more than one location is used to fulfill the order.
Click the Add button in the appropriate sections to add warehouse and drop ship locations. Warehouses should have a complete inventory of all products not otherwise assigned to a drop ship location. If you have more than one warehouse defined, the warehouse closest to the shopper will be used to retrieve shipping rate estimates.
Drop ship locations usually represent vendors that supply items that you don’t inventory. These items are shipped directly to your customer on your behalf. An item can be assigned to only one drop ship location. Items not assigned to a drop ship location are assumed to ship from your warehouse(s).
When an order will ship from more than one stocking location (e.g. warehouse and drop ship locations or more than one drop ship location) a single figure will display for the shipping rate estimate labeled “Shipping”. The amount of the quote will be equal to the sum of the cheapest shipping option for each location.
A best practice is to define at least one warehouse, even if all your products are drop shipped. If all your products are drop shipped (you have no warehouses), make the highest volume drop ship location a warehouse. This ensures that shipping rate estimates will still be returned if a product is added to your catalog without an assigned drop ship location.
| Nickname | Enter a nickname for the location. It will only be seen in the app settings. |
| Street Address | Enter the street address for the location. This is important for features in the app that need to know the distance between the location and the ship-to address. Examples are the In-store pickup and Local Delivery features. |
| ZIP | Enter the postal code for the location. Enter only the five-digit ZIP code for U.S. addresses. |
| City | The app will attempt to prefill the City based on the postal code. Edit it if the prefilled value is incorrect. |
| State | The app will attempt to prefill the State based on the postal code. Edit it if the prefilled value is incorrect. |
| Country | The app will attempt to prefill the Country based on the postal code. Edit it if the prefilled value is incorrect. Use only the two-character standardized country code. |
| Handling Fee / Markup | Increases the amount of the quote received for this location by a specified amount prior to displaying it/them in the shopping cart. The number entered will be interpreted as dollars and cents unless it is followed by a % sign. For example, entering 5.00 will cause $5.00 to be added to the quotes. Entering 5.00% will cause each quote to be multiplied by 1.05 (= 1 + 5%).
Note: The app has four settings that can be used to mark up shipping quotes. They are applied to shipping quotes in the following order: 1) Product-specific Mark Up (Product settings); 2) Location-specific Handling Fee / Mark Up (Warehouse settings); 3) Service-specific Mark Up (Quote settings); and 4) General Handling Fee / Mark Up (Quote settings).
|
The locations you identified in Shopify will be displayed on the page when you select Shopify Locations from the How will your shipment origins be identified? drop-down list. Any changes to your locations will need to be made in Shopify. If you are on the app’s ADVANCED plan, you can use the Edit link to enable and manage your in-store pickup and local delivery settings.
4a. In-store pickup settings |
Return to top. |
The Advanced Plan is required to use this feature. If you aren’t on the Advanced Plan the words Advanced plan required will appear adjacent to the settings header, and the fields associated with the feature will be inaccessible.

Click on the text Advanced plan required to upgrade your plan and gain access to the feature. You must be signed into Shopify with the Store Owner credentials to perform the upgrade.
In-store pickup can be offered during checkout based on the shopper’s postal code or proximity. It will be offered only when the feature is enabled and a single stocking location (warehouse or drop ship location) is involved in providing the quote. The settings for In-store pickup are available on the page used to add or edit a warehouse or drop ship location.
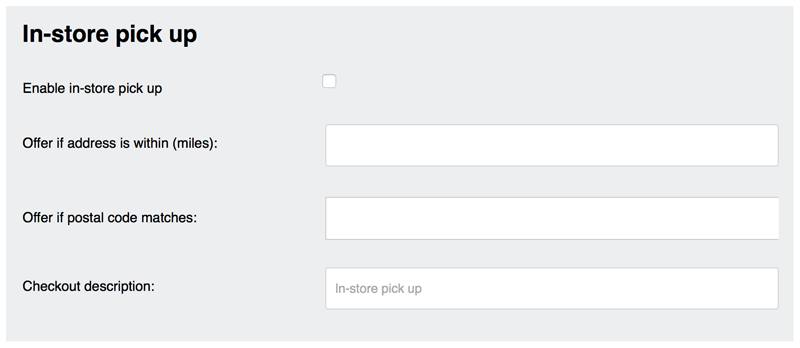
| Enable in-store pickup | Check the box to enable the in-store pickup feature. |
| Offer if address is within (miles) | The distance in miles within which you’d like to offer in-store pickup. The distance is route miles (driving distance). Leave blank if you don’t want to use distance to determine if in-store pickup should be offered. If both distance and postal codes are used as evaluation criteria, in-store pickup will display if either is satisfied. |
| Offer if postal code matches | The postal codes to which you’d like to offer in-store pickup. Enter only the five-digit ZIP code for U.S. addresses. Leave blank if you don’t want to use postal codes to determine if in-store pickup should be offered. If both distance and postal codes are used as evaluation criteria, in-store pickup will display if either is satisfied. |
| Checkout description | The description to use to identify the option in the checkout process. The most obvious candidate is In-store pickup, but you can make it anything you’d like. |
| In-store pickup fee | Enter an amount, in dollars (e.g. 5.00), that you want to charge for in-store pickup. Leave this field blank if you don’t charge for in-store pickup. |
4b. Local delivery settings |
Return to top. |
The Advanced Plan is required to use this feature. If you aren’t on the Advanced Plan the words Advanced plan required will appear adjacent to the settings header, and the fields associated with the feature will be inaccessible.

Click on the text Advanced plan required to upgrade your plan and gain access to the feature. You must be signed into Shopify with the Store Owner credentials to perform the upgrade.
Local delivery can be offered during checkout based on the shopper’s postal code or proximity. It will be offered only when the feature is enabled and a single stocking location (warehouse or drop ship location) is involved in providing the quote. Local delivery can be free or have an associated charge. Other shipping options provided by the app can be suppressed when local delivery is offered. The settings for Local delivery are available on the page used to add or edit a warehouse or drop ship location.
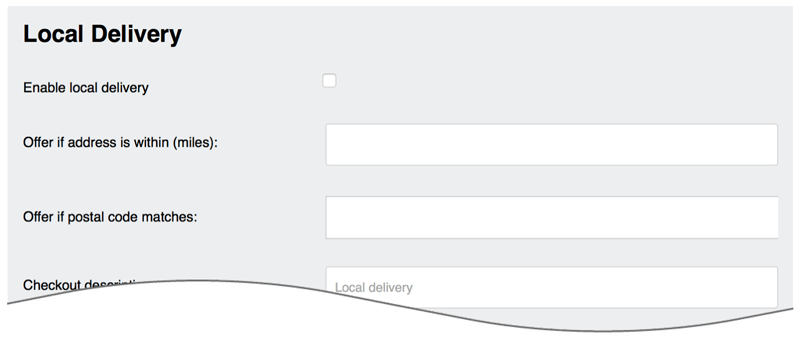
| Enable local delivery | Check the box to enable the local delivery feature. |
| Offer if address is within (miles) | The distance in miles within which you’d like to offer local delivery. The distance is route miles (driving distance). Leave blank if you don’t want to use distance to determine if local delivery should be offered. If both distance and postal codes are used as evaluation criteria, local delivery will display if either is satisfied. |
| Offer if postal code matches | The postal codes to which you’d like to offer local delivery. Enter only the five-digit ZIP code for U.S. addresses. Leave blank if you don’t want to use postal codes to determine if local delivery should be offered. If both distance and postal codes are used as evaluation criteria, local delivery will display if either is satisfied. |
| Checkout description | The description to use to identify the option in the checkout process. The most obvious candidate is Local delivery, but you can make it anything you’d like. |
| Local delivery fee | Enter the amount to charge for local delivery. Leave blank to offer local delivery for free. |
| Suppress other rates | Check the box to show only the option for local delivery when the criteria for doing so (distance or postal code) is met. Leave unchecked to have local delivery offered in addition to the shipping options normally displayed by the app. |
5. Choose the desired quote settings. |
Return to top. |
On this page you’ll choose the settings that will affect every Small Package Quote your shopper sees. Enter the information prompted for, and then click the Save Settings button at the bottom of the page.
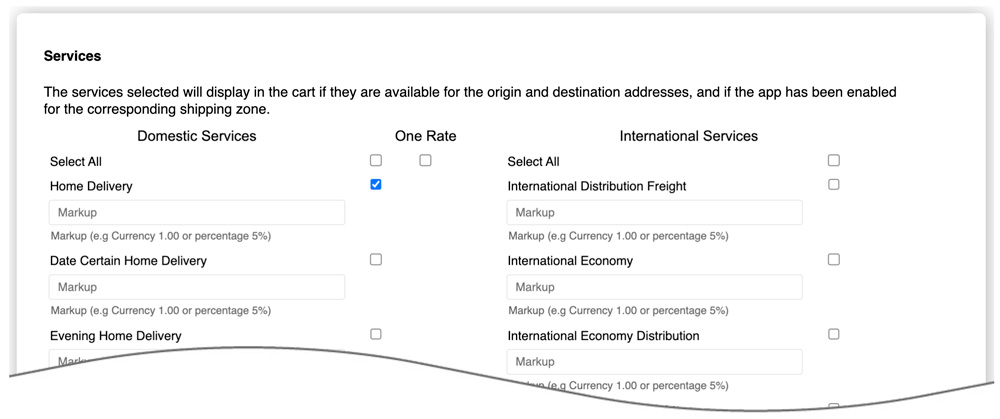
| Quote Service Options | Place checkmarks next to the services you want to be displayed in the shopping cart at checkout. Selected services will be displayed only if the destination is included in a corresponding shipping zone and the service is offered to that zone. Check the carrier’s service guide for a description of its services.
Beneath each service is a markup field. You can enter a dollar amount (e.g. 5.00) or percentage (e.g. 3.5%) in the field if you’d like to mark up the rate returned for that service. You can also enter a negative value if you want to mark down the rate. Entering “-100%” will cause the service to be offered to the shopper for free. Later in the Quote Settings, there is a general Handling Fee / Markup field that will be applied to all returned rate estimates. The service level markups are applied before the general setting. One Rate services require that the carrier has authorized your account to use the One Rate program. SmartPost quotes will only be presented as an option during checkout when: 1) The carrier has it enabled on your account; 2) It is enabled in the Quote Settings; 3) The packaging solution for the order involves only one box; 4) No other service-related restrictions are violated. |
| Delivery Estimate Options | Don’t display delivery estimates Select this option if you don’t want information about the delivery estimate to display with the shipping quote. Display estimated number of days
Select this option to display the number of days the shipment will be in transit. Display estimated delivery date
Select this option to display the order’s estimated delivery date. The shipment date will be the date of the order unless you are using the Order Cut Off Time, Fulfillment Offset Days, or What days do you ship orders? settings to adjust the shipment date. |
| Cut Off Time & Ship Date Offset | The Standard Plan is required to use these settings. The settings are only relevant if you have the Display estimated delivery date setting enabled.
When the app requests shipping quotes, it identifies a ship date. The estimated delivery date is dependent on the ship date. These settings allow you to influence the ship date so that it aligns with your fulfillment operations. Order Cut Off Time
Enter the cutoff time for orders. Orders received before the cutoff time are quoted using the order date as the ship date. Orders received after the cutoff time use the next workday as the ship date. Business days are Monday through Friday except for public holidays on which the carrier does not provide pickup service. When left blank, the order date will be the ship date. Orders received on weekends will use the next workday as the ship date. Fulfillment Offset Days
Enter the number of days to offset the ship date. This setting allows you to postpone the ship date by a specified number of business days. Example 1 Example 2 Business days are Monday through Friday except for the public holidays on which the carrier does not provide pickup service. What days do you ship orders?
Identify the days of the week on which you ship orders. The ship date used for the rate request will be modified accordingly, which may affect the expected delivery date. |
| Ground transit time restrictions | The Advanced Plan is required to use this feature. If you aren’t on the Advanced Plan the words Advanced plan required will be displayed. Click on the Advanced plan required text to upgrade your plan and gain access to the feature.
This feature is commonly used by merchants who sell perishable products and need to prevent Ground service from displaying as an option when the shipment transit time exceeds a certain number of days. Enter the number of transit days to restrict ground service to. Leave blank to disable this feature.
In the box provided, enter the maximum number of days your products can be in transit. Leave blank to disable this feature. Restrict by the calendar days in transit
Pick this option if you want to include weekends and holidays when determining if Ground service will be displayed. Choose this option if you always ship orders at the first opportunity to do so. Restrict by the carrier’s in transit days metric
Pick this option to apply the rule based on the carrier’s in transit days estimate. Carriers identify the in-transit days as business days. Choose this option if you hold orders until a ship date occurs upon which the order can be shipped and not be delayed by weekends or holidays. |
| Residential address settings | Do not return rate if the ship-to address appears to be a post office box Enable this setting if you don’t want the app to present shipping quotes when the ship-to address appears to be a post office box. If the app is on the BASIC subscription plan, text string matching is used to identify post office boxes. This method is not infallible or guaranteed. When the app is on the STANDARD or ADVANCED subscription plan, post office boxes in the United States are reliably identified through an API sourced from the U.S. Postal Service. Text string matching will continue to be used for other countries. Always quote residential delivery
Enable this setting if you want the residential delivery fee always included in shipping rate estimates. Automatically detect residential addresses
The Standard Plan is required to use this setting. Enable this setting to have the app determine whether the ship-to address is residential. If it is, the shipping quotes will include the residential delivery fee. This setting determines the address type in real time so that quotes to commercial addresses don’t include the fee. Default unconfirmed address types to:
Displays only if the Automatically detect residential addresses setting is enabled. In rare cases, the app may be unable to confirm the address type. This occurs when a match for the address can’t be found in the USPS database. Invalid addresses are the most common reason for this. In rare cases an address may be valid, but the match found in the USPS database has a low confidence metric. Choose how you want addresses treated in these cases.
Residential
Default. Choose this option if you want unconfirmed address types to be treated as residential. Commercial
Choose this option if you want unconfirmed address types to be treated as commercial. Address type disclosure:
Inform the shopper when ship-to address is identified as a residential address
Default. When enabled, the visitor will be informed if the shipping quote includes the residential delivery fee. Don’t disclose the address type to the shopper
Choose this option if you don’t want the visitor to be informed that a shipping quote includes the residential delivery fee. |
| Hazardous material settings | The Standard Plan or higher is required to use this feature. If you aren’t on the Standard Plan or higher the words Standard plan required will be displayed. Click on the Standard plan required text to upgrade your plan and gain access to the feature.
Only quote ground service for hazardous materials shipments
Check this box if you only want ground service quoted in the event that one or more of the products in the shopping cart is identified as hazardous material. Ground Hazardous Material Fee
Enter in the amount that should be added to the ground rate estimate in the event that one or more of the products in the shopping cart is identified as hazardous material. The fee will only be added once per shipment. Add ” – Hazmat” to names of Ground services
Enable this checkbox if you want – Hazmat added to the name of ground services if the quote contains the hazardous material fee. Air Hazardous Material Fee
Enter in the amount that should be added to the air service estimates in the event that one or more of the products in the shopping cart is identified as hazardous material. The fee will only be added once per shipment. A special agreement/contract may be required to use air services to ship hazardous materials. Add ” – Hazmat” to names of Air services
Enable this checkbox if you want – Hazmat added to the name of air services if the quotes contain the hazardous material fee. |
| Handling Fee / Mark Up | Increases the amount of each returned quote by a specified amount prior to displaying it/them in the shopping cart. The number entered will be interpreted as dollars and cents unless it is followed by a % sign. For example, entering 5.00 will cause $5.00 to be added to the quotes. Entering 5.00% will cause each quote to be multiplied by 1.05 (= 1 + 5%). |
| Negotiated Rates | Choose whether to show your negotiated rates or the carrier’s list rates in the shopping cart. |
| Error management | Quote shipping using known shipping parameters, even if other items are missing shipping parameters. Choose this setting if you want the app to return shipping quotes using the known shipping parameters of the items in the Cart. If the shipping parameters of items in the Cart are incomplete, they will be excluded when retrieving shipping quotes. Don’t quote shipping if one or more items are missing the required shipping parameters.
Choose this setting if you don’t want the app to return shipping quotes if any of the items in the Cart have incomplete shipping parameters. |
| Enable Logs | Enable this setting to activate the Logs feature. A new tab labeled Logs will become visible. Information about the API transactions made by the app will appear on the Logs page. The page will list as many as 25 of the most recent transactions for the current day. |
| Quote Details | Write the quote details to the Additional Details widget Choose this option if you want the details of the shipping quote selected by the shopper to be recorded in the Additional Details widget. Write the quote details to More Actions > Shipping quote details page
Choose this option if you want the details of the shipping quote selected by the shopper to be recorded in this alternate destination. You should choose this option if you have other apps installed that also record information in the Additional Details widget. Each app writing to the Additional Details widget will replace the information previously recorded there. |
6. Box Size (Packaging) Settings |
Return to top. |
These settings are active when the Standard Box Sizes feature is disabled. Use of the Standard Box Sizes feature will result in the most accurate shipping rate estimates possible, but it is a usage-billed feature (3¢ per packaging solution). If you’d prefer not to use the Standard Box Sizes feature, choose the method you want the app to use to rate your shipments.
| Package rating method when Standard Box Sizes isn’t in use | Quote each item as shipping as its own package
Select this option if you want each item in the Cart to be quoted as its own package.
Combine the weight of all items without dimensions and quote them as one package while quoting each item with dimensions as shipping as its own package
This option will sum the weight of all the items in the Cart that are missing dimensions and treat them as a single package. The billable weight of this package will be its actual weight. Items in the Cart that have dimensions will be quoted as shipping as their own package. The billable weight of these packages will be the greater of the dimensional or actual weight according to the carrier’s service guidelines.
Split the combined weight into packages
Select this option to divide the combined weight of Cart items without dimensions into two or more packages. Use the settings below to identify the maximum weight for each package and how the total weight should be distributed.
Maximum package weight
This setting is used when Split the combined weight into packages is enabled. It establishes the maximum weight, in pounds, for each package the app creates from the combined weight of Cart items that don’t have dimensions. It doesn’t change the weight assigned to any product. Instead, it tells the app when the combined weight must be divided into two or more packages before rates are requested.
70 LB
Select this preset if no package created from the combined weight should exceed 70 pounds.
150 LB
Select this preset if no package created from the combined weight should exceed 150 pounds.
Custom
Select this option to enter a different maximum package weight. Enter the desired weight in the field provided. The value will be interpreted as pounds, and no package created from the combined weight will exceed the value entered.
If the combined weight is equal to or less than the selected maximum, the app will rate it as one package. If the combined weight exceeds the selected maximum, the app will create enough packages so that none exceeds that weight.
Important: Parcel carriers may impose a maximum weight or charge one or more fees when a package exceeds a specified weight. This setting doesn’t override the carrier’s rules or guarantee that a fee will be avoided. Review the carrier’s service guide and your pricing agreement before selecting an option.
Weight distribution
This setting determines how the combined weight will be distributed when the app creates more than one package.
Distribute the total weight evenly among packages
Select this option to divide the total weight evenly among the required packages. For example, if the total weight is 120 pounds and the Custom maximum package weight is set to 50 pounds, the app will create three packages weighing 40 pounds each.
Fill each package to its maximum before creating the next package
Select this option to assign the maximum permitted weight to each package before creating another package for the remaining weight. For example, if the total weight is 120 pounds and the Custom maximum package weight is set to 50 pounds, the app will create three packages. The first two packages will weigh 50 pounds each, and the third will weigh 20 pounds.
|
The Standard Box Sizes feature is optional and will allow you to retrieve hyper-accurate shipping rate estimates. The feature is required for flat rate shipping services, such as One Rate. With the Standard Box Sizes feature enabled, you can identify:
- The sizes of the boxes you inventory.
- The rotational property of items that can be packed in a box with other items.
- Items that ship as their own package (Can’t be packed in a box with other items).
- Items pre-packaged to ship in more than one box.
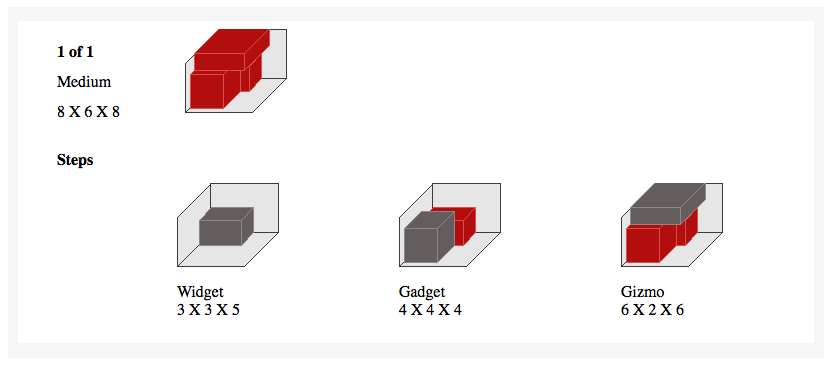
When items in the Cart can be packaged together, the app will identify the best box(es) to use for the order and send the packaging solution to the carrier when requesting rates. The packaging solution is saved as a step-by-step graphical illustration which you can access from the Order Details page. Use the step-by-step instructions to pack the order exactly as it was quoted.
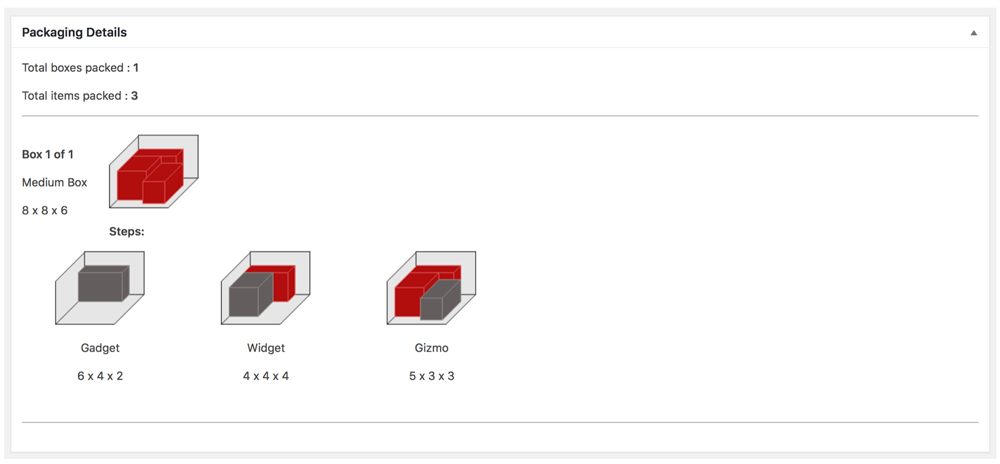
Dimensional weight is an extremely important factor when calculating rates for parcel services. Have a clear understanding of the topic when deciding whether or not to use the Standard Box Sizes feature. (Learn more about dimensional weight)
6a. Identify your standard box sizes |
Return to top. |
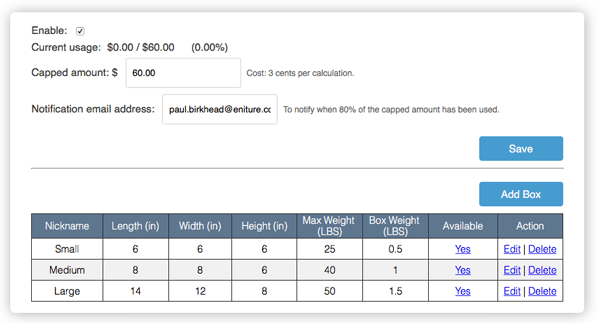
| Enable checkbox | Check this box to enable the Standard Box Sizes feature. While it is enabled, a charge of 3¢ will be incurred for each calculated packaging solution unless the capped amount for the billing cycle has been reached. If the capped amount has been reached, you can re-enable the feature by increasing it. |
| Current usage | Shows the usage of the feature at the time the page loads. |
| Capped amount | The amount entered in this field is the maximum you can be charged for the Standard Box Sizes feature during a billing cycle. If this amount is reached, the feature will stop working and the optimal packaging solution algorithm will be used instead. This may affect the accuracy of your shipping rates. You can increase the capped amount to re-enable the feature. |
| Notification email address | An email will be sent to the address entered when usage of the Standard Box Sizes feature reaches 80% of the capped amount. Increasing the capped amount after receiving the email will reduce the risk of the feature being disabled, which could lead to less accurate shipping quotes. |
| Optimization mode | Maximize space utilization Choose this setting if you want the packaging algorithm to prioritize the amount of space used in each box. For example, two boxes may be selected for the packaging solution if they have a higher utilization percentage than using a single, larger box. Minimize the number of packages
Choose this setting if you want the packaging algorithm to prioritize the fewest number of boxes used for the packaging solution. |
| Save button | Click the Save button to save the changes made to the fields above it, provided the changes pass field-level validation. |
| Add Box button | Click this button to display a form for entering the box parameters. |
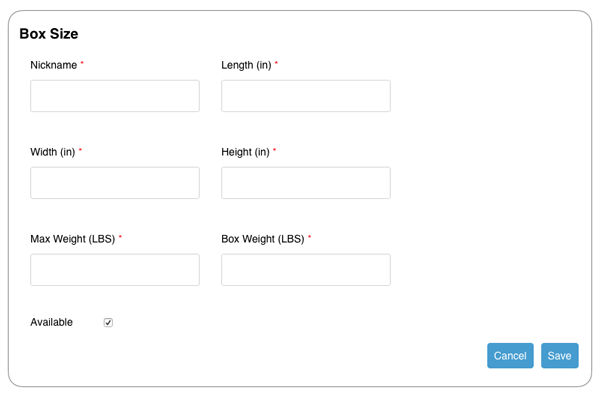
| Nickname | Enter a nickname for the box. This will be used to identify the box in the graphical representation of the packaging solution. |
| Box Availability | Available for all products Choose this option if the box will be available for consideration in all cases where a specific box is not required. Available only for specific products
Choose this option if the box will be used for specific products. You’ll assign the box to the product(s) in the product settings. |
| Box Type | Choose the option that represents the box you are defining. You may have options in addition to Merchant defined box if you have an Eniture Technology app installed for a shipping provider that offers its own packaging. |
| Length | Enter the length in inches. |
| Width | Enter the width in inches. |
| Height | Enter the height in inches. |
| Max Weight | Enter the maximum weight, in pounds, that the box can weigh. This includes the weight of the box. |
| Box Weight | Enter the weight of the box in pounds. |
| Box Fee | Enter an amount to add to shipping rate estimates when this box is used in the packaging solution. Otherwise, leave it blank. |
| Available | Select this checkbox to make the box available to the algorithm that calculates the packaging solution. |
6b. Add carrier-supplied packaging |
Return to top. |
The use of carrier-supplied packaging is a requirement of the One Rate program. You can add carrier-supplied packaging even if you aren’t approved for One Rate. However, One Rate quotes will not be offered during checkout unless you are approved for the program, have at least one One Rate service enabled in Quote Settings, and have the Standard Box Sizes feature enabled with at least one carrier-supplied box identified.
To add carrier-supplied packaging, click the Add Box button, then select the carrier-supplied packaging you inventory from the Box Type drop-down list.
6c. Items that ship as multiple packages |
Return to top. |
When you enable the Standard Box Sizes feature, a setting is available on the Product Shipping Parameters page to allow you to specify that the item ships as multiple packages. When you enable the setting, the item will appear on the Box Sizes page in the Items that ship as multiple packages section.
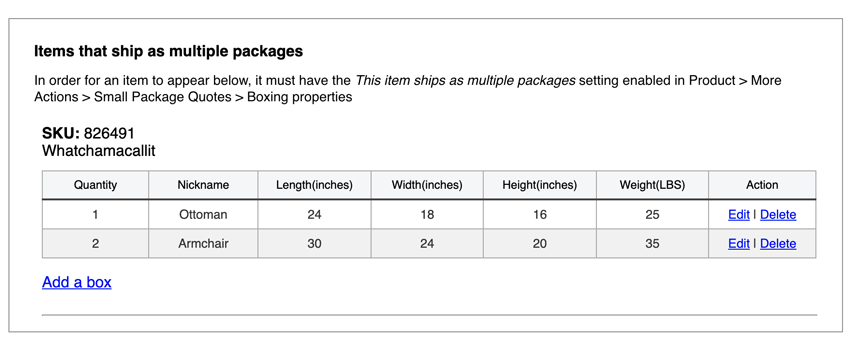
To add a box, click the Add Box button. A pop-up window will prompt you for the following information about the box:
| Quantity | Enter the number of boxes there are of this size. |
| Nickname | Enter a nickname for the box. The nickname will be used to identify the box in the graphical illustration of the packaging solution. |
| Length | The length of the box in inches. |
| Width | The width of the box in inches. |
| Height | The height of the box in inches. |
| Weight | The weight of the box in pounds. |
If you also have one of Eniture Technology’s LTL Freight Quotes apps installed, it will use the Freight Class and Weight entered on the Product Shipping Parameters page when an LTL freight quote is returned. However, if the Freight Class is set to Density Based and the Item ships as multiple packages setting is enabled, a freight class for the item will be calculated using the weight and dimensions of the boxes entered here.
7. Shipping Rules |
Return to top. |
The Shipping Rules page gives you an opportunity to customize the behavior of the app. A shipping rule will alter the results that would otherwise be displayed on the Checkout page. To introduce a rule, click the Add Rule button. Complete the form using the instructions below. If you introduce a rule but don’t apply a filter, then the rule will affect every checkout.
| Rule Name | Enter a name for the rule. The name is for your convenience. It will not be seen by your customers. |
| Type | Select the rule type. The following options are available:
|
| Apply to | Cart Choose this option if you want the shipping rule to apply to the entire Cart. Shipment
Choose this option if you want the shipping rule to apply only to individual shipments. For example, the app is capable of combining shipping quotes from multiple ship-from locations. If you want the rule to apply only to the shipments that meet the rule filter(s), then choose this option. If you want the rule to apply to all the shipments if any of the shipments satisfy the rule filter(s), then choose the option for Cart. |
| When the Type is “Hide Methods” | No other settings apply to this rule type. If the rule filter is met and it applies to the “Cart”, then the app will not present shipping quotes during checkout. If the rule filter is met and it applies to the “Shipment”, then the quotes for the shipment will not contribute to the sum of the shipping rates retrieved for the other ship-from locations. |
| When the Type is “Discount” or “Surcharge” | Discount/Surcharge Amount Enter a dollar amount (e.g. 5.00) or a percentage (e.g. 5.0%). |
| When the Type is “Override Rates” | Display As Enter the text that should be used to identify the rate on the Shopify Shipping Methods page. Description
Enter the text you want to accompany the “Display As” text to describe it. Often this is used to convey the expected shipping interval (“Allow 5 to 7 days for delivery”) or something about the rate (“Promotional flat rate shipping”). Flat Rate
Enter the dollar amount of the rate that will be displayed when the rule filter(s) are met. Suppress other rates
Enable the checkbox if you want the override rate to replace the rates that the app would otherwise display on the Shopify Shipping Methods page. Leave it disabled if you want the override rate to be displayed in addition to the real-time rates that the app will display on the Shopify Shipping Methods page. |
| When the Type is “Large Cart Settings” | Max items Enter the threshold for the number of items. If the Cart contains a quantity of items equal to or greater than this value, the Standard Box Sizes feature will be bypassed. Maximum weight per package
If the Standard Box Sizes feature is bypassed, choose the maximum weight to use for each package. |
| When the Type is “Minimum Shipping Charge” | Minimum Shipping Rate Enter the amount for the minimum shipping rate. This value will be presented on the Checkout page as the quoted shipping rate for any service that was quoted by the carrier at a lesser amount. |
| Filters | Filter Name Enter a name for the filters you want to implement. The name is for your convenience. It will not be seen by your customers. Filter by weight
Enable the checkbox if you want to use the weight of the Cart as a criterion for applying the rule. Enter the range for the weight in the From and To fields. The value entered in the From field will be included in the criteria. The value entered in the To field will be excluded from the criteria. If you enter “From 100” and “To 150,” a cart with a total weight of 100 LBS will trigger the rule, while a cart with a total weight of 150 LBS will not. Consider the To field the “Up to” value. Filter by price
Enable the checkbox if you want to use the price of the Cart as a criterion for applying the rule. Enter the range for the price in the From and To fields. The value entered in the From field will be included in the criteria. The value entered in the To field will be excluded from the criteria. If you enter “From 100” and “To 150,” a cart with a total price of $100 will trigger the rule, while a cart with a total price of $150 will not. Consider the To field the “Up to” value. Filter by quantity
Enable the checkbox if you want to use the quantity of items in the Cart as a criterion for applying the rule. Enter the range for the quantity in the From and To fields. The value entered in the From field will be included in the criteria. The value entered in the To field will be excluded from the criteria. If you enter “From 10” and “To 20,” a cart containing 10 items will trigger the rule, while a cart with 20 items will not. Consider the To field the “Up to” value. Filter by vendor
Enter the vendor name. The value entered must be an exact match for what you have entered on the Shopify Product Detail page in the Product Organization > Vendor field. Separate multiple entries with a comma. Filter by product tag
Enter the product tag. The value entered must be an exact match for what you have entered on the Shopify Product Detail page in the Product Organization > Tags field. Separate multiple entries with a comma. Available
Enable this checkbox if you want the rule to be applied. Disable it if you want to keep the rule settings for future use, but you don’t want to actively apply it. |
8. Enter the product shipping parameters. |
Return to top. |
Now that the app settings have been established, it’s time to enter the product settings. Repeat these instructions for every product for which you want parcel shipping quotes. Select Products from the Shopify menu. Locate the product in the list and click it to open the product details page. Click the More actions button in the upper-right corner of the page and select the app.
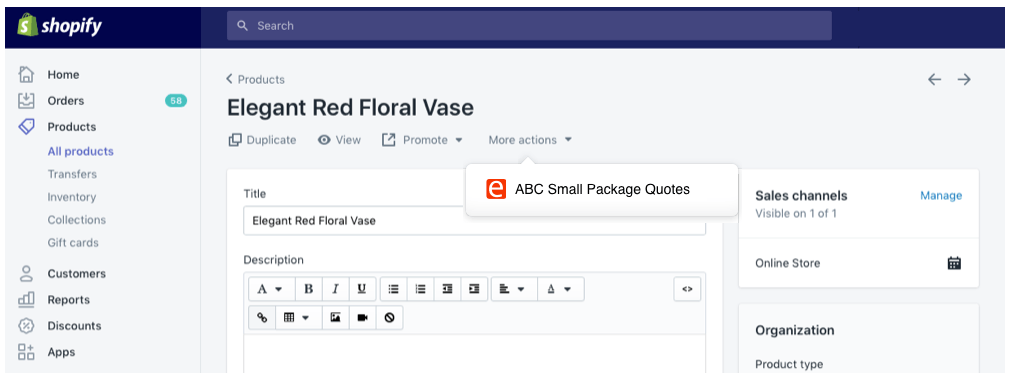
The app will open the product’s shipping parameters page. Enter the requested information, then click the Save & Return button at the bottom of the page to return to the product details page in Shopify.
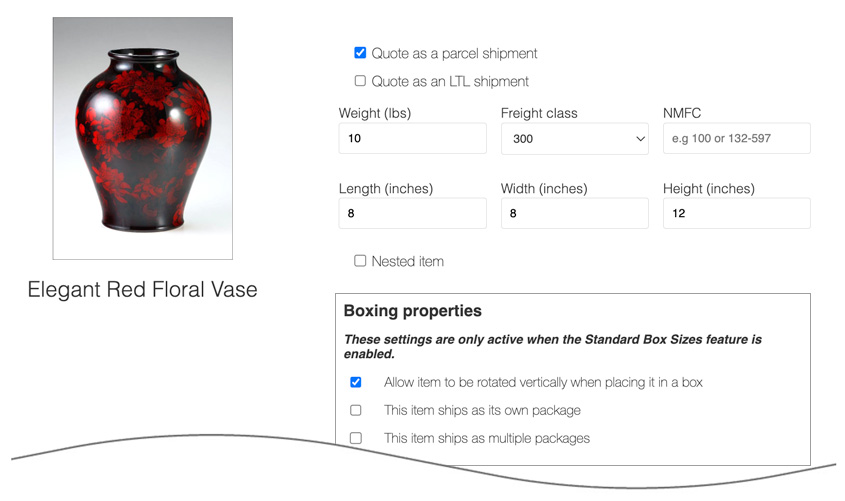
| Quote as a parcel shipment | Check this checkbox to have the item included in rate estimates retrieved by the app. The app will ignore the item if this checkbox is left unchecked. |
| Weight | Enter the weight of the product in pounds. Include the weight of any packaging materials that are used to ship the product. |
| Freight Class | Freight class is relevant to LTL freight shipments. If you installed one of Eniture Technology’s LTL Freight Quotes apps, it’s a good idea to set this parameter even if the product normally ships through the parcel network. When the Cart contains products that ship by both parcel and LTL freight, or the order exceeds the parcel network’s weight threshold, an LTL freight quote will be offered. In these cases, providing the freight class will greatly improve the accuracy of the quoted shipping rate.
Select the product’s freight class from the drop-down list. You may also select Density Based from the list, which will calculate freight class on the fly using the product’s weight and dimensions. The density-based calculation will return the correct freight class in most, but not all cases. You are solely responsible for identifying the correct freight class of your product(s). If you need assistance, contact your LTL freight provider or refer to the National Motor Freight Classification (NMFC) directory published by the National Motor Freight Transportation Agency (NMFTA.org). |
| NMFC | Usually an NMFC number is not required to get an LTL freight quote. However, in certain circumstances, an LTL freight provider may require it for individual accounts. If you are required to provide a commodity’s NMFC number to obtain an LTL freight quote, enter it here. |
| Length | Enter the length of the product in inches. It should include any incremental inches added by packaging materials that may be required to ship the product. |
| Width | Enter the width of the product in inches. It should include any incremental inches added by packaging materials that may be required to ship the product. |
| Height | Enter the height of the product in inches. It should include any incremental inches added by packaging materials that may be required to ship the product. |
| Fulfillment Offset Days | The Standard Plan is required to use this setting. The setting is only relevant if you have the Display estimated delivery date setting enabled on the Quote Settings page.
When the app requests shipping quotes, it identifies a ship date. The estimated delivery date is dependent on the ship date. The Quote Settings page has three settings that are applied globally that will alter the ship date so that it aligns with your fulfillment operations. The product-level setting for Fulfillment Offset Days allows the offset to be different for individual products. The product-level setting for Fulfillment Offset Days takes precedence over its globally applied counterpart on the Quote Settings page. In cases where the Cart contains multiple products with different Fulfillment Offset Days, the largest number of offset days is used to adjust the ship date. Enter the number of days to offset the ship date for this product. If you don’t need a unique setting for this product, leave it blank. |
| Handling Unit Settings | These settings are relevant only if you are using an Eniture Technology product that retrieves LTL freight quotes. Skip these settings (leave them blank) if you are not.
The Quote Settings page has handling unit settings that are applied globally. If different handling unit settings are required for an individual product, enter them here. Leave these settings blank to use the global handling unit settings on the Quote Settings page. Product-level handling unit settings take precedence over the global handling unit settings. Weight of Handling Unit
Enter in pounds the weight of your pallet, skid, crate or other type of handling unit you use. The amount entered will be added to shipment weight for this product prior to requesting a quote. Maximum Weight per Handling Unit
Enter in pounds the maximum weight that can be placed on the handling unit. If the total weight of the product exceeds this value, the weight of additional handling units will be added as needed. For example, if the maximum weight is 500 LBS, and the total weight in the Cart for the product is 1200 LBS, the weight of the handling units added to the shipment shall be 3 times the weight entered in the Weight of Handling Unit field. (=roundup(1200/500,0)*Weight of Handling Unit) |
| Nested item | The Advanced Plan or higher is required to use this feature. If you aren’t on the Advanced Plan the words Advanced plan required will be displayed.
Enable this checkbox if the item can be nested inside another identical item for shipping. Examples include 13-gallon trash cans and plastic cups. If you also have one of Eniture Technology’s LTL Freight Quotes apps installed, the Freight Class will always be Density Based when this setting is enabled. |
| Nested dimension | This setting is only relevant if the Nested item setting is enabled.
Identify the dimension (length, width or height) on which the nesting occurs. |
| Nesting percentage | This setting is only relevant if the Nested item setting is enabled.
Enter the percentage of the item’s height that fits inside another identical item when the items are nested. For example, if one item is 10 inches tall and two nested items have a combined height of 11 inches, the second item adds only 1 inch to the total height. This means that 90% of the second item is nested inside the first item. Enter 90%. Calculation: ((10 inches – 1 inch) ÷ 10 inches) × 100 = 90% |
| Maximum nested items | This setting is only relevant if the Nested item setting is enabled.
Enter the maximum number of items you’ll allow in a single stack of nested items. |
| Stacking property | This setting is only relevant if the Nested item setting is enabled.
Select Maximized or Evenly. If your Maximum nested items is 6, and there are 7 items in the Cart, then the Maximized option will result in one stack of 6 and one of 1. If the Stacking property is set to Evenly, it will result in one stack of 4 and one of 3. |
| Boxing properties | This setting requires the optional Standard Box Sizes feature to be enabled.
Box selection criteria
Use boxes available for all products
Default. Choose this option if the item can be packaged in any of the boxes defined in the Box Sizes settings. Use only specific boxes for this product
Choose this option if the product should be packaged only in specific boxes defined in the Box Sizes settings. Select the boxes from the associated drop-down list. To select more than one box, hold down the COMMAND key on a Mac or the CTRL key on a PC. Allow item to be rotated vertically when placing it in a box
Enabling this setting allows the item to be rotated while identifying a packaging solution involving standard box sizes. This setting provides the most flexibility for arriving at a solution. This item ships as its own package
Enabling this setting prevents the item from being combined with other items into one of the standard box sizes. The item will be included in the shipment as its own package with the weight and dimensions specified. Items with this setting enabled are not fed to the Standard Box Sizes packaging algorithm and do not incur a charge. This item ships as its own package when it is the only item in the cart
Enabling this setting prevents the item from being combined with other items into one of the standard box sizes when the Cart contains only one of it. In this case the item’s weight and dimensions will be used as the package shipping parameters. Items with this setting enabled are not fed to the Standard Box Sizes packaging algorithm and do not incur a charge. This item ships as multiple packages
When this setting is enabled, the product will be added to the Items that ship as multiple packages section of the Box Sizes page. The section appears below the list of standard box sizes. Locate the product there to record the boxes that contain the materials and parts that comprise the item. Items with this setting enabled are not fed to the Standard Box Sizes packaging algorithm and do not incur a charge. |
| Item subject to additional handling fee | Check this box if the product is subject to the carrier’s additional handling fee. If checked the fee will be included in the rate estimate when this product is in the shopping cart. |
| Markup | This setting will cause the shipping quotes returned by the carrier to be changed. When entered as currency (e.g. 5.00) the amount entered will be multiplied by the quantity of the item in the cart and the result added to the shipping quote(s) returned by the carrier. When entered as a percentage (e.g. 5.0%) the price for the item will be multiplied by the quantity of the item in the cart and then multiplied by the percentage entered for the setting. The result will be added to the shipping quote(s) returned by the carrier. You may enter a negative value (e.g. -5.00 or -5.0%) if you wish to mark down the shipping quote(s).
Note: The app has four settings that can be used to mark up shipping quotes. They are applied to shipping quotes in the following order: 1) Product-specific Mark Up (Product settings); 2) Location-specific Handling Fee / Mark Up (Warehouse settings); 3) Service-specific Mark Up (Quote settings); and 4) General Handling Fee / Mark Up (Quote settings).
|
| Hazardous Material | The Standard Plan or higher is required to use this feature. If you aren’t on the Standard Plan or higher the words Standard plan required will be displayed. Click on the Standard plan required text to upgrade your plan and gain access to the feature. You must be signed into Shopify with the Store Owner credentials to perform the upgrade.
Check this checkbox if this item must be identified as hazardous material. If so, when the item is included in the cart, the hazardous material fee identified in the quote settings will be added to the rate estimate. |
| Drop ship this product | Check this box if this item is drop shipped from a location other than your warehouse. |
| Drop ship location | Displays only if the Drop ship this product checkbox is checked. Select the drop ship location from the drop-down list. These locations are defined on the Warehouses tab in the app settings described in Step 4. |
| Insurance | The Standard Plan or higher is required to use this feature. If you aren’t on the Standard Plan or higher the words Standard plan required will be displayed.
Enable this setting to have the carrier’s declared value insurance premium included in the shipping quotes when this item is in the Cart. |
Logs |
Return to top. |
The Quote Settings page contains the Enable Logs setting. When enabled, the app’s navigation will include a tab to the Logs page. Up to 25 of the most recent transactions will appear on the Logs page. The Response column shows the outcome of each transaction. Click on a transaction’s response result to view its details.
When viewing the transaction details, click the “+” symbols to expand the level of detail and the “–” symbols to collapse it. A basic understanding of Application Programming Interfaces (APIs) will be useful when viewing the logs.
What your customer sees. |
Return to top. |
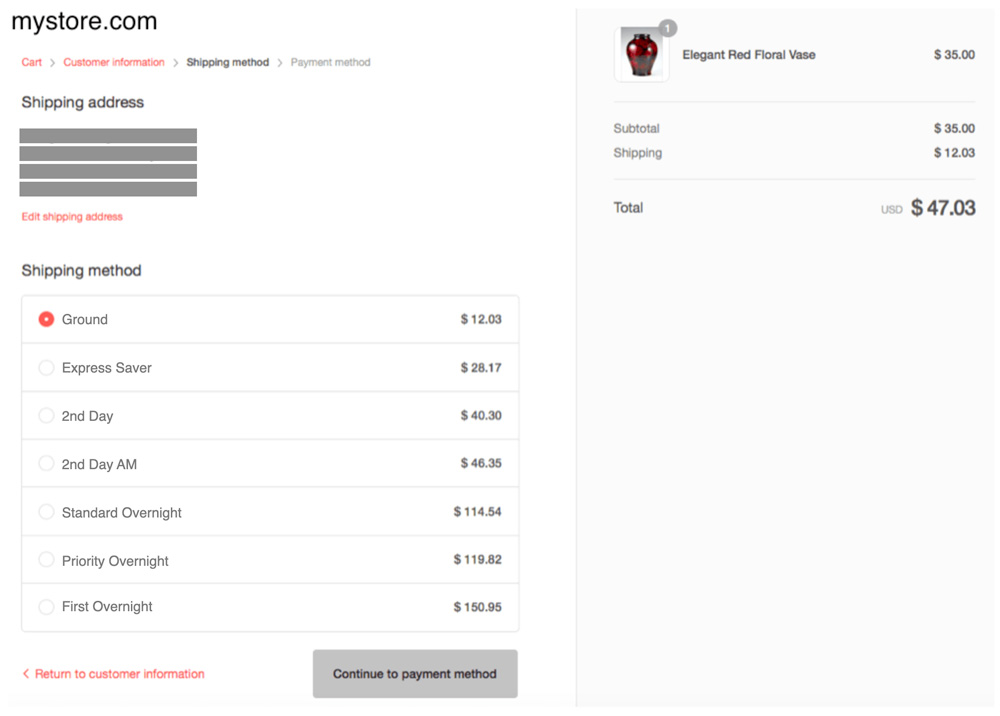
The illustration below shows an example of a U.S. domestic quote with multiple standard service options enabled.
What you see. |
Return to top. |
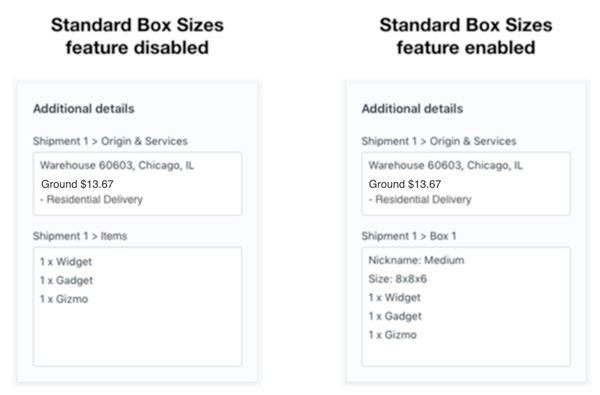
Shipment Origin & Services
This information block will identify the shipment origin, the selected carrier service and a list of any additional services (such as residential delivery) associated with the shipment. A separate Shipment Origin & Services information block will appear for each shipping location that will participate in fulfilling the order. This is particularly useful for stores with multiple warehouses and drop ship locations.
Shipment Content
A Shipment Content information block is presented beneath each Shipment Origin & Services information block. It identifies the products that will ship from that location.
If the optional Standard Box Sizes feature is enabled, a separate Shipment Content information block will be present for each box in the shipment. Each information block will identify the box’s nickname, its dimensions and its contents. This information is available graphically by clicking on the More Actions button at the top of the Order Detail page and selecting the Packaging Solution option.
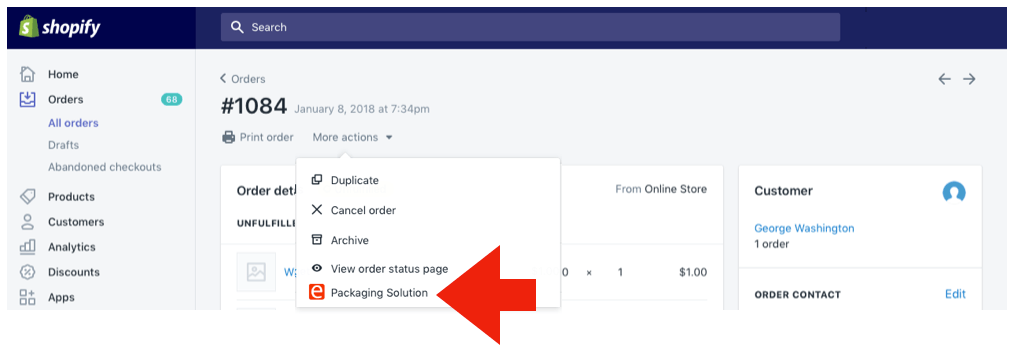
A graphic will illustrate the packaging solution. Each box will have an illustration showing it fully packed, along with step-by-step instructions showing how each item should be placed in the box.
Updating products with the Import CSV Utility or API. |
Return to top. |
Using the app’s user interface is the simplest way to populate the product shipping parameters. However, if your store has a lot of products, using the app’s Import CSV Utility or its Product API will be more time-efficient for people with sufficient technical skills. Which method is used will depend on the individual’s level of expertise. Instructions for both appear below.
You can’t use the Import CSV utility or the Products API to create products in Shopify. The products must exist in Shopify prior to downloading the CSV template or using the API if they are to be updated.
Using the Import CSV Utility |
Return to top. |
Navigate to the Import CSV tab in the app preferences.
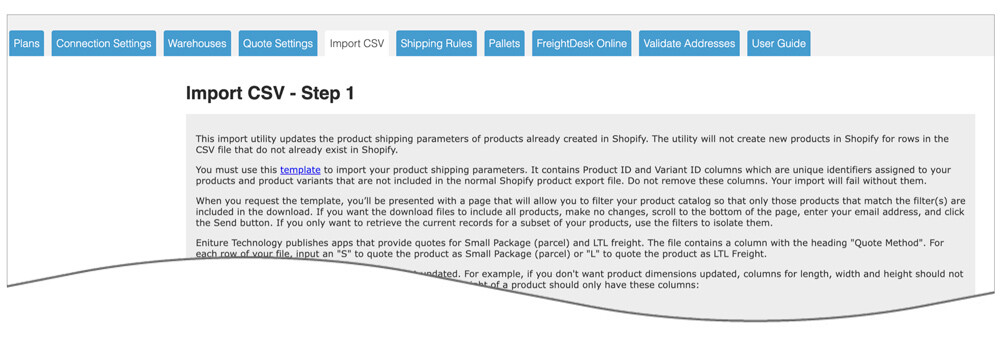
Use the link below to access instructions on how to…
- Download the CSV template.
- Use the filters to isolate the product/variant records you want to update.
- Populate the CSV file with your shipping parameters.
- Save the CSV file in the proper format.
- Import the CSV file to the app.
Using the Product API |
Return to top. |
Navigate to the Import CSV tab in the app preferences.
Scroll to the bottom of the page to the section titled, Update product shipping parameters via the API.
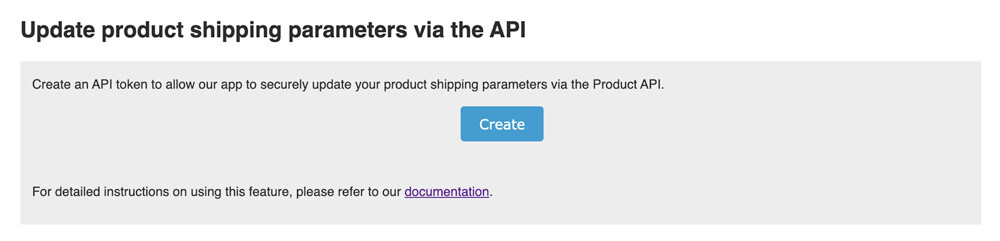
If an API token isn’t present, click the Create button. Copy the API token to your clipboard and follow the Product API documentation listed under Additional Resources.
Shipping with FreightDesk Online |
Return to top. |
- How to capture the cost of shipping on orders placed online.
- How to ship the order, including how to create the shipping label (or Bill of Lading in the case of LTL freight), schedule the carrier to pick up the shipment, and update the customer with the tracking number.
Quoting apps, like this one, provide a solution for the first challenge. What are your options for the second challenge?
Option 1 – The carrier’s website: You can log in to the carrier’s website and manually enter all relevant information. Carrier websites are free to use because the carrier earns money when it delivers an order. However, if you have more than a handful of orders each day, this approach is time-consuming and prone to costly data-entry errors.
Option 2 – Shopify Shipping: Shopify Shipping offers pretty competitive rates for postal companies like the U.S. postal service, and parcel companies like UPS, and DHL. But if you ship with another provider or have more than a low-to-moderate number of daily orders, you’ll find Shopify Shipping clunky and woefully inefficient.
Option 3 – Cloud-based Shipping Platforms: The next step up in capability are cloud-based shipping systems that will connect to your online store and retrieve the details of your orders, thereby eliminating the need for much of the manual data entry. Many of these shipping systems have arrangements with postal and parcel carriers that are on par if not better than the options available through Shopify Shipping. Where these systems excel is in the efficiency of the fulfillment process. That translates in to a much higher volume of shipments per unit of time. These systems are relatively inexpensive and the reduction in the amount of labor and time it takes to ship your orders will pay dividends.
Option 4 – FreightDesk Online: FreightDesk Online (freightdesk.online) is also a cloud-based shipping system. It enjoys all of the benefits of other cloud-based offerings but expands the solution in two ways:
- It makes use of the detailed information collected by Eniture Technology’s quoting apps (like this one) such as the packaging solution and the additional services included in the shipping option chosen when the order was placed.
- It provides merchants access to more than two dozen LTL freight providers in addition to the typical postal and parcel integrations offered by other cloud-based solutions.
These expanded capabilities deliver you closer to true “click-and-ship” shipping than any other alternative, whether you’re shipping with a postal carrier, a parcel carrier, or an LTL freight provider.
How to connect your Shopify store to FreightDesk Online |
Return to top. |
First, if you don’t already have one, register for a FreightDesk Online account (https://freightdesk.online/register). You can connect multiple online stores to FreightDesk Online, so you don’t have to create separate accounts for each one.
FreightDesk Online pricing is à la carte. You can choose a separate plan for parcel and postal shipments and another for LTL freight shipments based on the anticipated volume for each. Your monthly subscription rate will be based on these two selections. You can begin a 30-day trial of both shipment types by selecting Trial in the corresponding drop-down fields on the registration form.
After you complete the registration process, log in to FreightDesk Online. Click your avatar in the upper-right corner of the browser window. Copy your FreightDesk Online ID, which appears below your company name.
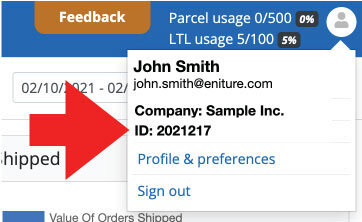
Return to the app preferences and click on the FreightDesk Online tab. Enter your FreightDesk Online ID and click the Connect button.
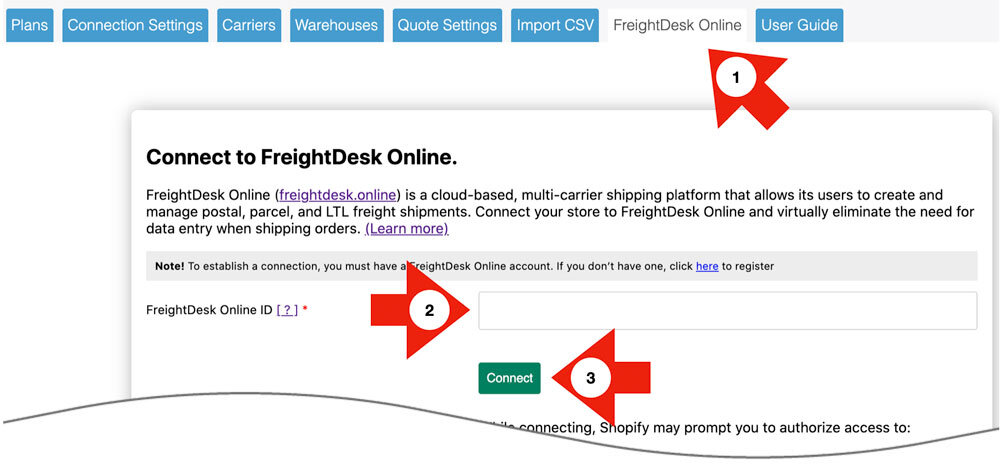
Complete the connection by granting the permissions that Shopify prompts you for.
Now that you’ve connected FreightDesk Online, unfulfilled orders will automatically appear there. To view them, log in to FreightDesk Online and click Orders in the navigation menu. You’ll need to connect your shipping providers before you can start shipping. You can find a quick-start guide by navigating to Help > Getting Started.
Using Validate Addresses |
Return to top. |

– Benjamin Franklin
Shipping to invalid addresses is expensive and avoidable. The cost of failed deliveries, returned shipments, and carrier fees can quickly change a profitable sale into a loss. Without interfering with the Shopify checkout process, Eniture Technology’s DIY Validate Addresses app immediately identifies orders that are safe to ship or notifies customers to confirm or correct the address. Customer updates are instantly reflected in Shopify so you know when it’s safe to ship the order.
The peace of mind that comes from knowing you are shipping to a valid address can cost as little as 1¢ per order. The DIY Validate Addresses app is available in the Shopify App Store. More detailed product information, including the User Guide, is available on eniture.com. Links to both are listed under Additional Resources.