This shipping calculator is a Distance x Rate calculator for Shopify merchants. If you are looking for an app to retrieve your negotiated carrier rates real-time, look over our complete list of apps for Shopify merchants. We have a wide selection of apps available for LTL freight and parcel carriers.
SETUP & DEMO TUTORIAL (5 min)
Using a shipping calculator to present shipping rates to your online shoppers is an excellent alternative when shipping costs aren’t available from your transportation providers in real-time. This app retrieves the distance between your shipping origins and your customer and applies a rate per unit of distance (mile or kilometer) to calculate the shipping rate estimate. Online merchants who use the following modes of transportation to ship or price online orders will find this plugin indispensable:
- Same day delivery services.
- Local delivery services.
- Courier services.
- Self-delivery service.
- Truckload (Full Truckload) service.
- Partial truckload service.
- Refrigerated truckload service.
- Flatbed truckload service.
- Intermodal freight.
- International air freight.
- Ocean freight.
- White-glove delivery service.
- Time-critical freight.
- Any type of transportation you want to be estimated with a distance x rate calculation.
Common Features Available On All Plans
Calculated shipping rates returned to the Shipping Methods page based on the distance between the ship-from and ship-to address and your specified rate per unit of measure (Kilometer or Mile).
Supported origins: Anywhere in the world with a valid street address recognized by the Google Cloud Platform.
Supported destinations: Anywhere in the world with a valid street address recognized by the Google Cloud Platform.
Distance determined by “Route” or “Straight Line”. Route distance is available only if the origin and destination addresses can be serviced by an over-the-road transportation method recognized by the Google Cloud Platform.
Create one or more calculated shipping method and name each one according to your needs.
Create different rates for commercial and residential addresses.
Identify a minimum and/or maximum rate for each calculated shipping method.
Specify a weight range for each calculated shipping method. The app will only return the calculated shipping rate if the total weight of the cart falls within this range.
Define unique calculated shipping rates for different distances.
Trigger the app to calculate a shipping rate based on price, vendor, and/or product tag.
Free Trial Free
Up to 50 transactions for the initial monthly billing period.
Automatically renews to the selected auto-renew plan when the current billing period ends or the number of transactions is fully depleted, which ever occurs first.
Starter $5.00/mo.
Up to 100 transactions per monthly billing cycle.
If all 100 transactions are used, the effective rate is 5¢ per transaction. Transactions exceeding 100 are billed at 5¢ each if the Usage Charges setting is enabled (see the documentation)
Bronze $10.00/mo.
Up to 250 transactions per monthly billing cycle.
If all 250 transactions are used, the effective rate is 4¢ per transaction. Transactions exceeding 250 are billed at 4¢ each if the Usage Charges setting is enabled (see the documentation)
Silver $30.00/mo.
Up to 1,000 transactions per monthly billing cycle.
If all 1,000 transactions are used, the effective rate is 3¢ per transaction. Transactions exceeding 1,000 are billed at 3¢ each if the Usage Charges setting is enabled (see the documentation)
Gold $60.00/mo.
Up to 3,000 transactions per monthly billing cycle.
If all 3,000 transactions are used, the effective rate is 2¢ per transaction. Transactions exceeding 3,000 are billed at 2¢ each if the Usage Charges setting is enabled (see the documentation)
Platnum $100.00/mo.
Up to 10,000 transactions per monthly billing cycle.
If all 10,000 transactions are used, the effective rate is 1¢ per transaction. Transactions exceeding 10,000 are billed at 1¢ each if the Usage Charges setting is enabled (see the documentation)
Current version: 1.0
Requirements
A Shopify account with the Real-Time Carrier Shipping feature enabled. The feature is standard on the Advanced Shopify subscription package. It can be added to other packages by contacting Shopify customer service. Learn more.
FAQs
Why should I use a distance-based shipping rate calculator?
In ideal circumstances, during checkout you want your store to retrieve accurate real-time shipping quotes from your shipping provider. However, this isn’t always possible. Some types of transportation don’t use a readily available schedule of rates. Some transportation providers may have a schedule of rates, but don’t have the technology in place to make them available through a web service or application programming interface (API). Regardless of the circumstances, when you can’t retrieve accurate real-time shipping quotes using a distance-based shipping rate calculator is an excellent alternative.
What happens if all the transactions included in my plan are used up before the start of the next the billing cycle?
Unless you have the Usage Charges setting enabled, the app will stop functioning for the remainder of the monthly billing cycle. To ensure continuous operation, navigate to the Settings tab in the app’s settings and enable the Usage Charges setting. Usage charges are only incurred when this setting is enabled and you have depleted all of the transactions included in your monthly subscription.
What constitues a transaction?
A transaction occurs each time Shopify asks the app for a shipping rate and the app queries the distance between the addresses from the Google Cloud Platform. If a constraint, such as the Minimum Weight setting, stipulates that the app should not return a shipping rate then an inquiry is not sent to the Google Cloud Platform and a transaction isn’t charged. Shopify will ask the app for a shipping rate when the app is present in a Shopify Shipping Profile that is in use due to the contents of the shopping cart. A shopping cart will consume more than one transaction (shipping rate requests) when Shopify identifies that more than one shipping location is required for the order.
Are the rates returned by this app actual shipping rates?
No. The rates returned by this app are based on the distance between two points (route or straight line) and a rate per unit of measure (kilometers or miles) that you specify. If you use the app, more than likely you are doing so to approximate the cost of shipping an order using a transportation method or transportation provider for which real-time quotes are not available via a web service or application programming interface (API).
What is the difference between “route” and “straight line” distance?
“Route” distance is the driving distance between two points. It takes into account the roads that are available for the transport of the order or service. It is a good choice for truckload (a.k.a. full truckload) service, local delivery service, courier service, and other services that use established roads recognized by the Google Cloud Platform. “Straight line” distance, sometimes referred to as “As the crow flies”, is the distance between two points measured as a straight line. It is a good choice for air freight, ocean freight, and other services whose route is not confined to established roads recognized by the Google Cloud Platform.
Do I need an account with a shipping company to use this app?
No, you do not need an account with a shipping company to use this app.
User’s Guide
- Install the Application from the Shopify App Store.
- Prepare Shopify to use the application.
- Understanding the Plans page.
- Make your selections on the Settings page.
- Define your shipping rates.
- What your customer sees.
- What you see.
Other information contained in this guide:
1. Install the application from the Shopify App Store. |
Return to top. |
Log in to Shopify with the Store Owner credentials. You must be logged into Shopify as the Store Owner to perform this step because only the Store Owner can accept the charges associated with the app and authorize the permissions that are required by the app to function properly.
Click on Apps in the navigation menu that appears on the left of the screen.
Click on the Explore apps button that appears above the top right hand corner of the list of installed apps.
You’ll be redirected to the Shopify App Store. Using the search field, search for “Distanced Based Shipping Rates” or “eniture”.
Locate the Distance Based Shipping Rates app in the search results and click on it.
On the app’s listing page, click on the Add app button to initiate Shopify’s installation wizard.
Follow the prompts in the wizard until the installation process is complete.
2. Prepare Shopify to use the application |
Return to top. |
You must have the Third-party calculated shipping rates feature on your Shopify plan to have shipping quotes from the Distanced Based Shipping Rates app displayed in the checkout process. It is standard on the Shopify Advanced plan and can be added to other Shopify plans by contacting Shopify Customer Service. (Learn more)
Navigate to the Settings>Shipping page. Click on the Manage rates link for the General shipping rates in the Rates at checkout section.

In the General shipping profile, locate the shipping origin from which you want the app to provide quotes.

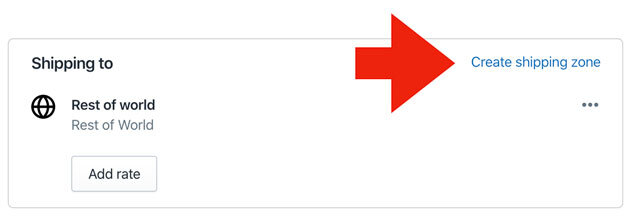
If the only shipping zone you have is Rest of world, click on the Create shipping zone link and then enter a zone name (i.e. “Domestic”).
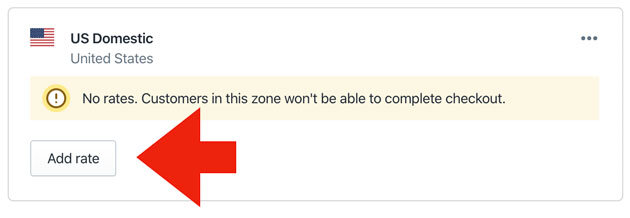
Locate the shipping zone for which you want to app to provide quotes. Click the Add rate button.
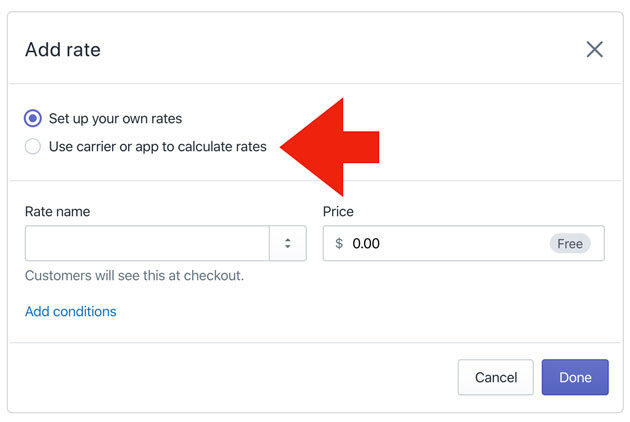
Select the option Use carrier or app to calculate rates.
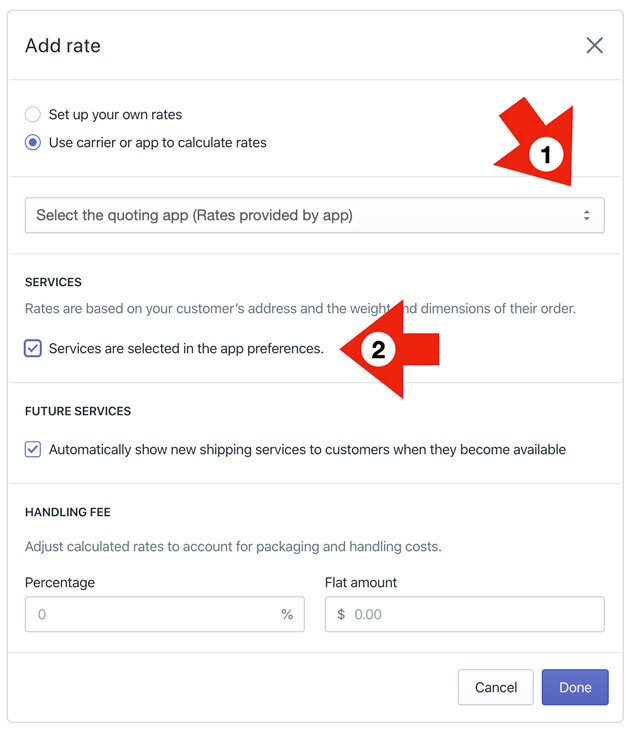
It may take a moment for Shopify to retrieve the list of apps capable of providing shipping quotes for your store. After it has, the appearance of the Add rate page will be similar to the image below. Perform the following actions:
- Select the app from the drop down list.
- Enable the Services are selected in the app preferences setting if a checkbox is present. (A checkbox may not be present, and that’s okay.)
- Click the Done button at the bottom of the page.
Repeat the steps above if you want to enable the app for any other shipping zones.
3. Understanding the Plans tab. |
Return to top. |
When you install the Distance Based Shipping Rates app you’ll be prompted to approve the $5 monthly charge for the Starter plan. Prior to the start of the initial billing cycle, you’ll receive a 14-day free trial. To avoid charges for the app, remove the app from your store prior to the conclusion of the free trial period.
Once the initial monthly billing cycle begins, you’ll be billed $5 for the Starter plan. The Starter plan includes to up to 100 transactions for the billing period. A transaction occurs each time the app retrieves the distance between a ship-from and ship-to address in order to make a DISTANCE x RATE calculation. At the conclusion of each monthly billing cycle, the Starter plan will be renewed for a new block of 100 transactions.
You can change your plan using the Plans tab. Simply click on the green button representing the monthly subscription rate for the desired plan. Shopify will prompt you to approve the subscription rate for new plan. Shopify will pro-rate the differences between your old and new plans which you’ll see reflected on your monthly Shopify invoice. Upgrading to plan that includes more transactions may lower your effective rate per transaction.
Use the Settings tab, described in the next section, to bridge the gap between two plans. If the number of transactions included in your current plan aren’t enough and you don’t want to upgrade your plan, then properly enabling Usage Charges on the Settings tab will allow the app to continue to function after the number of transactions included in your plan are depleted.
4. The Settings page. |
Return to top. |
Each subscription plan for the Distance Base Shipping Rates app provides up to a specified number of transactions. If the number of transactions for the active plan are depleted prior to the monthly renewal date, the app will stop functioning unless the Usage Charges setting is enabled on the Settings tab. When enabled, transactions that exceed the number included in the active subscription plan will be billed on a per transaction basis. In addition to using this feature to ensure continuing operations, it can also be used to extend the utility of the current subscription plan and eliminate the need to upgrade to another plan.
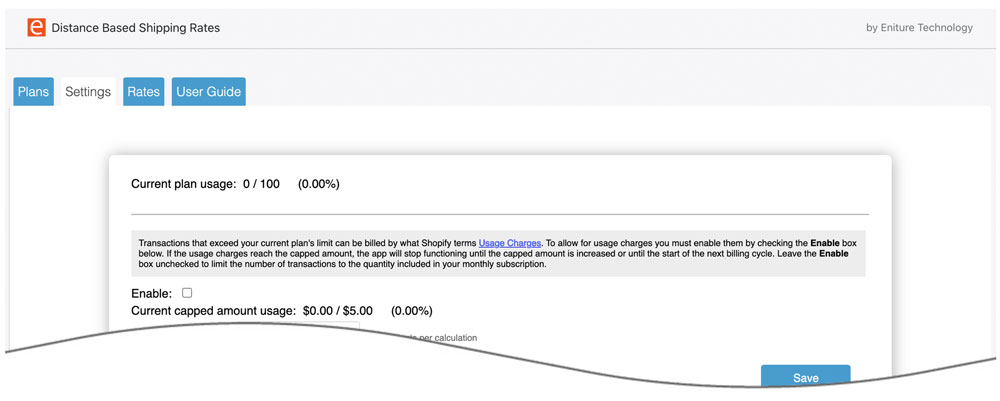
| Current plan usage | Read only. Visible at the top of the page, this counter identifies how many transactions included in your subscription plan have been used in the current billing period. |
| Enable | This setting is disabled by default. Check the checkbox to enable the feature. |
| Current capped amount usage. | Read only. Identifies how much of the capped usage amount has been consumed. Usage transactions occur only when this feature is enabled and only after the number of transactions included in the current subscription plan have been fully depleted. |
| Capped amount | Enter the dollar amount at which you want to cap usage charges that are attributed to transactions that exceed the number included in your subscription plan. If the capped amount is met during the subscription period, the app will stop working. The “capped amount” is Shopify’s way of allowing merchants to limit the transactional charges they may incur during a billing period. |
| Notification email address | Enter the email address of the person you want to be notified when the usage charges reach the Notification threshold which you’ll establish in the next setting. Usage charges are only incurred when the setting is enabled and after all of the transactions included in your monthly plan have been depleted. |
| Notification threshold | Enter the percentage of the capped amount upon which you want the email notification sent. (e.g. Enter 80 for 80%) For example, if the Notification threshold is set to 80%, and the Capped amount is set to $20, the email notification will be sent when the accumulated usage charges equals or exceeds $16. |
5. Define your shipping rates. |
Return to top. |
To present a shipping rate, the product(s) in the cart must be identified as a physical product and have a weight. These settings exist on the Shopify Product Details page. Refer to Shopify’s online documentation if you are unfamiliar with this page or these settings.
Click on the Rates tab to add or maintain your distance based shipping rates. To add a distance-based shipping rate, click on the Add Rate button. To edit an existing rate, click on the Edit link.
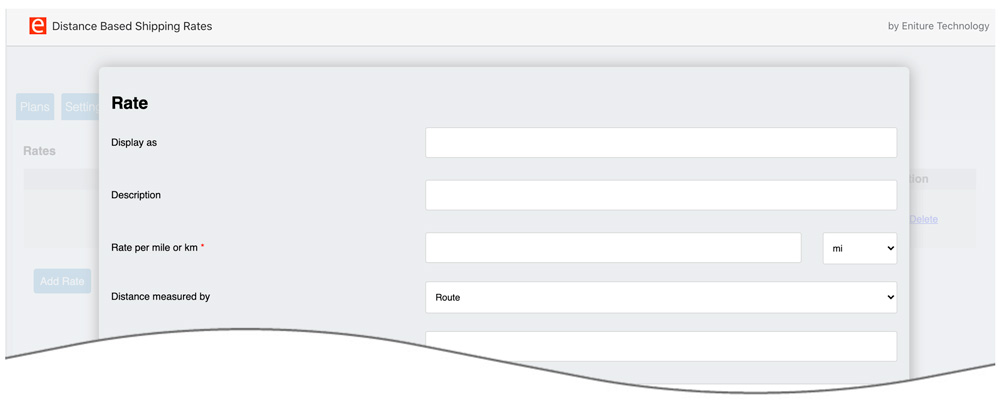
| Display as | Enter the name of the shipping method as you want it to be seen on the Shipping Methods page during the checkout process. For example, you might enter “Truckload freight” or “Same Day Courier Service” depending on what type of service you want to offer. |
| Rate description preference | Choose the option that best describes the description that you want to display along side the Display As label. |
| Description | Enter a description for the shipping method. A common use for this field is to convey the delivery interval. For example, you might enter “Allow up to 5 days for delivery” for truckload service or “Delivery in 60 minutes or less” for local food delivery service. |
| Address Type | Identify the type of address that will be presented with the calculated shipping rate. To display the shipping rate to any type of address, choose “Commercial and residential”. |
| Default unknown address types to | In rare cases, it may not be possible to identify the ship-to address provided by the site visitor as “Commercial” or “Residential”. If the address type can’t be confirmed, how do you want the application to treat the address? |
| Rate per mile or km | Enter the rate to use per mile or kilometer. Specify which unit of measure the rate is for using the adjacent dropdown field. The currency represented will be the currency used for your store. Whole units of currency (such as a Dollar, Pound, or Euro) preceed the decimal point. Fractional units are to be entered after the decimal point. For example, “1.25” would be one dollar and twenty five cents in the case of the US or Canadian Dollar; 1 pound and 25 pence in the case of the British Pound; or one euro and 25 cents in the case of the European Union Euro. You can carry the rate out to three significant digits (e.g. 0.001). When displayed during checkout, the calculated shipping rate will be rounded up to the second significant digit (e.g. 0.01). |
| Distance measured by | Quickest Route Choose this setting if you want the quickest route. The quickest route should only be used for shipping methods that are restricted to transport on roads recognized by the Google Cloud Platform. Shortest Route
Select this setting if you want the shortest route. The shortest route should only be used for shipping methods that are restricted to transport on roads recognized by the Google Cloud Platform. Straight Line
Select this setting if you want the option to be calculated as a straight line. “Straight Line” is the distance between the ship-from and ship-to addresses measured in a straight line. This option is useful for transportation modes that don’t use the roadways, such as air or ocean shipments. |
| Base Charge | If you want the result of the Distance x Rate calculation added to a beginning value other than zero, enter the amount here. |
| Minimum distance | Enter the minimum distance to use to trigger the shipping method. When the distance between the ship-to and ship-from addresses is equal to or more than this value, the shipping method will return a shipping rate, as long as it is less than the maximum distance setting.
Leave this field blank if you don’t want to use distance as a condition to use to retrieve a calculated shipping rate. Zero is a permitted value for this field. |
| Maximum distance | Enter the maximum distance threshold. If the distance between the ship-to and ship-from addresses less than this value, the shipping method will return a shipping rate, as long as it is also more than or equal to the minimum. You don’t have to specify a maximum. Leave the field blank if you don’t wish to set a maximum distance.
If you don’t want to use distance as a condition to use to retrieve a calculated rate, leave both the Minimum distance and Maximum distance fields blank. |
| Minimum Weight | Enter the minimum weight for which you want the app to calculate a distance-based shipping rate for this shipping method. If the total weight of the cart is equal to or more than this value, the app will provide a shipping rate estimate, as long as it is less than the maximum weight setting. |
| Maximum Weight | Enter the maximum weight for which you want the app to calculate a distance-based shipping rate for this shipping method. If the weight of the Cart is less than this value, the shipping method will return a shipping rate, as long as it is also more than or equal to the minimum. Leave this field blank if you don’t want to set a maximum. |
| Minimum Cart Price | Enter the minimum value of the Cart for which you want the app to calculate a distance-based shipping rate for this shipping method. If the total value of the cart is equal to or more than this value, the app will provide a shipping rate estimate, as long as it is less than the maximum cart price setting. |
| Maximum Cart Price | Enter the maximum value of the Cart for which you want the app to calculate a distance-based shipping rate for this shipping method. If the total value of the Cart is less than this value, the shipping method will return a shipping rate, as long as it is also more than or equal to the minimum. Leave this field blank if you don’t want to set a maximum. |
| Distance adjustment | Use this field if you want to manipulate the distance that the plugin identifies between the ship-from and ship-to addresses. You can enter a positive or negative number. The adjustment will impact the calculated shipping rate. If you enabled the Display the distance between the ship-from and ship-to addresses setting, the adjustment will also be reflected in what the customer sees. The plugin prevents the distance between ship-from and ship-to addresses from being a value less than zero or presenting a negative shipping rate. |
| Rate adjustment | Use this field if you want to manipulate the shipping rate the plugin calculates. You can enter a positive or negative number. Enter a number (e.g. 5.00 or -5.00) to adjust the shipping rate by an amount of currency. Follow the number with a percent sign (e.g. 5.0% or -5.0%) to make a percentage change to the rate. The plugin prevents a negative shipping rate from occuring. |
| Minimum Quote | Enter the amount for the minimum shipping rate the app will return for the shipping method. For example, if the rate x distance calculation results in a value of 85.37 and the Minimum Quote setting is set to 100.00, the shipping method will be presented to the shopper as 100.00. Leave the field blank if you don’t want to set an minimum value for the shipping rate of the shipping method. |
| Maximum Quote | Enter the amount for the maximum shipping rate the app will return for the shipping method. For example, if the rate x distance calculation results in a value of 1,537.26 and the Maximium Quote setting is set to 950.00, the shipping method will be presented to the shopper as 950.00. Leave the field blank if you don’t want to set an maximum value for the shipping rate of the shipping method. |
| Handling Fee / Markup | You can increase or decrease the calculated shipping rate by an amount or by a percentage. Enter a number (e.g. 5.00) to change the calculated shipping rate by a number. Follow the number with a percentage sign (e.g. 5.00%) to change the calculated shipping rate by a percentage. To reduce the calculated shipping rate, preceded the entry with a negative sign (e.g. -5.00 or -5.00%). |
| Trigger Rates When Ship-to Address Contains | Use these settings if you only want the plugin to display the results of the rate calculation based on the geography of the ship-to address.
Specific Countries
Enable the checkbox and select the countries from the dropdown if you want the calculated shipping rate to be presented only when the ship-to address is located in these countries. Specific States/Provinces
Enable the checkbox and select the states or provinces from the dropdown if you want the calculated shipping rate to be presented only when the ship-to address is located there. The country must be selected and enabled before enabling this setting. Specific Postal Codes
Enable the checkbox and identify the postal code(s) to have the calculated shipping rate presented only when the ship-to address is located in the postal code. The country must be selected and enabled before enabling this setting. |
| Trigger Rates When Cart Contains | Use these settings if you only want the plugin to display the results of the rate calculation when….
Specific Vendor(s)
Enable the checkbox and identify the vendors if you want the calculated shipping rate to be presented only in these cases. Specific Product Tag(s)
Enable the checkbox and identify the product tags if you want the calculated shipping rate to be presented only in these cases. |
| The calculated shipping rate is for the contents of the Cart | Choose this setting if you want the app to calculate a shipping rate as if all the items shipping from each ship-from location will be considered to be on the same shipment. This option allows each item from each location to contribute to the minimum and maximum weight and quote settings. |
| Multiply the calculated shipping rate by the number of items in the Cart before applying the minimum and maximum quote values | Choose this setting if you want the app to calculate a shipping rate as if each item is its own shipment. This option multiplies the calculated shipping rate by the number of items in the Cart before applying the minimum and maximum quote values.
Example
Items in Cart: 2
Calculated distance-based shipping rate: $8.00
Multiply by number of items in the Cart: 2 x $8.00 = $16.00
Minimum quote: $20.00
Maximum quote: $100.00
Quoted shipping rate: $20.00 ($20.00 minimum > $16.00 calculated shipping rate)
|
| Multiply the calculated shipping rate by the number of items in the Cart after applying the minimum and maximum quote values | Choose this setting if you want the app to calculate a shipping rate as if each item is its own shipment. This option multiplies the calculated shipping rate by the number of items in the Cart after applying the minimum and maximum quote values.
Example
Items in Cart: 2
Calculated distance-based shipping rate: $8.00
Minimum quote: $20.00
Maximum quote: $100.00
Shipping rate per item: $20.00 ($20.00 minimum > $8.00 calculated shipping rate per item)
Quoted shipping rate: $40.00 (= 2 x $20.00)
|
| Just show a flat rate, do not calculate rates based on distance | Choose this option to display the value entered into the Rate per mile or km field as the shipping rate without multiplying it by the distance. To offer free shipping, choose this setting and set the Rate per mile or km setting to zero. |
Repeat these steps for every shipping method you’d like to define.
6. What your customer sees. |
Return to top. |
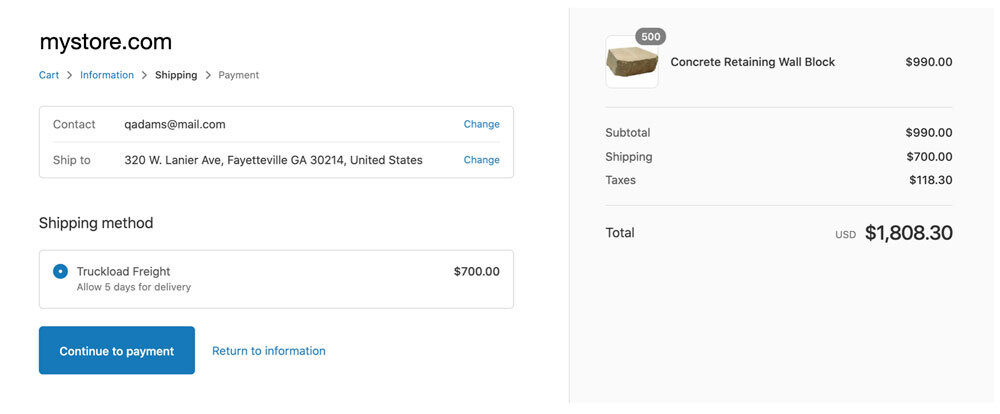
The exact presentation of shipping rates will depend on your settings. The example below has the Display as setting set to “Truckload Freight”, and the Description setting set to “Allow 5 days for delivery”. In the example, no other shipping methods are enabled. If other shipping methods were enabled, they would appear as additional shipping options.
7. What you see. |
Return to top. |
The app populates shipping related information in the ADDITIONAL DETAILS widget on the Order Details page. The content of the widget falls into two categories: 1) Shipment Origin & Services; and 2) Shipment Content.
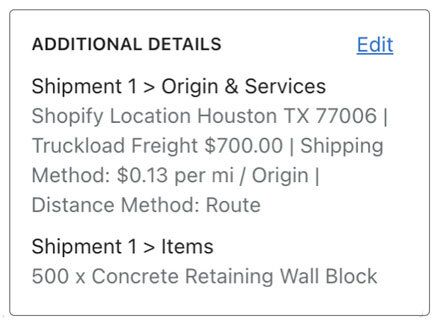
Shipment Origin & Services
This information block will identify the shipment origin, the shipping method chosen by the customer, and other information relevant to the calculated shipping rate. A separate Shipment Origin & Services information block will appear for each shipping location that will participate in fulfilling the order. This is particularly useful for stores with multiple warehouses and drop ship locations.
Shipment Content
A Shipment Content information block is presented beneath each Shipment Origin & Services information block. It identifies the products that were quoted as shipping from the location.
Shipping with FreightDesk Online |
Return to top. |
- How capture the cost of shipping on orders placed online.
- How to ship the order, including how to create the shipping label (or Bill Of Lading in the case of LTL freight), schedule the carrier to pick up the shipment, and update the customer with the tracking number.
Quoting apps, like this one, provide a solution for the first challenge. What are your options for the second challenge?
Option 1 – The carrier’s website: You can log into the carrier’s website and manually enter all of the relevant information. Carrier websites are free to use since the carrier makes money when you use them to deliver an order. However, if you have more than a handful of orders each day this approach is time consuming and ripe for data entry errors which can be costly to correct.
Option 2 – Shopify Shipping: Shopify Shipping offers pretty competitive rates for postal companies like the US postal service, and parcel companies like UPS, and DHL. But if you ship with another provider or have more than a low-to-moderate number of daily orders, you’ll find Shopify Shipping clunky and woefully inefficient.
Option 3 – Cloud-based Shipping Platforms: The next step up in capability are cloud-based shipping systems that will connect to your online store and retrieve the details of your orders, thereby eliminating the need for much of the manual data entry. Many of these shipping systems have arrangements with postal and parcel carriers that are on par if not better than the options available through Shopify Shipping. Where these systems excel is in the efficiency of the fulfillment process. That translates in to a much higher volume of shipments per unit of time. These systems are relatively inexpensive and the reduction in the amount of labor and time it takes to ship your orders will pay dividends.
Option 4 – FreightDesk Online: FreightDesk Online (freightdesk.online) is also a cloud-based shipping system. It enjoys all of the benefits of other cloud-based offerings but expands the solution in two ways:
- It makes use of the detailed information collected by Eniture Technology’s quoting apps (like this one) such as the packaging solution and the additional services included in the shipping option chosen when the order was placed.
- It provideds merchants access to more than two dozen LTL freight providers in addition to the typical postal and parcel integrations offered by other cloud-based solutions.
These expanded capabilities deliver you closer to true “click-and-ship” shipping than any other alternative, whether you’re shipping with a postal carrier, a parcel carrier, or an LTL freight provider.
How to connect your Shopify store to FreightDesk Online |
Return to top. |
First, if you don’t already have one, register for a FreightDesk Online account (https://freightdesk.online/register). You can connect multiple online stores to FreightDesk Online, so you don’t have to create separate accounts for each one.
The pricing for FreightDesk Online is á la carte. You’ll be able to pick a separate plan for parcel (and postal) shipments, and for LTL freight shipments based on the anticipated volume for each type of shipping. Your monthly subscription rate will be comprised of these two selections. You can begin a 30-day trial of both types of shipping by selecting Trial in the corresponding dropdown fields on the registration form.
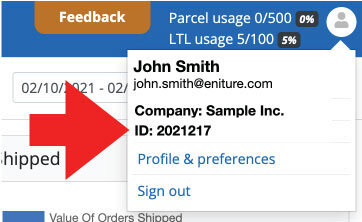
After you complete the registration process, log into FreightDesk Online. Click on your avatar located in the top right-hand corner of the browser window. Copy your FreightDesk Online ID which will be located below your company name.
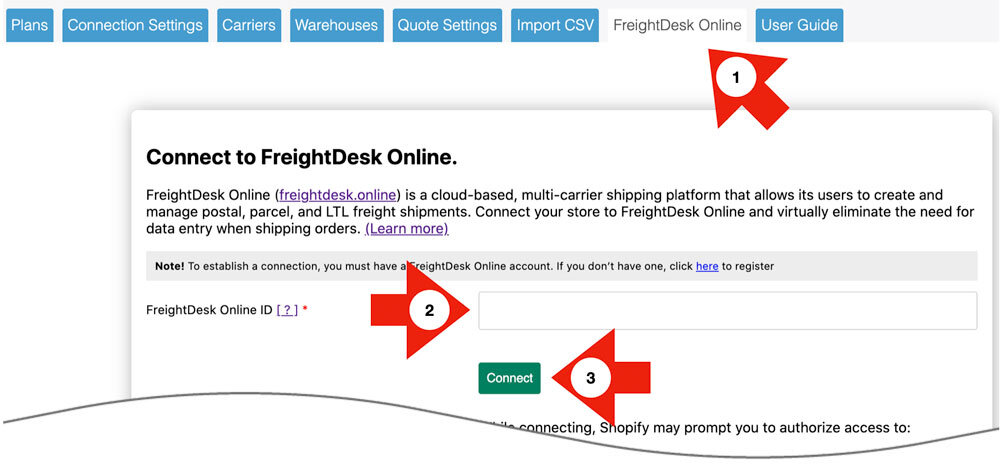
Return to the app preferences and click on the FreightDesk Online tab. Enter your FreightDesk Online ID and click the Connect button.
Complete the connection by granting the permissions that Shopify prompts you for.
Now that you’ve connected FreightDesk Online, unfulfilled orders will automatically appear in FreightDesk Online. To view them, log into FreightDesk Online and click on Orders in the navigation menu. You’ll need to connect your shipping providers before you can start shipping. You can find a quick start guide in FreightDesk Online by navigating to Help > Getting Started.
Using Validate Addresses |
Return to top. |

– Benjamin Franklin
Shipping to invalid addresses is expensive and avoidable. The cost of failed deliveries, returned shipments, and carrier fees can quickly change a profitable sale into a loss. Without interfering with the Shopify checkout process, Eniture Technology’s DIY Validate Addresses app immediately identifies orders that are safe to ship or notifies customers to confirm or correct the address. Customer updates are instantly reflected in Shopify so you know when it’s safe to ship the order.
The peace of mind knowing that you are shipping to a valid address can cost as little as 1¢ per order. The DIY Validate Addresses app is available in the Shopify App Store, and more detailed product information, including the User Guide, is available on eniture.com. The links below will take you to these resources:
DIY Validate Addresses Shopify App Store Listing
DIY Validate Addresses product information on eniture.com

