This app allows Shopify merchants to add a field to the product page that customers can use to enter the square feet or cubic volume of their project and easily add the correct quantity of the product to the Cart. The app will be of interest to merchants that sell building materials, cleaning products, flooring, concrete products, fertilizer, paint, soil, tile, turf, warehouse racks, or any product whose description includes words such as, “…one unit will cover X…” The app solves a common problem with other third-party Shopify apps that create variants on the fly and result in a failure to generate shipping rates during the checkout process.
SETUP TUTORIAL & DEMO (6 min)
Features
$5/mo.
Works for any situation where the quantity of a product needed is determined by area or cubic volume.
Doesn’t create variants on the fly so that shipping methods, inventory levels, and other important functions aren’t compromised.
Immediately calculates the quantity of product needed based on the customer’s input making it easy to add the correct quantity to the Cart.
Easily create different user experiences for different products by enabling the app differently for each product theme.
Use Shopify’s App Blocks to customize the location and formatting of the field on product pages used to collect information from the customer about the area or cubic volume of their project.
Optionally specify minimum and maximum order quantities.
Current version: 1.0
Requirements
Use of a Shopify theme that complies with Shopify Online Store 2.0 or later and supports App Blocks.
FAQs
Does the Quanity Calculator work for both imperial and metric units of measure?
Yes.
Will the Quantity Calculator handle a mix of units of measure?
The app will introduce a product settings field to record a number to be used as a divisor. As long as the divisor is relevant to the unit measure for the product, the quantity calculated will be correct. This can be different for each product.
User’s Guide
-
- Install the Application from the Shopify App Store.
- Prepare Shopify to use the application.
- Add the App Block to the Product Templates.
- Removing the App Block from a Product Template.
- Identify the Coverage per Unit.
- Your Customer’s Experience
- Add the Min/Max App Block to the Product Templates.
- How to Make the Min/Max Order Quantity Dynamic.
- Removing the Min/Max App Block from a Product Template.
- Min/Max Order Quantity: Your Customer’s Experience.
1. Install the application from the Shopify App Store. |
Return to top. |
Log in to Shopify with the Store Owner credentials. You must be logged into Shopify as the Store Owner to perform this step because only the Store Owner can accept the charges associated with the app and authorize the permissions that are required by the app to function properly.
Click on Settings in the navigation menu that appears on the left of the screen.
Click on Apps and sales channels.
Click on the Customize your store button that appears above the top right hand corner of the list of installed apps. (Shopify constantly relabels this button, so it may be identified differently.)
You’ll be redirected to the Shopify App Store. Using the search field, search for “Quantity Calculator” or “eniture”.
Locate the Quantity Calculator app in the search results and click on it.
On the app’s listing page, click on the Add app button to initiate Shopify’s installation wizard.
Follow the prompts in the wizard until the installation process is complete.
2. Prepare Shopify to use the application |
Return to top. |
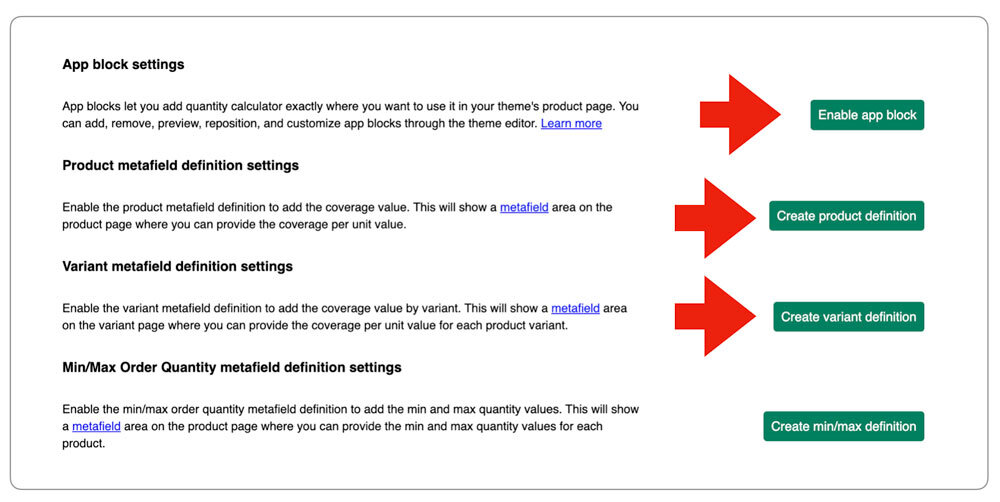
Navigate to the Quantity Calculator Settings page. Click on the Enable app block button. You can implement the quantity calculator at either the product level, variant level, or both.
The coverage per unit will be defined at the product level, and if the product has variants the same coverage per unit will apply.
The coverage per unit will be defined at the variant level. This will allow you to have different coverages for different variants of products. Paint is a good example. You may have variants for a pint, a gallon, and 5 gallons. If you’re using the Quantity Calculator to identify the number of units required to paint a specified number of square feet, then each variant would have a different coverage value.
When both are enabled, the application will check first for a setting at the variant level. If it is unpopulated, the application will use the setting at the product level if one is available.
Click the Create product definition and/or the Create variant definition buttons in accordance to your use case.
3. Add the App Block to the Product Templates. |
Return to top. |
Shopify themes have a default theme page for products. These instructions will describe how to add the Quantity Calculator to the default product theme page. In addition to the default product theme page, you can create or may have created additional product theme pages.
Repeat these instructions for each product theme page you want the Quantity Calculator to appear on. The appearance and location of the field used to collect the area or volume of the customer’s project can be different for each theme.
In the Shopify navigation menu, select Online Store > Themes. Click on the button labeled Customize.

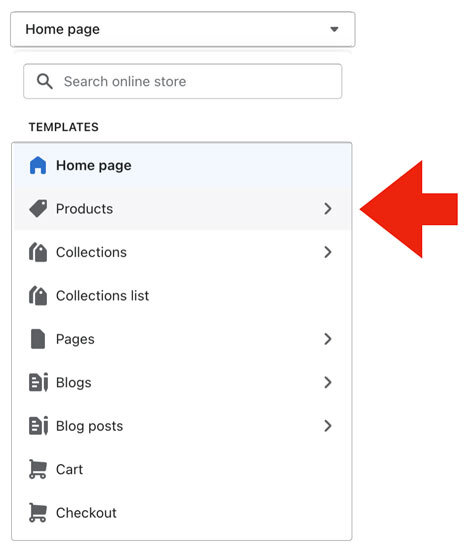
From the drop down at the top of the page, select Products and then chose the option for Default product or another product theme that you want to add the Quantity Calculator to.
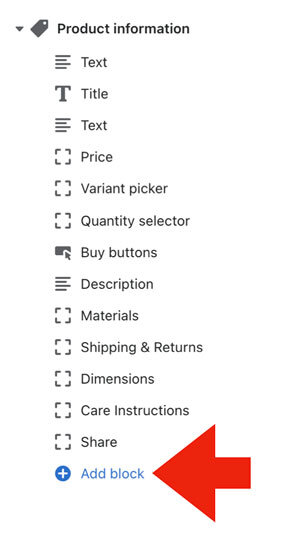
If you’re using Shopify Online Store 2.0 or later, on the left hand side of the page you’ll see a list under the heading Product information. Click on the Add block entry. (If your user interface doesn’t resemble the image below, then you aren’t using Shopify Online Store 2.0 and you can’t use the Quantity Calculator app. Contact Shopify support to find out how to upgrade.)
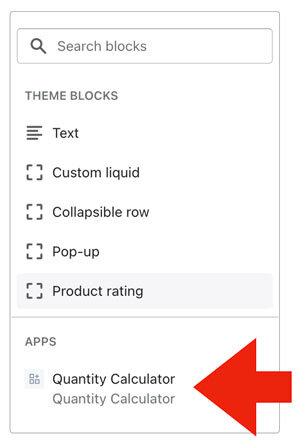
In the section labeled APPS, click the Quantity Calculator.
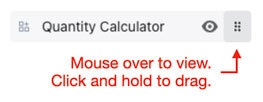
After the Quantity Calculator is added to the list of blocks displaying on your product theme page, hover over it to reveal the controls for displaying and moving that app block. Use the move control to drag the Quantity Calculator to the location on the page where you want it to be visible. The most popular location is above the Quantity selector block.
Next, in the Product information section, click on the Quantity Calculator to reveal its settings. Most likely, the settings will appear on the right side of the page. Use the instructions below to populate the settings to suit your needs. Be sure to click the Save button located at the top right corner of your browser window to save your settings.
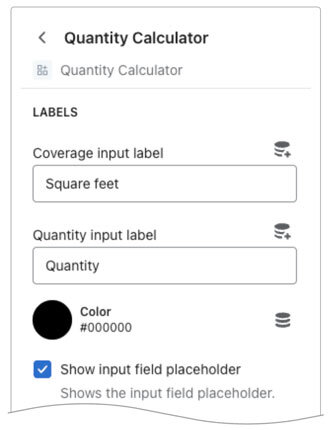
| Labels | Coverage input label Enter the unit of measure that describes what the the field is intended to collect. “Square feet” or “Cubic volume” are common labels, but you can specify any type of unit of measure you wish. Quantity input label
Enter a label for the optional Quantity field. The Quantity Calculator adds a quantity field that you can use in place of the product theme’s Quantity selector so that you can match the formatting of the Coverage input label. You can hide this field as described later in these instructions if you’d prefer to use the product theme’s Quantity selector field. To avoid confusing your customer, if you elect to use the Quantity Calculator’s Quantity field, you should hide the product theme’s Quantity selector. Color
Click on this setting to change the color of the labels. Show input field placeholder
Enable this setting if you want the input field labels to also appear in the input fields as placeholder text. Show quantity field
Enable this setting if you intend to use the Quantity Calculator’s Quantity field. Disable it if you will use your theme’s Quantity selector block instead. Put the…
Choose containers (e.g. boxes, cans, other) in the Cart if you want the number of containers required for coverage area identified by the customer to be placed in the Cart. This should be your selection if the item price is per container. Choose coverage value (e.g. area, volume) into the Cart if you want the total coverage value that the number of containers will cover placed in the Cart. This value will be greater than the coverage value specified by the customer if the customer’s specified coverage value would result in a partial container. The amount of the coverage value placed in the Cart will equal the number of calculated containers, times the coverage value you specified for the container. Fractional values will be rounded down to the nearest integer. This should be your selection if the item price is per square foot, per cubic volume, or some other unit of measure. If you choose this option you need to hide the theme’s Quantity Selector and use the Quantity Selector provided by the Quantity Calculator.
Impact on the calculator if the visitor changes the variant:
Keep project requirements & recalculate quantity
When this setting is enabled, if the visitor changes the selection of variant after inputing the project requirements (e.g., square feet), the value entered for the project requirements will remain unchanged but the quantity of units (e.g., boxes) will be updated for the newly selected variant. Reset quantity to 1 and its coverage value
When this setting is enabled, if the visitor changes the selection of variant the quantity of the variant will be reset to 1 and the value in the project requirements field will be updated to reflect its coverage value for 1 unit of the variant. |
| Additional Message | Show actual calculation Enable this checkbox if you want the results of the actual coverage calculation to be displayed to the visitor. For example, a box of a product may cover 24.3 square feet. If the visitor indicates that the project size is 1000 square feet, the quantity calculator will identify that 42 boxes of the product are required. However, 42 boxes actually contains enough material to cover 1020.6 square feet (= 42 boxes x 24.3 sqft per box). Enabling this setting will display a message conveying the actual coverage for the number of boxes identified. Actual calculation info
Enter the message you want to display about the actual coverage provided by the quantity of boxes calculated for the visitor’s project requirements. Be sure the short code “{calculation}” appears in the message. It is where the result of the calculation Quantity x Coverage will appear. Show message
Enable this checkbox if you want to display a message with the calculator. Typically the message will explain the relationship between the field used to collect the area or volume input by the site visitor, and the product quantity that will be added to the Cart. Message
Enter the message you want displayed to the site visitor. “This product is sold by the box.” is a common use for this field. Width
Use the slider to change the width used to display the message. Color
Click on this setting to change the font color of the message. |
| Widget Layout | Direction Choose Column if you want the Coverage input field and the Quantity field to appear above and below one another. Or choose Row to have them appear side-by-side. Alignment
Identify how you want the Quantity Calculator fields aligned. |
| Sizing | Width Use the slider to adjust the width of the input fields. Inner padding
Use the slider to adjust the inner padding. “Inner padding” is the space between the values entered by the customer and the input field borders. Font size
Use the slider to adjust the size of the font. |
| Spacing | Padding top Use the slider to adjust the space between the Quantity Calculator input fields and the element above them. Padding bottom
Use the slider to adjust the space between the Quantity Calculator input fields and the element below them. Vertical space between fields
Use the slider to adjust the vertical space between the Quantity Calculator input fields. This setting only applies when the Direction setting is set to Column. Horizontal space between fields
Use the slider to adjust the horizontal space between the Quantity Calculator input fields. This setting only applies when the Direction setting is set to Row. |
| Border | Thickness Use the slider to adjust the thickness of the Quantity Calculator’s input fields. Corner radius
Use the slider to round the corners of the Quantity Calculator’s input fields. Color
Click on this setting to change the color of the borders of the Quantity Calculator’s input fields. |
4. Remove the App Block from a Product Template. |
Return to top. |
If you decide not to use the Quantity Calculator, you can temporarily hide it by clicking on its visibility icon in the list of app blocks shown for the Product template.
To permanently remove the app block, navigate to the app block settings, scroll to the bottom and click the link to delete the app block.

To cancel the subscription charge, be sure to delete the app from your list of installed apps.
5. Identify the Product’s Coverage per Unit |
Return to top. |
Using the Shopify navigation menu, go to Products and select a product that uses a product template that you added the Quantity Calculator to.
If you clicked on the Create product definition button described in Step 2 of these instructions, scroll down the page until you see a section labeled Metafields.

Enter the value to be used as the divisor for the calculation you want to perform. For example, if you set up the Quantity Calculator to collect the number of square feet and one unit of the product covers 10 square feet, enter “10”. Likewise, if you set up the Quantity Calculator to collect the amount of cubic feet and one unit of the product covers 3 cubic feet, enter “3”.
If you clicked on the Create variant definition button described in Step 2 of these instructions, select a variant from the Variants section of the product page. With the variant page loaded, scroll to the bottom of the page until you see a section labeled Metafields.

Enter the value to be used as the divisor for the calculation you want to perform. For example, if you set up the Quantity Calculator to collect the number of square feet and one unit of the product covers 10 square feet, enter “10”. Likewise, if you set up the Quantity Calculator to collect the amount of cubic feet and one unit of the product covers 3 cubic feet, enter “3”.
Repeat this for each product variant. If, in the Metafields section, you leave the Coverage per unit field blank, the product level Coverage per unit setting will be used if it is enabled and populated.
Click Save to save your setting.
Repeat these instructions for each product that will use the Quantity Calculator.
6. Your Customer’s Experience |
Return to top. |
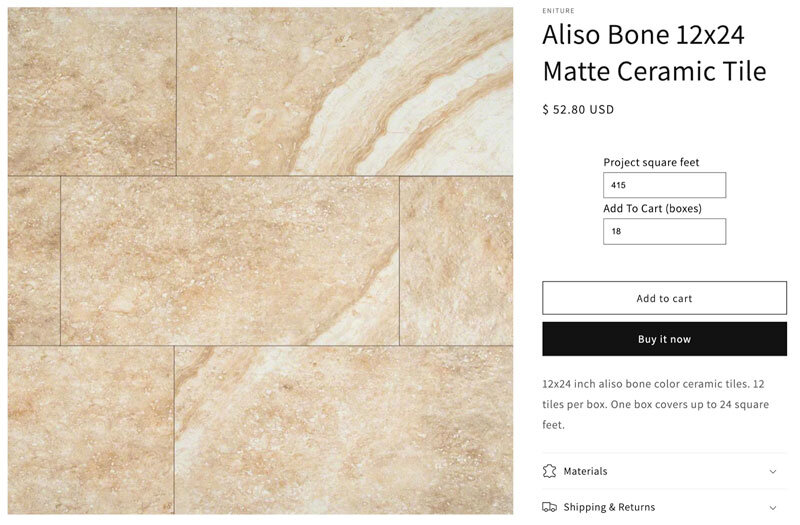
Below is an example of a product page that has the Quantity Calculator set to prompt the customer for the square feet of their flooring project. The customer typed in “415”. The product’s metadata setting for Coverage per unit is set to 24 (square feet per box). The actual result is 17.292 boxes (= 415/24 = 17.292).
In this case the app will round the number of boxes up to 18, and immediately update the Add To Cart quantity field.
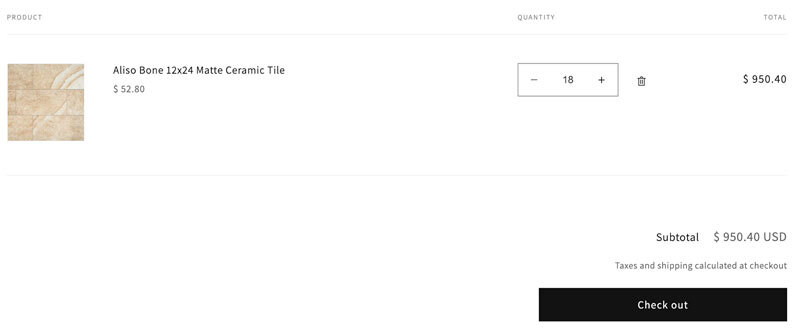
When the customer clicks on the Add to cart button, the quantity of 18 (using our example) is added to the Cart without the need to create variants on the fly.
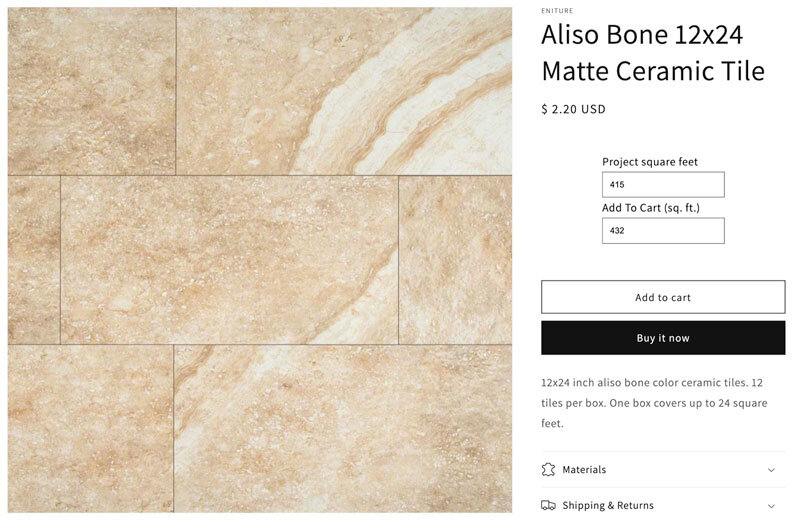
In this case, the merchant has elected to price the product by square foot. When the customer specifies that the project is 415 square feet, the app determines that 18 boxes are required and multiplies 18 by the number of square feet per box. The result is 432 square feet (= 18×24 = 432). The Add To Cart quantity field is immediately updated.
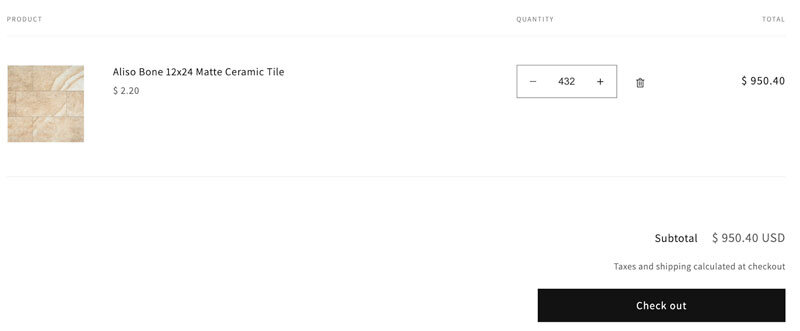
When the customer clicks on the Add to cart button, the quantity of 432 (using our example) is added to the Cart without the need to create variants on the fly.
Note: Calculated quantities that result in a fraction will be rounded to the nearest integer. Quantities of containers (e.g. boxes) will be rounded up. Quantities related to coverage (e.g. square feet) will be rounded down.
7. Add the Min/Max App Block to the Product Templates. |
Return to top. |
When you installed the Quantity Calculator, the Min/Max Order Quantity app block was also introduced. It allows you to specify a minimum and/or maximum order quantity for the products using the template. Use of it is optional and it requires the simultaneous use of the Quantity Calculator app block. To implement the Min/Max Order Quantity app block, follow the instructions below. The default product theme will be used for these instructions.
Return to the app settings and click the Create min/max definition to add enable the min/max order quantity functionality.
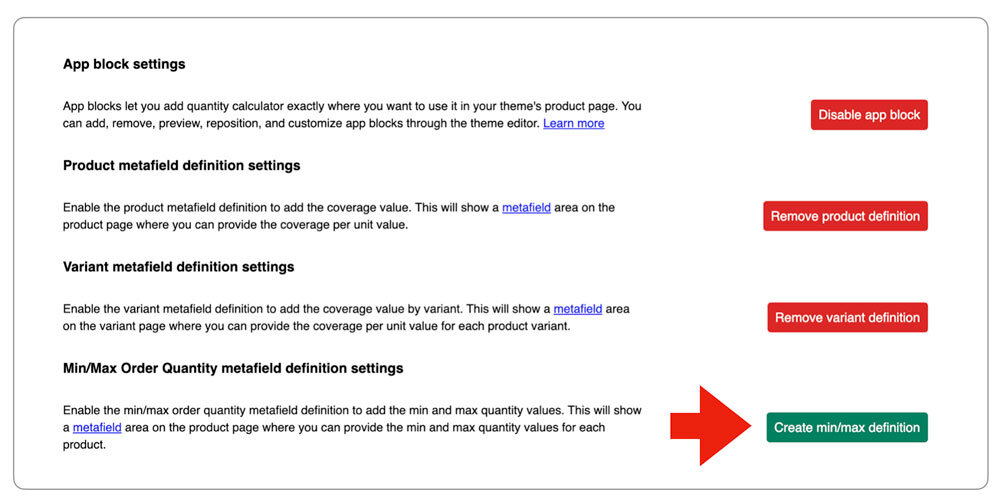
Execute these instructions for each product theme you want the Min/Max Order Quantity app block to be active on.
In the Shopify navigation menu, select Online Store > Themes. Click on the button labeled Customize.

From the drop down at the top of the page, select Products and then chose the option for Default product or another product theme that you want to add the Min/Max Order Quantity app block to.

If you’re using Shopify Online Store 2.0 or later, on the left hand side of the page you’ll see a list under the heading Product information. Click on the Add block entry. (If your user interface doesn’t resemble the image below, then you aren’t using Shopify Online Store 2.0 and you can’t use the Quantity Calculator app. Contact Shopify support to find out how to upgrade.)

In the section labeled APPS, click on Min/Max Order Quantity.
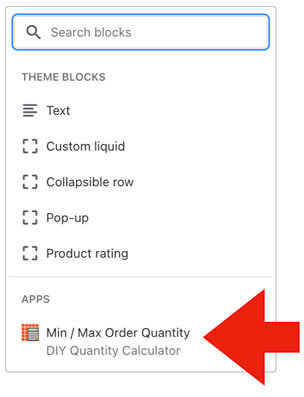
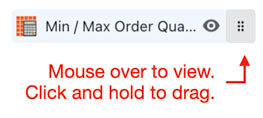
After Min/Max Order Quantity is added to the list of blocks displaying on your product theme page, hover over it to reveal the controls for displaying and moving that app block. Use the move control to drag the Min/Max Order Quantity app block to the location on the page where you want it to be visible. The most popular location is directly above or below the Quantity Calculator app block.
Next, in the Product information section, click on Min/Max Order Quantity to reveal its settings. Most likely, the settings will appear on the right side of the page. Use the instructions below to populate the settings to suit your needs. Be sure to click the Save button located at the top right corner of your browser window to save your settings.
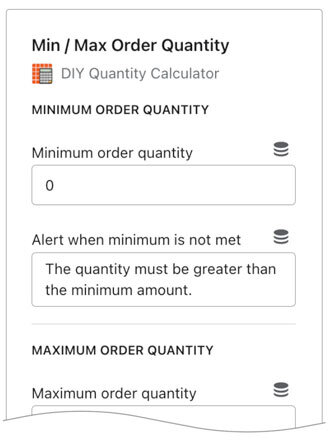
| Minimum Order Quantity | Enter the minimum quantity that must be added to the Cart. The required minimum quantity will apply to all products that use the product template. To make the minimum quantity dynamic (so that differs for each product), read the next section in the User Guide titled, “How to Make the Min/Max Order Quantity Dynamic”. If you don’t wish to require a minimum purchase quantity, set this field to zero. |
| Alert when minimum is not met | Enter the message to display to the shopper if the minimum order quantity is not met. |
| Maximum order quantity | Enter the maximum order quantity. Leave it set to zero if no maximum order quantity is imposed. The maximum order quantity will apply to all products that use the product template. To make the maximum order quantity dynamic (so that differs for each product), read the next section in the User Guide titled, “How to Make the Min/Max Order Quantity Dynamic”. |
| Alert when maximum is not met | Enter the message to display to the shopper if the maximum order quantity is exceeded. |
| Styling | Color Use the color picker to choose the color of your preference for the alert messages. Alignment
Choose how you want the alert messages to be aligned. |
8. How to Make the Min/Max Order Quantity Dynamic. |
Return to top. |
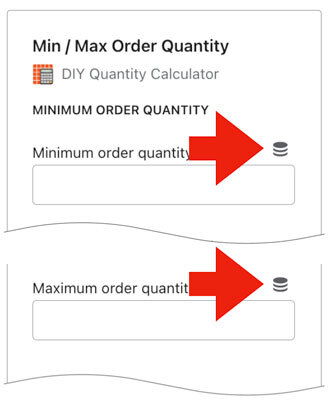
You can make the minimum and/or maximum order quantity dynamic so that they differ by product. To do so, access the panel that contains the Min/Max Order Quantity settings. Remove the value present in the field. Afterward, click on the Dynamic Resource icon.
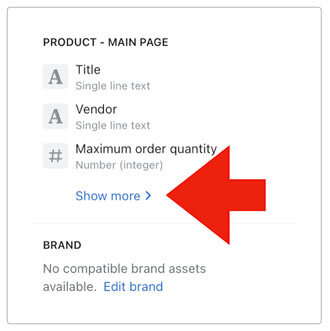
Click on the Show more link to reveal all the options (if necessary).
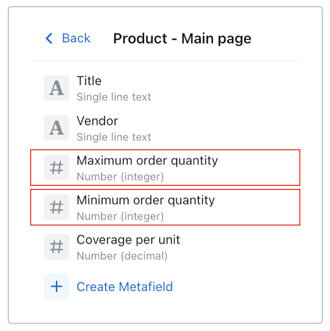
Choose the option for the Minimum order quantity or Maximum order quantity depending on which setting you are populating.
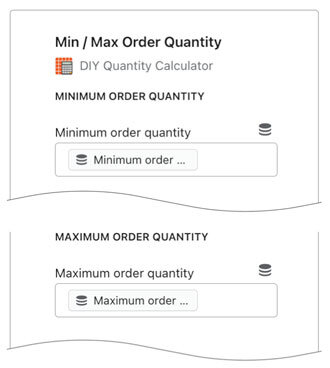
Afterward, your settings for Minimum order quantity and/or Maximum order quantity should resemble the following:
Before continuing, click the Save button to retain the updates to your settings.
To set the Minimum order quantity and/or Maximum order quantity for a product, use the Shopify ADMIN menu to navigate to the Products page and select it from the list. Scroll to the bottom of the product settings page and locate the section for Metafields. Enter the values you’d like to use for the product in the Minimum order quantity and/or Maximum order quantity fields. If you don’t want to enforce a limit on the number a customer can purchase, leave the Maximum order quantity field blank or enter zero.
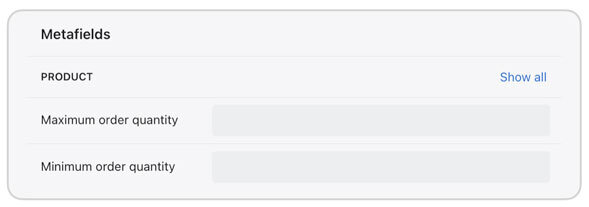
Repeat this action for every product that uses the product template and for which you want to specify a Minimum order quantity and/or Maximum order quantity.
9. Remove the Min/Max App Block from a Product Template. |
Return to top. |
If you decide not to use the Min/Max Order Quantity app block, you can temporarily hide it by clicking on its visibility icon in the list of app blocks shown for the Product template.

To permanently remove the app block, navigate to the app block settings, scroll to the bottom and click the link to delete the app block.

10. Min/Max Order Quantity: Your Customer’s Experience |
Return to top. |
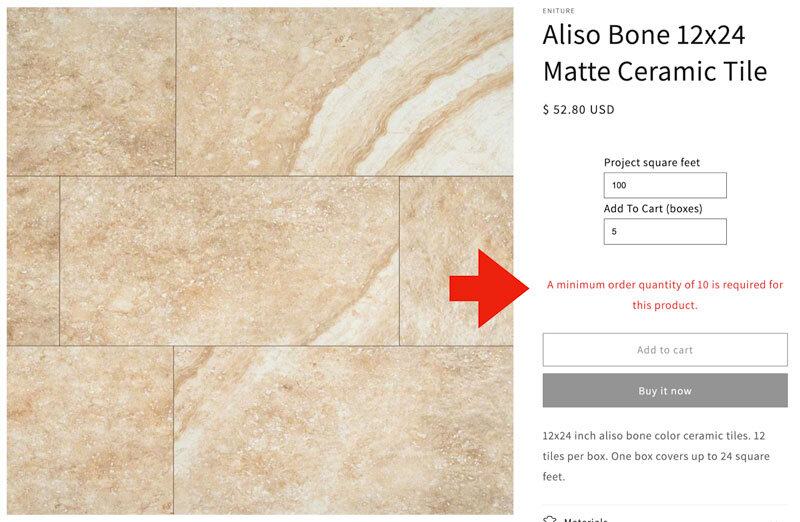
Below is an example of a product page that has the Min/Max Order Quantity app block enabled, and the shopper failed to meet the minimum order quantity. The Add to cart button will be disabled until the minimum order quantity requirement is met.
