$6.75 / month
14 day free trial
Improve your conversion rate and the shopping experience of tax exempt shoppers by allowing them to declare their tax exempt status during the checkout process. Without this app tax exempt shoppers must contact you about their tax exempt status, limiting the ability to do business with them to your regular business hours. Allowing shoppers to declare their tax exempt status during the checkout process returns your store to a 24/7 operation, increases the likelihood of order capture, and eliminates headaches for everyone.
GALLERY
SETUP & DEMO VIDEO (3 min)
Features
Turns your store into a 24/7 store front for tax-exempt shoppers.
Increases sales by providing a better user experience to tax-exempt customers.
Reduces your work load by enabling tax-exempt declaration during checkout.
Easily format the appearance of the tax-exempt widget to match your theme.
Easily replace the text on the tax-exempt widget to reflect your word and language preferences.
Receive email notifications when customers claim tax-exempt status.
Tag orders when new customer claim tax-exempt status or existing customers change their declaration.
Use the optional tax document upload utility to collect documents from customers that support their tax-exempt declaration.
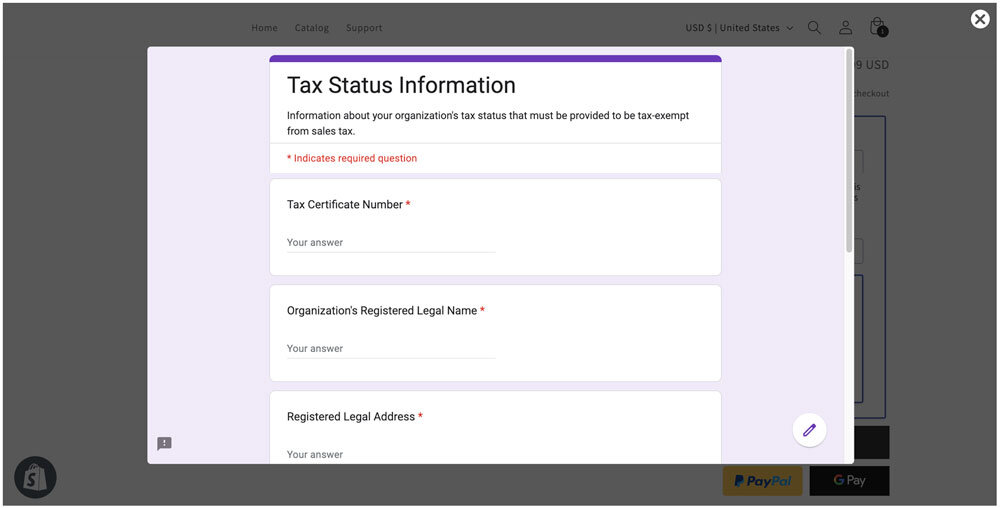
Embed links to forms to extend the functionality and collect VAT and other information.
Supports Online Store 2.0 themes.
Vintage themes were fully supported prior to January 2024 when Shopify deprecated support for them. If you installed the app on a Vintage theme prior to 2024, its settings can still be managed from within the app.
Current version: 1.0
Requirements
An Online Store 2.0 theme with a Cart page that is enabled with sections.
Vintage themes were fully supported prior to January 2024 when Shopify deprecated support for them. If you installed the app on a Vintage theme prior to 2024, its settings can still be managed from within the app.
FAQs
Will the app confirm a shopper’s tax exempt status?
No. It simply makes it more convenient for the shopper to indicate that they are tax exempt. You still need to perform the verification steps set forth by your state, province, or governing tax authority. You can include a link in the Tax Exempt Checkout widget to a page on your website where your customer can submit their information using a form or by uploading documents. Contact us if you need assistance doing this.
How will the app impact my existing tax exempt customers?
There is no impact. The app checks your store’s customer records when sufficient information is known about the shopper. If an entry for the shopper is found, the app honors the tax exempt setting in the record.
User’s Guide
Other information contained in this guide:
This document will be useful to merchants that still use a Vintage theme and need to convert the Cart theme page to the Online Store 2.0 theme architecture to enable the use of the DIY Tax Exempt Checkout app.
This document will be useful to merchants that use a theme that complies with Shopify’s Online Store 2.0 architecture, but the Cart theme page does not include the +Add blocks function to allow for the placement of the tax-exempt checkout widget.
Online Store 2.x Setup Instructions |
Return to top. |
Other information contained in this section:
1. Install the application from the Shopify App Store. |
Return to top. |
Log in to Shopify with the Store Owner credentials. You must be logged into Shopify as the Store Owner to perform this step because only the Store Owner can accept the charges associated with the app and authorize the permissions that are required by the app to function properly.
Click on Settings in the navigation menu that appears on the left of the screen.
Click on Apps and sales channels.
Click on the Customize your store button that appears above the top right hand corner of the list of installed apps. (Shopify constantly relabels this button, so it may be identified differently.)
You’ll be redirected to the Shopify App Store. Using the search field, search for “Tax Exempt Checkout” or “eniture”.
Locate the Tax Exempt Checkout app in the search results and click on it.
On the app’s listing page, click on the Add app button to initiate Shopify’s installation wizard.
Follow the prompts in the wizard until the installation process is complete.
2. Prepare Shopify to use the application |
Return to top. |
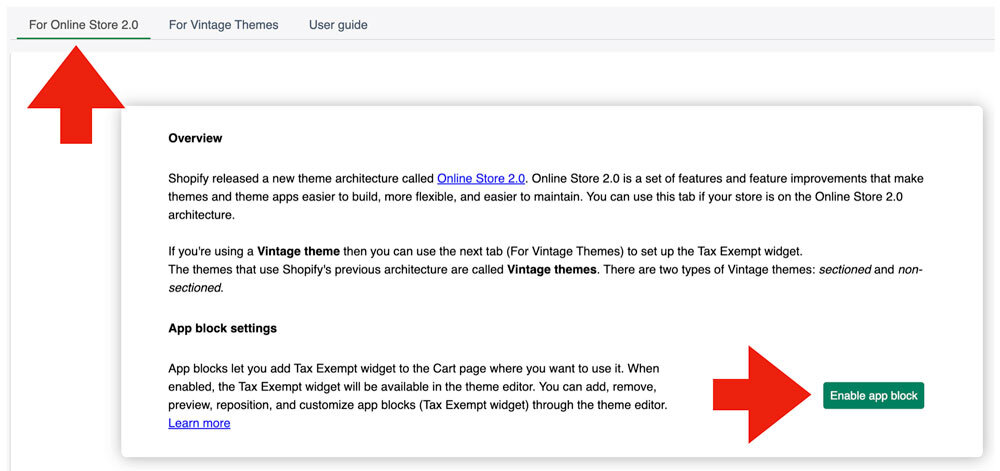
Navigate to the Tax Exempt Checkout app’s Settings page. Use the links at the top to ensure For Online Store 2.0 is selected. Next, click on the Enable app block button.
3. Add the App Block to the Theme’s Cart Template. |
Return to top. |
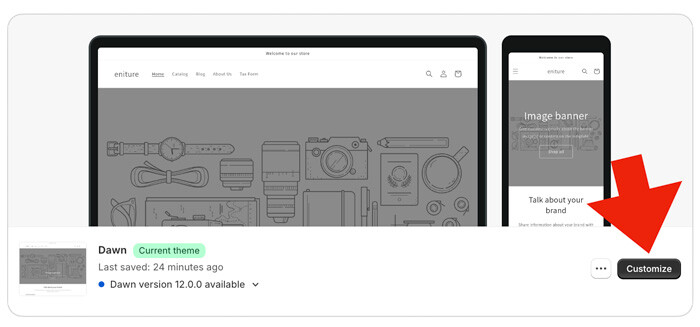
In the Shopify navigation menu, select Online Store > Themes. Click on the button labeled Customize.
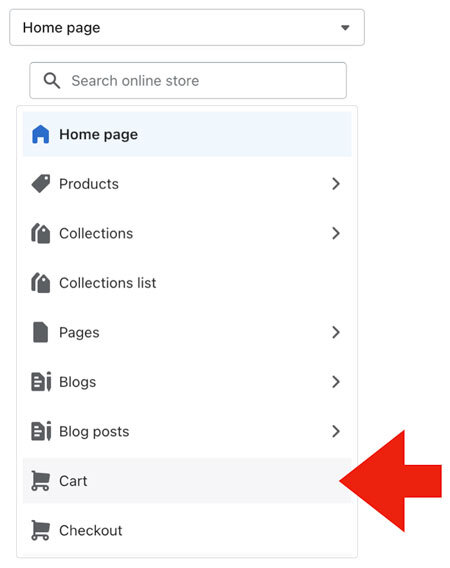
From the drop down at the top of the page, select Cart.
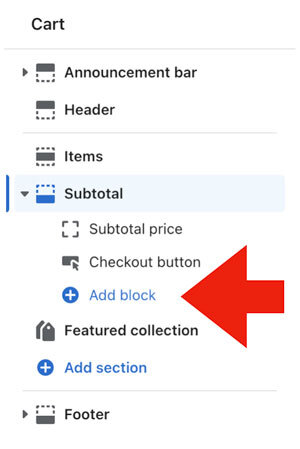
In the menu that appears in the left margin of the page, click on the Add block link in the Subtotal section.
In the list of available APPS, choose the Tax Exempt Checkout app.
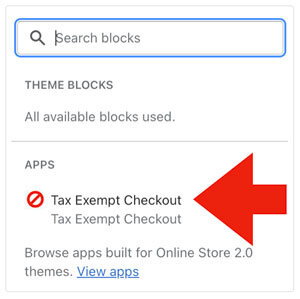
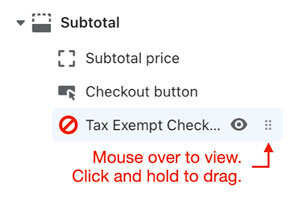
Afterward, the Tax Exempt Checkout app will appear in the list of blocks displaying on your Cart page. Mouse over it to reveal the controls for displaying and moving the app block. Use the move control to drag the Tax Exempt Checkout block to the location on the page where you want it to be visible. The most common is between the Subtotal price and Checkout button blocks.
4. Configure the App Settings. |
Return to top. |
Select the Tax Exempt Checkout app block in from the menu in the left margin. (The Cart template for the theme must be selected.) The settings for the app will appear in the menu in the right margin.
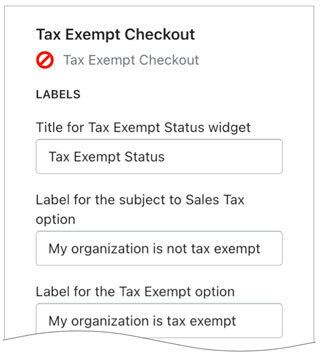
Use the instructions below to populate the settings to suit your preferences. Be sure to click the Save button located at the top right corner of your browser window to save your settings.
| Title for Tax Exempt Status widget | Enter the text you want used for the header of the Tax Exampt Status widget. |
| Label for the subject to Sales Tax option | Enter the label you want used for the Subject to Sales Tax option. The shopper will be charged sales tax if this option is selected and the ship-to address is located in an area for which you collect sales tax. |
| Label for the Tax Exempt option | Enter the label you want used for the Tax Exempt option. The shopper will not be charged sales tax if this option is selected and the ship-to address is located in an area for which you collect sales tax. |
| Make the Tax Exempt option the default option | Enable this checkbox if you want the tax-exempt option to be the default option. When enabled the tax-exempt option will be displayed first (above the “Subject to sales tax” option) and will be the initial active selection. |
| Preface text for the email input field | Enter the message you want to display above the email address field. You can include links to a popup form or page on your website to collect additional information required to document the visitor’s tax exempt status.
Related document:
|
| Email field placeholder | Enter the text you want to be used as the placeholder in the email address field. |
| Require email address? | Always require email address Choose this option if you want the visitor to always provide their email address before entering the checkout sequence (recommended). This option ensures that the customer’s profile record is always up to date. Require only when tax-exempt status is claimed
Choose this option if you want the email address field to be required only if the visitor is claiming tax-exempt status. This option has less friction for shoppers who aren’t tax-exempt. Don’t use this option if you have shoppers whose tax-exempt status can change from one purchase to the next. |
| Preface text for the certificate number field. | Enter the message you want to display above the certificate number field. You can include links to a popup form or page on your website to collect additional information required to document the visitor’s tax exempt status.
Related document:
|
| Certificate number field placeholder. | Enter the text you want to be used as the placeholder in the certificate number field. |
| Optional additional instructions | Enter the message you want to display above the tax document upload block. If left blank, nothing will display. You can include links to a popup form or page on your website to collect additional information required to document the visitor’s tax exempt status.
Related document:
|
| Tax document upload utility | The app has an optional tax document upload utility. Uploaded documents will be emailed, according to the chosen setting, to the recipient(s) identified on the Notifications page in the app settings. The upload utility will accept files up to 3MB in size.
Never display
Choose this setting if you won’t collect supporting documents from the shopper, or if you have added your own link to facilitate the document collection in the setting labeled: Preface text for the email input field. You can include HTML tags to format the text or provide a link to a page on your website. Require for new tax-exempt status declarations
The shopper will only be required to upload supporting documents when tax-exempt status has been claimed and the shopper is a new customer or an existing one whose customer record is not already marked as tax-exempt. An email address must be provided for this setting to be operational. Require for all tax-exempt status declarations
Require the shopper to upload supporting documents any time tax-exempt status is claimed. Alert text when validation has failed
Enter the text you want to display in an alert if the shopper attempts to upload a file that fails validation. |
| Tax certificate number capture | The app has an optional tax certificate input field. Choose the setting that matches your preference for these fields.
Never display
Choose this setting if you won’t collect a tax certificate number from the shopper. Optional for all tax-exempt status declarations
Choose this setting if you to give the shopper the option of providing a tax certificate number. Require for new tax-exempt status declarations
Require the shopper to provide a tax certificate number if they are claiming tax-exempt status on your website for the first time. Require for all tax-exempt status declarations
Require the shopper to provide a tax certificate number any time tax-exempt status is claimed. Alert text when validation has failed
Enter the text you want to display in an alert if the shopper attempts to upload a file that fails validation. |
| Spacing | Use the sliders to add space (padding) above and below the Tax Exempt Checkout widget. |
| Tax Exempt Dialog Box Styling | Background color Click on the setting and choose a background color for the widget. You can also enter the HEX value for your color of preference. You can use the Color Picker on w3schools.com as a resource if you aren’t familiar with HEX values. If you enter the HEX value, don’t enter the leading hashtag (#). Border thickness
Use the slider to change the width of the widget’s border. The larger the value, the thicker the border will be. Corner radius
Use the slider to round the corners of the border that surrounds the widget. The larger the value, the more round the corners will be. Border color
Click on the setting and choose a color for the widget border. You can also enter the HEX value for your color of preference. You can use the Color Picker on w3schools.com as a resource if you aren’t familiar with HEX values. If you enter the HEX value, don’t enter the leading hashtag (#). Input field border thickness
Use the slider to change the width of the border used for the input fields. The larger the value, the thicker the border will be. Input fields are: Email address, Certificate number, and the Tax document upload block. Input field corner radius
Use the slider to round the corners of the border that surrounds the input fields. The larger the value, the more round the corners will be. Input fields are: Email address, Certificate number, and the Tax document upload block. Input field border color
Click on the setting and choose a color for the borders of the input fields. You can also enter the HEX value for your color of preference. You can use the Color Picker on w3schools.com as a resource if you aren’t familiar with HEX values. If you enter the HEX value, don’t enter the leading hashtag (#). Input fields are: Email address, Certificate number, and the Tax document upload block. |
How To Remove The App |
Return to top. |
If you decide not to use the Tax Exempt Checkout app, you can temporarily hide it by clicking on its visibility icon in the list of app blocks shown for the Cart template.

To permanently remove the app block, navigate to the app block settings, scroll to the bottom and click the link to delete the app block.

To cancel the subscription charge, be sure to delete the app from your list of installed apps.
Vintage Theme Instructions |
Return to top. |
Vintage themes were fully supported prior to January 2024 when Shopify deprecated support for them. If you installed the app on a Vintage theme prior to 2024, you will still see the option For Vintage Themes in the app’s navigation menu, and its settings can still be managed from within the app. If you installed the app in 2024 or later, you will not see the option For Vintage Themes in the app’s navigation menu.
If you have the app installed on a Vintage theme and want it removed, open a support ticket by emailing support@eniture.com. In your email, include the URL of your store.
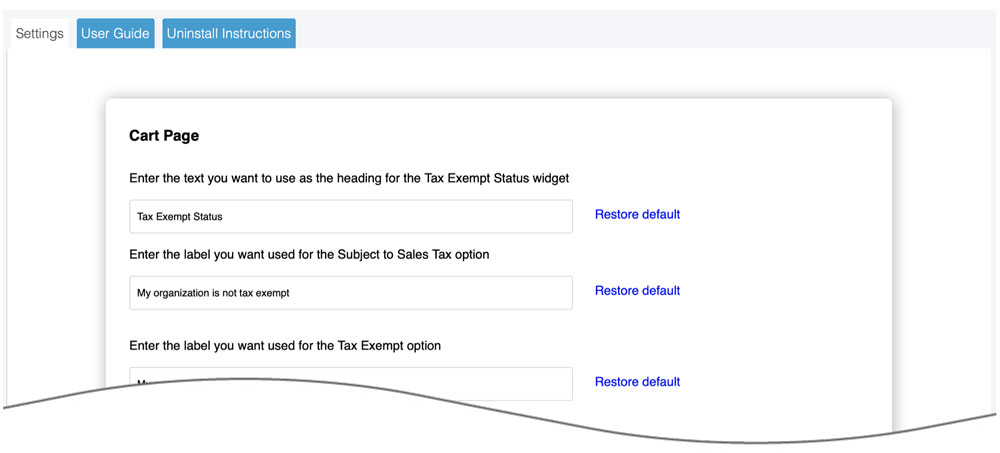
With For Vintage Themes selected in the app’s navigation menu, scroll down to the section titled, Tax Exempt widget customization.
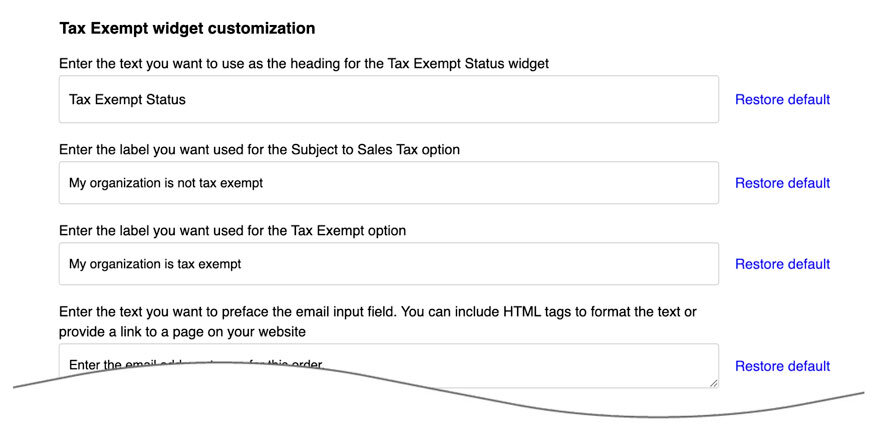
Use the instructions below to populate the settings to suit your preferences. Be sure to click the Save button located at the top right corner of your browser window to save your settings.
| Enter the text you want to use as the heading for the Tax Exempt Status widget | Enter the text you want to use for the header of the Tax Exampt Status widget. |
| Enter the label you want used for the Subject to Sales Tax option | Enter the label you want used for the Subject to Sales Tax option. The shopper will be charged sales tax if this option is selected and the ship-to address is located in an area for which you collect sales tax. |
| Enter the label you want used for the Tax Exempt option | Enter the label you want used for the Tax Exempt option. The shopper will not be charged sales tax if this option is selected and the ship-to address is located in an area for which you collect sales tax. |
| Enter the text you want to preface the email input field… | Enter the message you want to display above the email address field. You can include HTML tags to format the message and provide a link to a popup form or page on your website to collect information required to document the visitor’s tax exempt status.
Related document:
|
| Enter the placeholder text you want to show in the Email field | Enter the text you want to be used as the placeholder in the email address field. |
| Choose the border color for the tax exempt dialog box | Enter the HEX value for your color of preference fro the border. You can use the Color Picker on w3schools.com as a resource if you aren’t familiar with HEX values. When you enter the HEX value, don’t enter the leading hashtag (#). |
| Set the border width for the Tax Exempt Status widget in pixels. | Enter a value, in pixels for the width of the widget border. The larger the value, the thicker the border will be. |
| Require email address | The tax exempt widget prompts the user to provide their email address. Specify the desired user experience.
Always require email address
Choose this setting if you want the shopper to always enter an email address. Doing so ensures that the shopper is always associated with an existing customer record if one exists. You should choose this option if you have buyers whose tax-exempt status will change depending on who the purchase is for. Require email address only when tax-exempt status is claimed
Choose this setting if you want to require the shopper to enter an email address only when tax-exempt status is claimed. |
| Enter the text you want to preface the certificate number field… | Enter the message you want to display above the email address field. You can include HTML tags to format the message and provide a link to a popup form or page on your website to collect information required to document the visitor’s tax exempt status.
Related document:
|
| Enter the placeholder text you want to show in the Certificate number field. | Enter the text you want to be used as the placeholder in the tax certificate number field. |
| Tax document upload utility | The app has an optional tax document upload utility. Uploaded documents will be emailed, according to the chosen setting, to the recipient(s) identified on the Notifications page in the app settings. The upload utility will accept files up to 3MB in size.
Never display
Choose this setting if you won’t collect supporting documents from the shopper, or if you have added your own link to facilitate the document collection in the setting labeled: Enter the text you want to preface the email input field. You can include HTML tags to format the text or provide a link to a page on your website. Require for new tax-exempt status declarations
The shopper will only be required to upload supporting documents when tax-exempt status has been claimed and the shopper is a new customer or an existing one whose customer record is not already marked as tax-exempt. An email address must be provided for this setting to be operational. Require for all tax-exempt status declarations
Require the shopper to upload supporting documents any time tax-exempt status is claimed. Alert text when validation has failed
Enter the text you want to display in an alert if the shopper attempts to upload a file that fails validation. |
| Tax certificate number capture | The app has an optional tax certificate input field. Choose the setting that matches your preference for these fields.
Never display
Choose this setting if you won’t collect a tax certificate number from the shopper. Optional for all tax-exempt status declarations
Choose this setting if you to give the shopper the option of providing a tax certificate number. Require for new tax-exempt status declarations
Require the shopper to provide a tax certificate number if they are claiming tax-exempt status on your website for the first time. Require for all tax-exempt status declarations
Require the shopper to provide a tax certificate number any time tax-exempt status is claimed. Alert text when validation has failed
Enter the text you want to display in an alert if the shopper attempts to upload a file that fails validation. |
Notifications |
Return to top. |
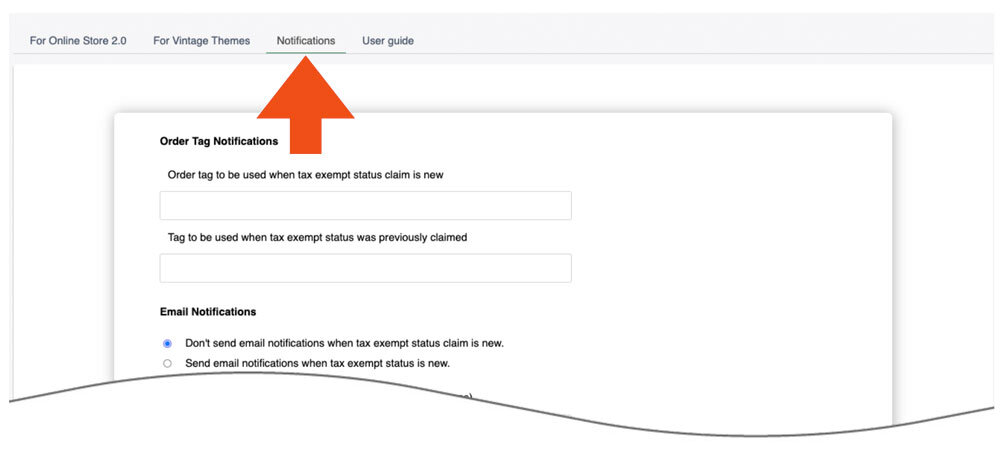
Notifications are common to both Online Store 2.0 and Vintage Themes.
| Order Tag Notifications |
Order tag to be used when tax exempt status claim is new
If you want to tag orders when a customer declares tax exempt status for the first time, enter the value to use for the tag here. Order tag to be used when tax exempt status was previously claimed
If you want to tag new orders that are placed by customers who previously declared tax exempt status, enter the value to use for the tag here. |
| Document Notifications |
Always send uploaded documents.
Choose this setting if you always want to receive uploaded documents supporting tax-exempt declarations. Send uploaded documents only when tax exempt status claim is new.
Choose this setting if you only wish to receive uploaded documents supporting new tax-exempt declarations. Email address(es) for email notifications
If you enabled email notifications, enter the email addresses of the recipients. Separate multiple email addresses with commas. These email addresses will also receive uploaded documents. Subject
Enter the text you want to appear in the subject line of the email notifications related to tax-exempt declarations. At the bottom of the page is a list of short codes that you can use as dynamic placeholders. For example, “{{order_number}}” will insert the order number into the line of text. |
| Email Notifications |
Don’t send email notifications when tax exempt status claim is new
Choose this setting if you don’t want email notifications sent when a tax exempt status claim is new. Send email notifications when tax exempt status claim is new
Choose this setting if you want email notifications sent when a tax exempt status claim is new. Email address(es) for email notifications
If you enabled email notifications, enter the email addresses of the recipients. Separate multiple email addresses with commas. These email addresses will also receive uploaded documents. Subject
Enter the text you want to appear in the subject line of the email notifications related to tax-exempt declarations. At the bottom of the page is a list of short codes that you can use as dynamic placeholders. For example, “{{order_number}}” will insert the order number into the line of text. Enter the text you want used in the body of email notifications
Enter the text to use in the body of the email notifications related to tax-exempt declarations. At the bottom of the page is a list of short codes that you can use as dynamic placeholders. For example, “{{order_number}}” will insert the order number into the body of text. |
What your shopper sees |
Return to top. |
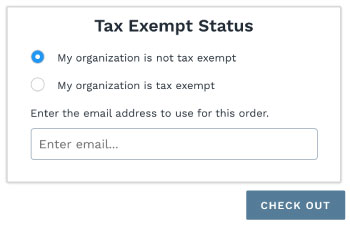
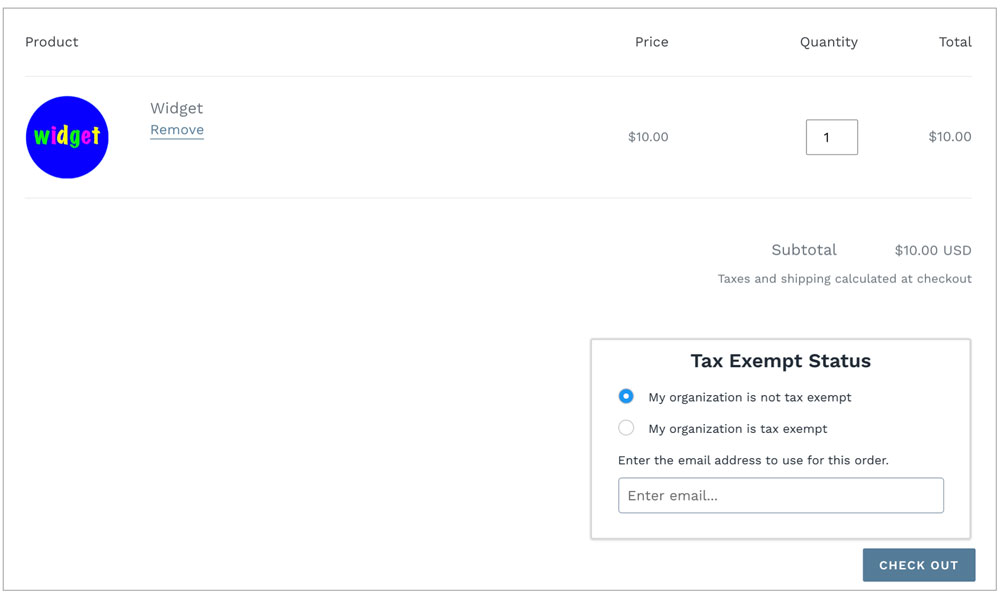
Your shopper will see the Tax Exempt Status widget when arriving on the Cart page. The exact appearance of the widget will depend on your settings.
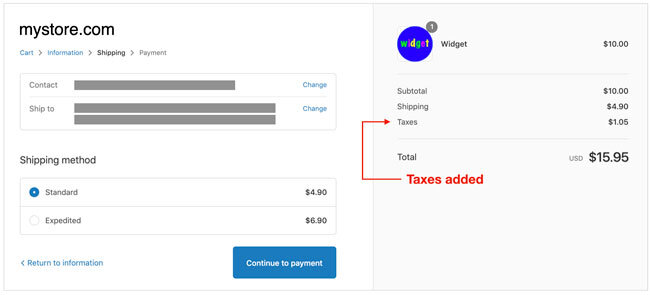
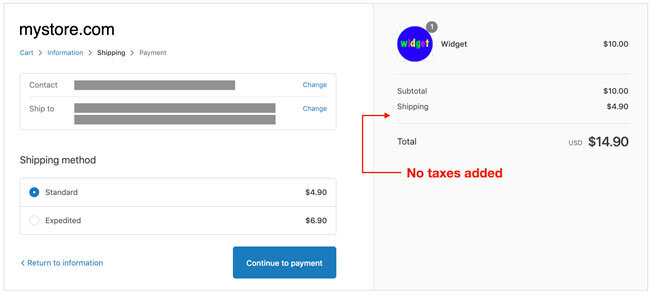
Taxes are applied and visible on the Shipping Methods page, which is the second of three pages in the Shopify checkout process. The images below show the appearance of the page when the address is located in an area for which taxes should be collected.
What you see |
Return to top. |
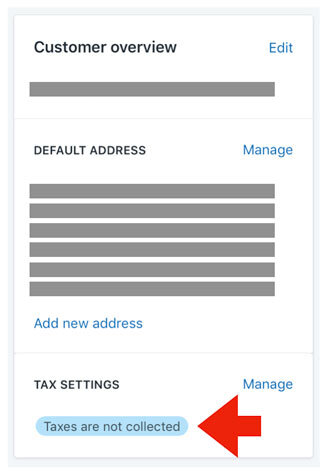
When a customer declares tax exempt status, you’ll see it reflected in the Customer overview widget when viewing the order.
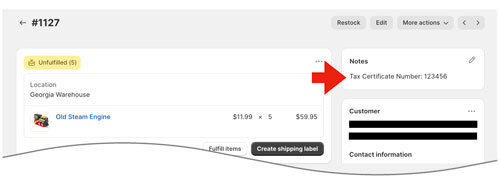
If the setting to capture the tax certificate number was used, the tax certificate number will appear in the order notes.
Uploaded tax documents are not stored in Shopify. Your settings allow you to specify where to email them, and under what circumstances. You should archive the tax documents attached to the emails according to your operating procedures.

