$5.00 / month
14 day free trial
The app allows the visitor to specify an interest in having the shipping charges billed to its account. When an interest is expressed, the visitor will be prompted to identify the shipping provider from the merchant’s list of supported providers and the account number. Afterward, an option to use the account to ship the order will be offered during checkout.
SETUP & DEMO TUTORIAL (4 min)
Features
$5/mo.
Allows a visitor the option of having shipping billed to its account with a shipping provider.
Merchants can specify the shipping providers it will accept for the “bill shipping to” arrangement.
All shipping methods are supported (e.g. postal, parcel, freight) so long as the shopper can provide a bill-to shipping account number.
Works anywhere in the world, for any type of shipping provider that offers account number billing to its customers.
Use Shopify’s App Blocks to customize the location and formatting of the shipping account capture widget on the Cart page.
Current version: 1.0
Requirements
Use of a Shopify theme that complies with Shopify Online Store 2.0 or later and supports App Blocks.
A Shopify plan that has the Third-party calculated shipping rates feature enabled. Learn more.
FAQs
What shipping providers will the app support?
The app allows the merchant to identify the shipping providers it is willing to accept bill-shipping-to information for. There are no restrictions on the providers the merchant can identify.
Will the app validate the shipping account number provided during checkout?
No. The app simply gives the visitor the option to identify a bill-to shipping provider listed as supported by the merchant, and enter an account number. The merchant is solely responsible for verifying the validity of the account number with the shipping provider before tendering the shipment, and for any charges the shipping provider may bill back if it is unsuccessful billing the account number provided.
User’s Guide
-
- Install the Application from the Shopify App Store.
- Create a Bill-to Shipping Provider
- Identify the Shipping Methods for the Provider
- Add the App Block to the Cart Template.
- App Block Settings.
- Add the App to Your Shipping Methods.
- Removing the App Block from a Product Template.
- Your Customer’s Experience
- What You See
1. Install the application from the Shopify App Store. |
Return to top. |
Log in to Shopify with the Store Owner credentials. You must be logged into Shopify as the Store Owner to perform this step because only the Store Owner can accept the charges associated with the app and authorize the permissions that are required by the app to function properly.
Click on Settings in the navigation menu that appears on the left of the screen.
Click on Apps and sales channels.
Click on the Customize your store button that appears above the top right hand corner of the list of installed apps. (Shopify constantly relabels this button, so it may be identified differently.)
You’ll be redirected to the Shopify App Store. Using the search field, search for “DIY Shipping Account Capture” or “eniture”.
Locate the DIY Shipping Account Capture app in the search results and click on it.
On the app’s listing page, click on the Add app button to initiate Shopify’s installation wizard.
Follow the prompts in the wizard until the installation process is complete.
2. Create a Bill-to Shipping Provider |
Return to top. |
This step will create an option in the bill-to-shipping-provider list.
However, make sure you execute the next step in the instructions to identify the services you will support for the provider. If you fail to do so, no options to bill shipping to the customer’s shipping account will be presented during checkout.
Using the Shopify ADMIN menu, select the app and then Settings.
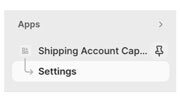
Click on the + Add a bill-to option link.

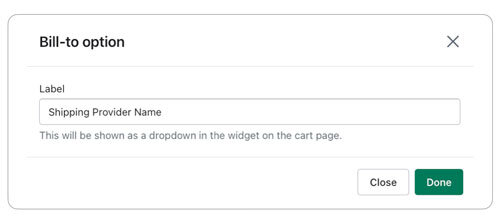
Enter the name of the shipping provider that you are willing to accept as a bill-shipping-to option. What you enter will be listed in the dropdown menu your customer sees as bill-shipping-to providers you support.
3. Identify the Shipping Methods for the Provider |
Return to top. |
Repeat this step for each shipping method option you want to offer to have billed to your customer’s account. Locate the shipping provider you created in the previous step and click on the + Add service option link.

Enter the information you want to be presented to the visitor.
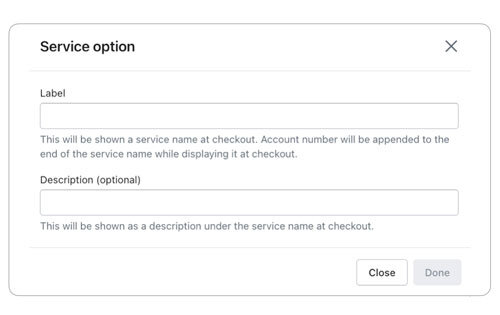
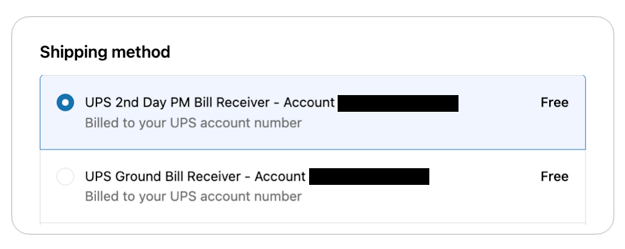
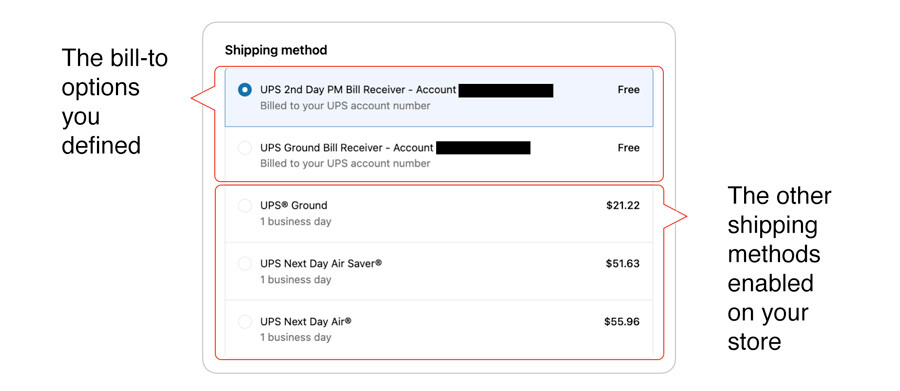
Label will be prominently displayed on the Cart page or during checkout. The optional Description will be less emphasized. In the image below, the label is on the top line of both shipping options, and the description is on the second line.
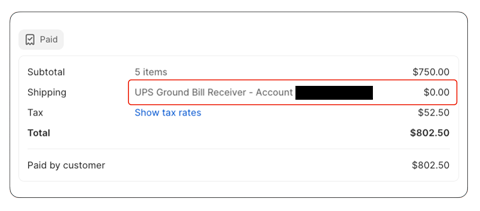
The words Bill Receiver – Account [account number] will appear after the text you enter in the Label field. If you enter “UPS Ground” in the Label field, it will be presented on the checkout page as UPS Ground Bill Receiver – Account [account number] as illustrated in the image below.
4. Add the App Block to the Cart Template. |
Return to top. |
Using the Shopify navigation menu, select Online Store > Themes. Click on the button labeled Customize.

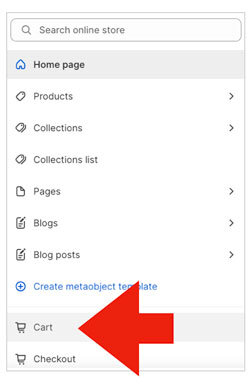
From the drop down at the top of the page, select Cart.
On the left hand side of the page you’ll see a list under the heading Subtotal. Click on the Add block entry. (If your user interface doesn’t resemble the image below, then you aren’t using Shopify Online Store 2.0 and you can’t use the Shipping Account Capture app. Contact Shopify support to find out how to upgrade.)
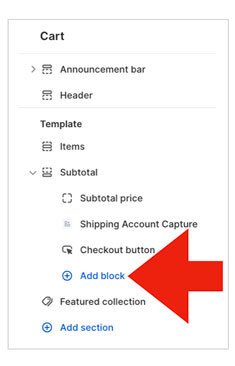
In the section labeled APPS, click Shipping Account Capture.
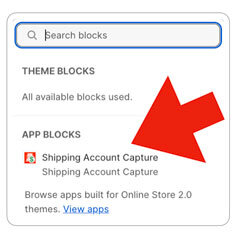
After the Shipping Account Capture app is added to the list of app blocks on your Cart page, hover over it to reveal the controls for displaying and moving it. Use the move control to drag the Shipping Account Capture app to the location on the page where you want it to be visible. The most popular location is directly above the Checkout button.

5. App Block Settings. |
Return to top. |
With the Shipping Account Capture app selected, you will see its settings. Follow the instructions below to customize how the shipping account capture widget will appear on the Cart page.
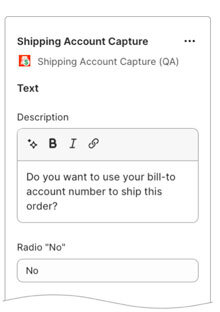
| Description | Enter the text you want to display to your visitor about having the shipping charges billed to its account. |
| Radio “No” | Enter the text to represent the visitor’s choice not to be presented with options to have shipping billed to its account. |
| Radio “Yes” | Enter the text to represent the visitor’s choice to be presented with options to have shipping billed to its account. |
| Dropdown option | Enter the text that the visitor will see prompting for the name of the bill-to shipping provider to use for the order. |
| Account number | Enter the text that will prompt the visitor to enter the account number to use for shipping. |
| Billing postal code | Enter the text that will prompt the visitor to enter the billing postal code associated with their shipping account. |
| Styling | The following settings govern how the widget that appears on the Cart page will appear to the visitor.
Text font
Choose the preferred font. Text color
Select the preferred color of the text. Background color
Identify the preferred background color for the Shipping Account Capture widget. Inner padding
Specify, in pixels, the amount of space between the Shipping Account Capture widget and the text it will contain. Top margin
Specify, in pixels, the amount of space between Shipping Account Capture widget and the element on the Cart page above it. (e.g. the Subtotal.) Bottom margin
Specify, in pixels, the amount of space between Shipping Account Capture widget and the element on the Cart page below it. (e.g. the Checkout button.) |
| Shadow | The following settings govern how the widget’s shadow appears on the Cart page.
Opacity
Changes the transparency of the shadow cast by the widget. Horizontal offset
Changes the direction of the widget’s shadow left or right. Vertical offset
Changes the direction of the widget’s shadow up or down. Blur
Causes the shadow to dissipate over a smaller or larger area. |
6. Add the App to Your Shipping Methods |
Return to top. |
Using the Shopify ADMIN menu, navigate to Settings > Shipping and delivery. Locate the shipping profile to which you want to add the Shipping Account Capture app. For the purpose of these instructions, the General shipping rates profile will be assumed. Access the shipping profile settings by clicking the “>” link.

Click the Add rate button.
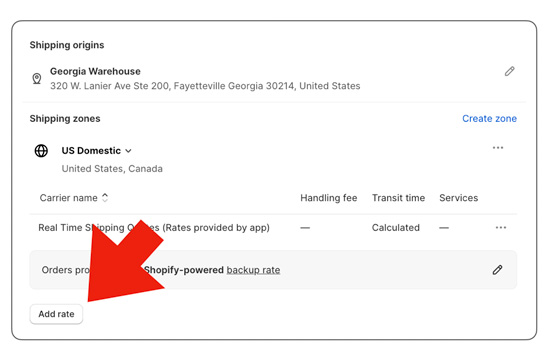
Choose the option to Use carrier or app to calculate rates and select Shipping Account Capture from the list. Make sure the Future services checkbox is enabled before clicking the Done button.
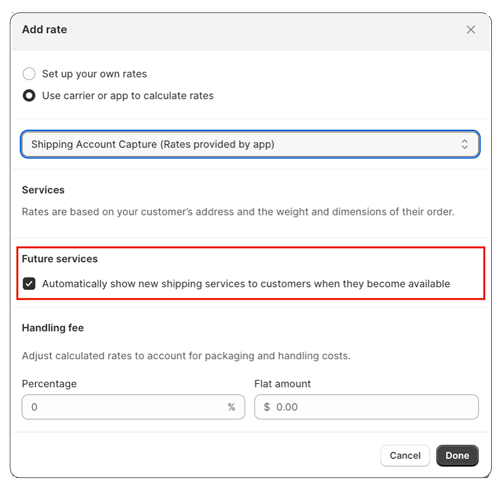
This will conclude the setup of the app. You may now conduct tests to see how the app performs for your store.
7. Remove the App Block from the Cart Template. |
Return to top. |
Should you decide not to use the Shipping Account Capture app, you can temporarily hide it by clicking on its visibility icon in the list of app blocks shown for the Cart template. (Refer to Step 4 for instructions on how to access the Cart template.)

To permanently remove the app block, navigate to the app block settings, scroll to the bottom and click the link to delete the app block.

To cancel the subscription charge, be sure to delete the app from your list of installed apps.
8. Your Customer’s Experience |
Return to top. |
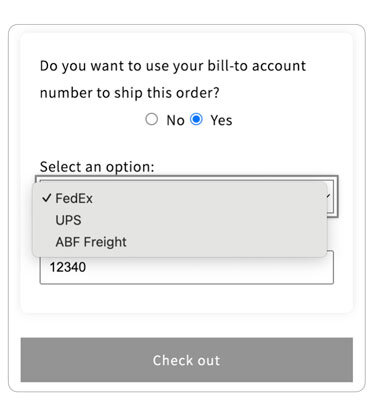
Below is an example of what a customer might see on the Cart page with the app installed on your store. The styling and options your customer sees will depend on the settings you choose to enable.
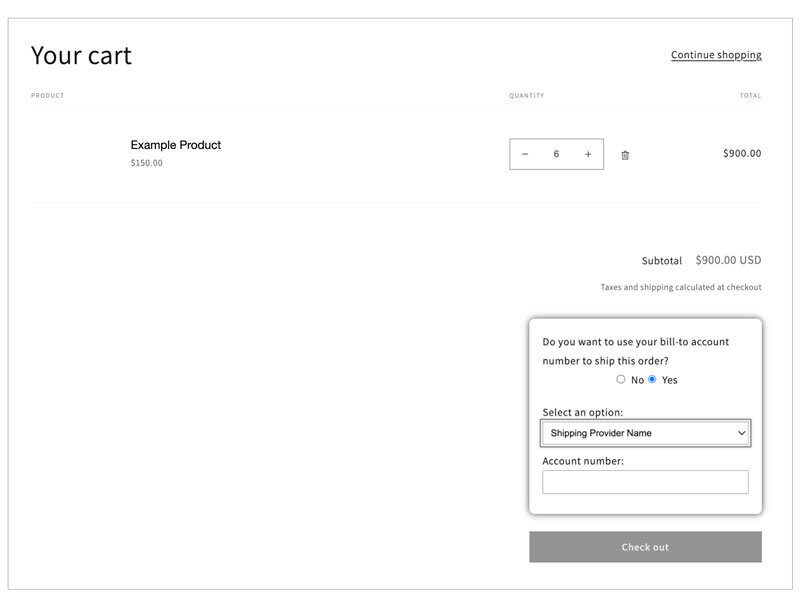
Your customer will see the service options you chose to offer to have billed to his/her account.
9. What You See. |
Return to top. |
If the visitor chooses an option provided by the Shipping Account Capture app, the chosen option and the account number is captured on the order.
