The app prompts visitors to accept your terms and conditions before entering the Shopify checkout page. The text accompanying the checkbox can be customized for any purpose and in any language. Include links to web pages that document the terms and conditions. Add the terms and conditions checkbox to the Cart page or product pages. Implement different product-specific terms and conditions acknowledgments for things like age requirements, export restrictions, resale prohibited, and others. Compatible with Buy-it-now buttons, including Amazon Pay, Apple Pay, Google Pay, Paypal, Shop Pay, and Venmo.
SETUP TUTORIAL & DEMO (7 min)
Features
Free
Compatible with Vintage and Online Store 2.0 themes.
Terms & conditions checkbox is added to the cart.
Accepting the terms and conditions is required before advancing to the checkout page.
Failure to accept the terms and conditions results in an on-screen alert.
Customize the alert message and format.
Use any language for the T&C checkbox text and alerts.
Embed links in the checkbox text to pages detailing the terms and conditions being accepted.
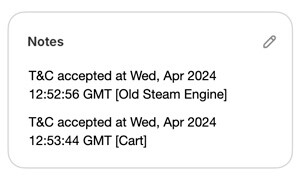
The date and time the terms and conditions are accepted are recorded with the order.
The Free plan does not include customer support.
$5/mo.
Customer support by phone and email
Adds product-level terms and conditions. (Requires an Online Store 2.0 theme.)
Use Shopify’s App Blocks to customize the location and formatting of the shipping account capture widget on the Cart page.
Supports dynamic checkout preferences.
Current version: 1.0
Requirements
The features available in the paid plan require the use of a Shopify theme that complies with Shopify Online Store 2.0 or later and supports App Blocks. A Vintage theme can be used for the features available on the Free plan, although an Online Store 2.0 theme is still recommended.
FAQs
What shipping providers will the app support?
The app will allows the merchant to identify the shipping providers it is willing to accept bill-shipping-to information for. There are no restrictions on the providers the merchant can identify.
Will the app validate the shipping account number provided during checkout?
No. The app simply gives the visitor the option to identify a bill-to shipping provider listed as supported by the merchant, and enter an account number. The merchant is solely responsible for any and all charges that it is ultimately billed for as a result of shipping with the shipping account information provided for the order.
User’s Guide
1. Install the application from the Shopify App Store. |
Return to top. |
Log in to Shopify with the Store Owner credentials. You must be logged into Shopify as the Store Owner to perform this step because only the Store Owner can accept the charges associated with the app and authorize the permissions that are required by the app to function properly.
Click on Settings in the navigation menu that appears on the left of the screen.
Click on Apps and sales channels.
Click on the Customize your store button that appears above the top right hand corner of the list of installed apps. (Shopify constantly relabels this button, so it may be identified differently.)
You’ll be redirected to the Shopify App Store. Using the search field, search for “DIY Terms & Conditions” or “eniture”.
Locate the DIY Terms & Conditions app in the search results and click on it.
On the app’s listing page, click on the Add app button to initiate Shopify’s installation wizard.
Follow the prompts in the wizard until the installation process is complete.
2. Choose a Plan |
Return to top. |
Use the Shopify menu to navigate to Apps > DIY Terms and Conditions > Plans.
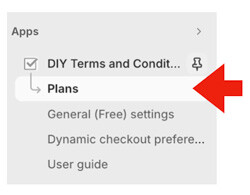
By default, you’ll be on the Free plan. It will allow you to add a customizable terms & conditions checkbox to the Cart page. If you want access to customer support and/or the features that are included in the Standard plan, click the button to activate the Standard plan.
3. Configure the Cart Page (Free) Settings |
Return to top. |
Use the Shopify menu to navigate to Apps > DIY Terms and Conditions > General (Free) settings.
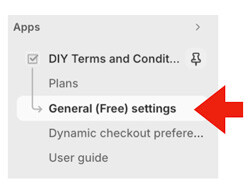
In the Themes dropdown, select the theme to which you want to add the Terms & Conditions checkbox.
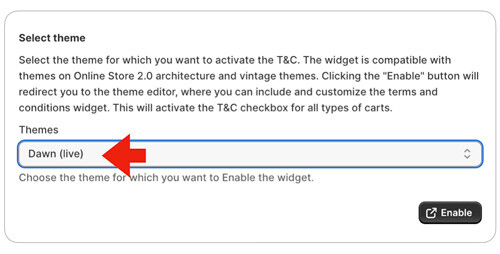
Afterward, click the Enable button. You’ll be redirected to the app settings for the Cart theme page.
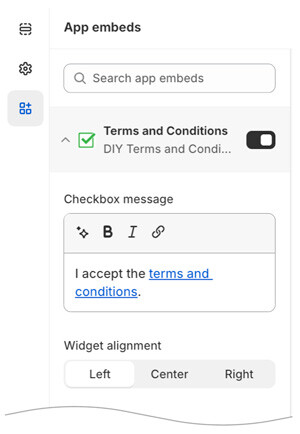
Use the instructions below to configure the content and appearance of the Terms & Conditions checkbox on the Cart page.
| Checkbox message | Enter the text you want displayed adjacent to the checkbox used to accept the terms and conditions. |
| Widget alignment | Choose how you want the checkbox and its label aligned (Left | Center | Right) relative to the button used to advance the shopper to the Checkout page. |
| Alert message | Enter the text for the message that will be presented if the customer attempts to advance to the checkout page without accepting the terms and conditions. |
| Alert message shows… | Choose how the alert message will be presented to the customer.
As a popup
The alert message will appear as a popup at the top-center of the page. The appearance of the alert will depend on the browser being used. Other settings for color and alignment will not influence the appearance of the popup alert. Inline before the checkbox
The alert will appear above the checkbox that must be enabled by the visitor before advancing to the Checkout page. Inline after the checkbox
The alert will appear below the checkbox that must be enabled by the visitor before advancing to the Checkout page. |
| Alert message color | This setting affects the color of the inline message only (not the popup). Click on the color swatch to reveal color options for the inline message. |
| Inline alert alignment | Choose how you want the alert to display (Left | Center | Right) relative to the terms and conditions checkbox and its label. |
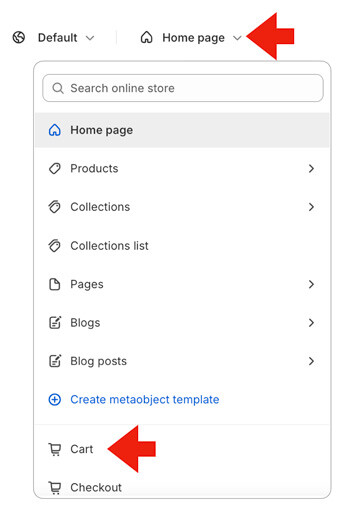
Afterward, choose the theme page for the Cart using the dropdown field.
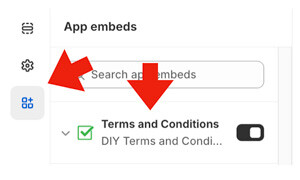
Click on the embedded apps icon and the entry for the Terms and Conditions app.
4. Configure the product page settings |
Return to top. |
To introduce the terms and conditions checkbox to product pages, you must be on the paid plan and be using an Online Store 2.0 theme.
4a. Enable the App for Product Theme Templates |
Return to top. |
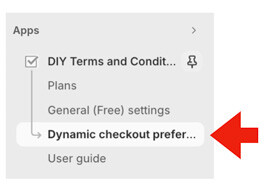
Use the Shopify menu to navigate to Apps > DIY Terms and Conditions > Dynamic checkout preferences.
Before enabling the DIY Terms & Conditions app for your product pages, choose an option for the consent event, and click the Save button.
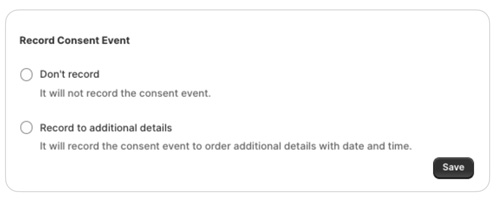
| Record Consent Event | Don’t record Choose this option if you don’t want to record the acceptance event of the terms and conditions. Record to additional details
Choose this option if you want the time and date stamp of the acceptance event recorded to the Additional Details widget. |
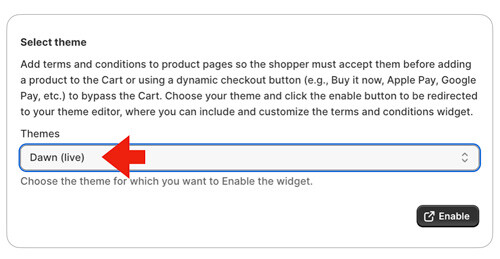
Next, use the dropdown field in the Select theme section to select the theme you want to add the product page Terms & Conditions checkbox to. Afterward, click the Enable button. You’ll be redirected to the Default product theme page.
4b. Identify/Create the product theme templates(s) |
Return to top. |
Enabling the Product T&C Block on the Default theme page will add a terms and conditions checkbox to every product that uses the default theme page. If instead, you want to introduce a terms and conditions checkbox to only certain products, use the theme page dropdown field to choose Products…
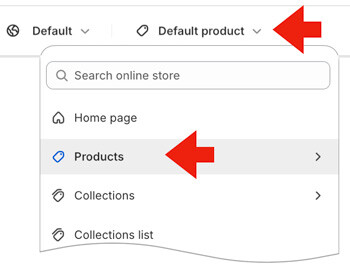
…and then click the Create template link.
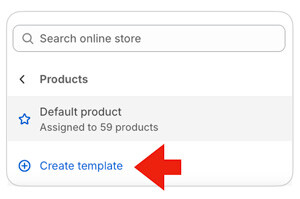
Enter a name for the template and then choose which existing template it will be cloned from. Most often, the new product theme template will be based on the Default product template.
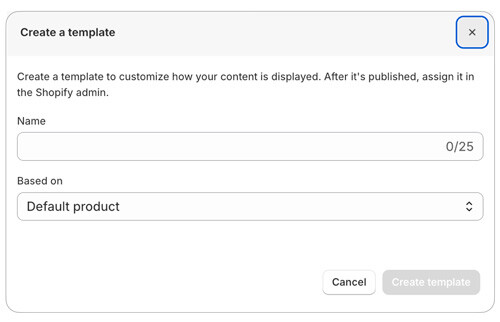
Repeat these steps to create a different product theme templates for each terms and conditions statement you need to introduce. For example, if you have a group of products whose sale is restricted by age and another that is restricted for export, create unique product theme templates for each group.
4c. Add the T&C checkbox to the product theme template |
Return to top. |
Use the theme page dropdown, select Products…

…and then the product theme template you want to add the terms and conditions checkbox to.
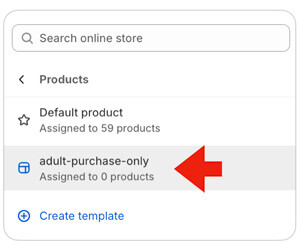
At the top of the navigation menu on the left side of the page, make sure the option for Sections is selected.
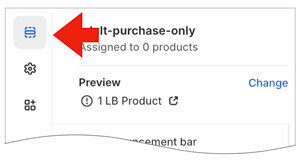
In the Template > Product information section of the left-side navigation, confirm that the Product T&C Block is visible. If it isn’t, click the Add block link.
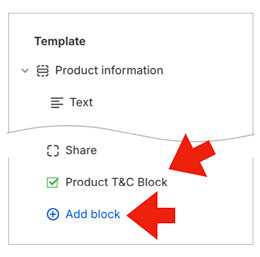
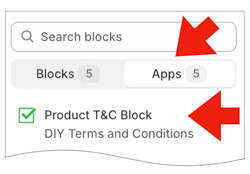
If you need to add the Product T&C Block, after clicking on the Add block link click on Apps and then the app from the list of available app blocks.
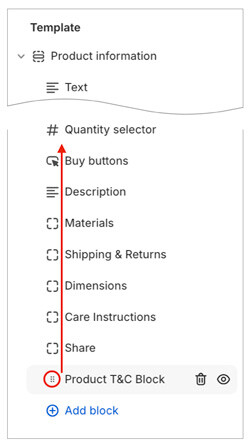
Hover over the Product T&C Block to reveal its controls and use the grab handle to relocate the T&C checkbox to your preferred location. Usually, this will be directly above the Buy buttons.
4d. Configure the T&C checkbox settings |
Return to top. |
Click on the Product T&C Block entry.
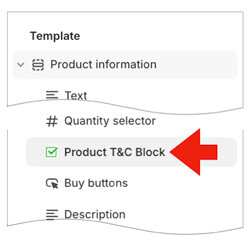
The app block settings will appear on the left or right side of your browser depending on the width of your browser window. Use the instructions below to configure the settings for the terms and conditions checkbox on this product theme template.
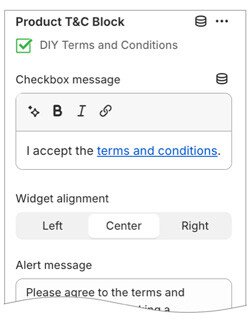
| Checkbox message | Enter the text you want to accompany the terms and conditions acceptance checkbox. |
| Widget alignment | Choose how you want the checkbox and the accompanying text to align. |
| Alert message | Enter the message to display to the visitor if a buy button is selected prior to accepting the terms and conditions. |
| Alert message shows… | As a popup The alert message will appear as a popup at the top center of the page. Other than the message itself, there are no formatting options available for this option. Inline before the checkbox
The alert message will appear above the terms and conditions checkbox and text. Inline after the checkbox
The alert message will appear below the terms and conditions checkbox and text. |
| Alert message color | Click on the color swatch and choose a color for the inline alert message. W3Schools has a good color picker if you’d like to search for a particular HEX color value. |
| Inline alert alignment | Select how you want the inline alert message to be aligned. |
| How will the app block be used? | To acknowledge a restriction Choose this setting if the app block will be used to acknowledge a restriction, such as age. In this case, you should disable the dynamic checkout preferences (e.g. “Buy it now” button) so the visitor can’t skip the Cart page where the checkbox for the store’s terms and conditions must be accepted. To accept the general terms and conditions
Choose this setting if the app block will be used to accept the store’s general terms and conditions. In this case, the visitor may use one of the enabled dynamic checkout options (e.g. “Buy it now” button) to advance straight to the checkout page. |
| Dynamic checkout preferences | Dynamic checkout buttons allow visitors to skip the Cart page and directly enter the Checkout page. Enable the checkboxes for the dynamic checkout buttons on your website that should require acceptance of the terms and conditions. |
5. Hide/Remove App from the Theme Template. |
Return to top. |
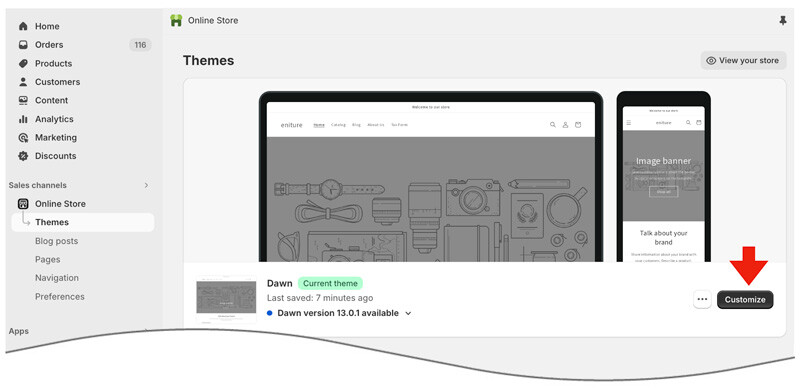
Use the Shopify ADMIN menu to navigate to Online Store > Themes and then click the Customize button for the theme you want to update.

5a. Hide/Remove from the Cart page |
Return to top. |
Choose the theme page for the Cart using the dropdown field.

Click on the embedded apps icon and then toggle off the setting for the Terms and Conditions app.
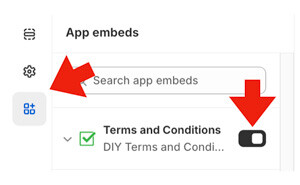
5b. Hide/Remove from the product pages |
Return to top. |
Choose Products from the list of theme templates…

…and select the product theme template you want to update from the list.

Locate the app block from the list, and hover over it to make the controls visible. Click the trashcan icon to delete it, or the eyeball to toggle visibility off.

5c. Uninstall the Terms & Conditions app |
Return to top. |
To permanently remove the app and cancel the subscription charge, use the Shopify ADMIN menu to navigate to Settings > Apps and sales channels. Locate and hover over DIY Terms and Conditions in the list of installed apps, and click on the Uninstall link.

6. Your customer’s experience |
Return to top. |
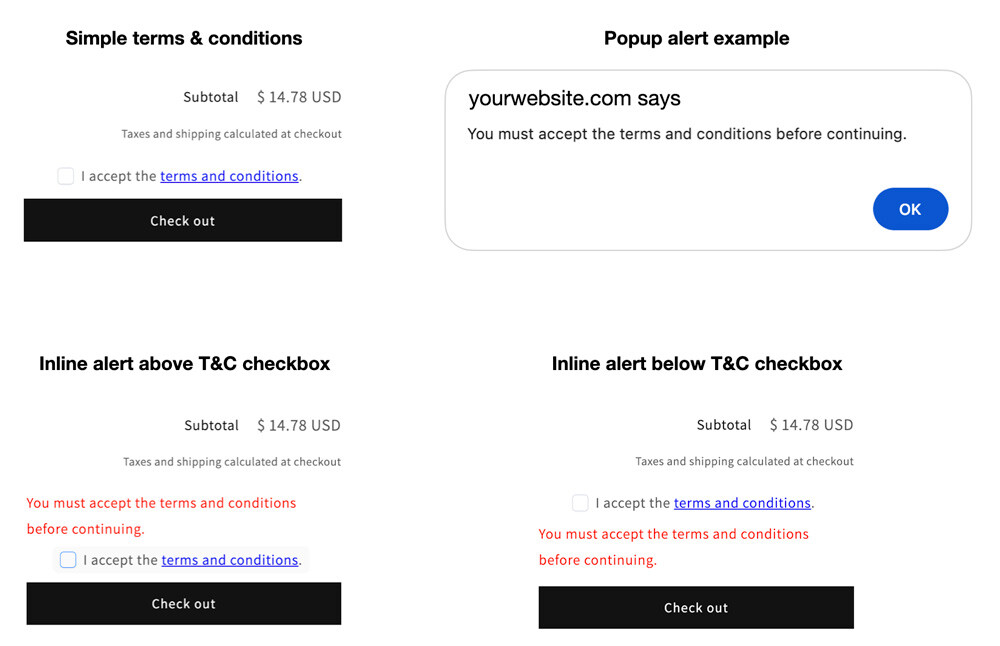
Below are examples of what a customer might see on the Cart page. The wording, styling, and options will depend on the settings you choose to enable. The first example shows the presentation of a simple terms and conditions statement. The remaining three show how the alert message can be presented if the visitor clicks the Check out without accepting the terms and conditions. The terms and conditions checkbox statement and the alert message are customizable.
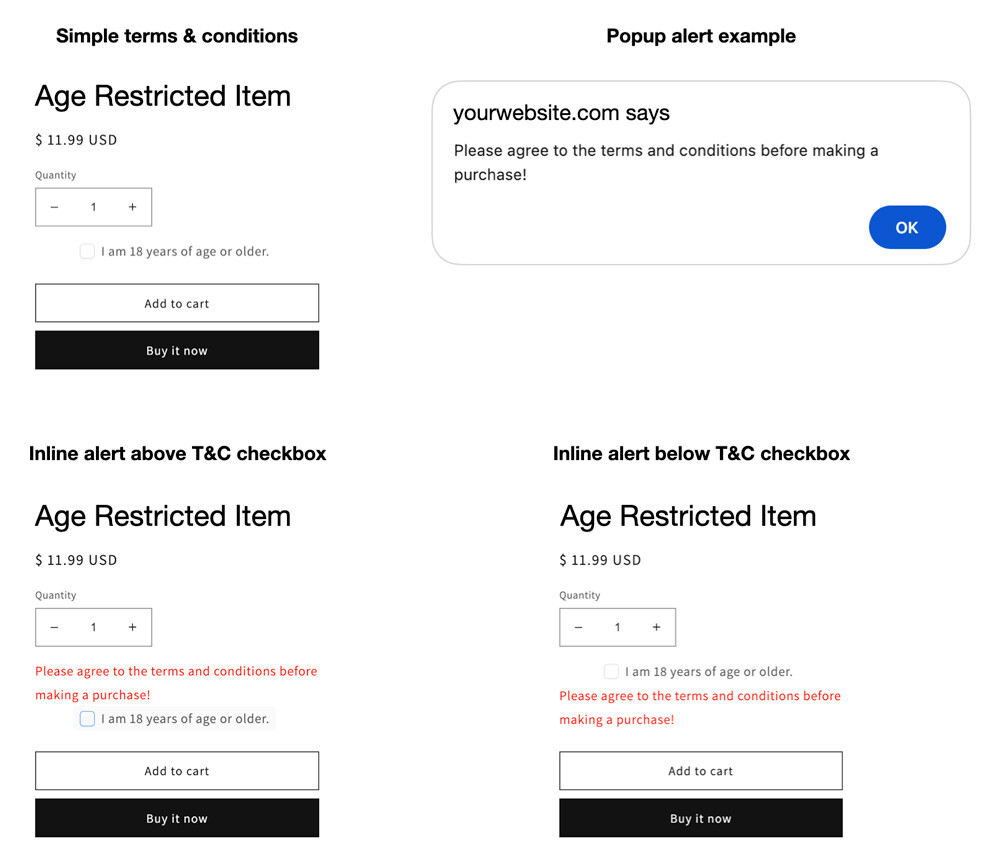
Below are examples of what a customer might see on a product page that uses a template that provides a simple terms and conditions statement related to age. The wording, styling, and options will depend on the settings you choose to enable. The first example shows the presentation of the simple terms and conditions statement. The remaining three show how the alert message can be presented if the visitor clicks the Add to cart or Buy it now buttons without accepting the terms and conditions. The product-specific terms and conditions acceptance requirement can also be enabled for other dynamic checkout buttons. The terms and conditions checkbox statement and the alert message are customizable.
7. What you see. |
Return to top. |
If you are on the app’s paid plan, when an order is placed that requires the acceptance of any terms and conditions, you have the option to have the consent event written to the order. Below is an example of an order that required acceptance of a product’s terms and conditions, and acceptance of a general terms and conditions statement for the contents of the Cart. In the example, the consent events are written to the Order Notes. You have the option of having them written to the Order Additional Details instead, or not at all. If only one of the acceptance events is required (only for the product or only for the Cart), then only the details for the one consent event will be recorded.
