 | LTL Freight QuotesCortigo Edition for Magento 2.x |
Cortigo TMS is an online Transportation Management System (TMS) allowing users to take advantage of a state of the art TMS while still leveraging their existing carrier relationships and pre-negotiated rates. Cortigo TMS uses your existing Carrier Credentials to retrieve your negotiated LTL freight pricing, takes action on them according to the extension settings, and displays the calculated result as shipping charges in the Magento shopping cart. To establish a Cortigo TMS account click here to access the new account enrollment form.
Features
Three Rating Options: Cheapest, Cheapest Options and Average.
Create a custom label to identify the freight charges in the shopping cart and checkout pages. The default is “Freight”, but you might change it to “LTL Freight”, for example. (Cheapest and Average methods only.)
Control the number of LTL freight options displayed in the shopping cart. (Cheapest Options method only.)
Choose to include transit time estimates with the rate quote(s). (Cheapest and Cheapest Options methods only.)
Limit the carrier list to just your preferred carriers.
Identify product specific freight classes.
Support for variable products.
Option to determine a product’s class using the built in density calculator.
Elect to include residential delivery fees in the returned quotes.
Choose to include fees for lift gate service at the destination address.
Mark up the quoted rates by a percentage or dollar figure.
Intelligently recognizes when the shopping cart contains products that will ship LTL freight and obtains LTL quotes only in those instances.
Doesn’t interfere with installed plugins for FedEx, UPS and USPS when the shopping cart doesn’t contain a product that will ship LTL freight.
LTL freight charges appear in the Shopping Cart, on the Checkout Page, in the Sales Order and on the customer’s order acknowledgement/receipt.
Current version: 1.0.0
Requirements
An installation of Magento CE (Version 2.x).
Your Cortigo TMS Shipper ID.
Your username and password to the Cortigo TMS online shipping system.
Your Cortigo TMS API access key.
FAQ’S
How do I get this module?
This module can be downloaded from this website after selecting a subscription package. It will also be available from Magento Connect, Magento’s online marketplace for extensions. If you download it from Magento Connect, you will still need to return to eniture.com to choose a subscription package and obtain a license key.
Will this work with Magento Enterprise Edition?
We have reports of companies using the module successfully in Magento Enterprise. You can install a trial version and verify that it will work for you. Be advised though, we can not provide support for installations on Magento Enterprise Edition.
How do I get a Cortigo TMS account number?
Click here to access the new account enrollment form.
Where do I find my Cortigo TMS username and password?
Usernames and passwords are issued when registering to use the Cortigo TMS online shipping system. If you’ve misplaced them email support@cortigo.com.
How do I login to Cortigo TMS?
If you have your Cortigo TMS username and password but can’t seem to find the login page, click here to access it.
Where do I get my Cortigo TMS authentication key?
Email support@cortigo.com
How do I get a license key for this Magento module?
You must register your installation of the module, regardless of whether you are taking advantage of the trial period or purchased a license outright. At the conclusion of the registration process an email will be sent to you that will include the license key. You can also login to eniture.com using the username and password you created during the registration process and retrieve the license key from the My Licenses tab.
How do I change my license from the trial version to one of the paid subscriptions?
Login to eniture.com and navigate to the My Licenses tab. There you will be able to manage the licensing of all of your Eniture Technology extensions.
How do I install the extension on another website?
The extension has a single site license. To use it on another website you will need to purchase an additional license. If you want to change the website with which the extension is registered, login to eniture.com and navigate to the My Licenses tab. There you will be able to change the domain name that is associated with the license key.
Do I have to purchase a second license for my staging or development site?
No. Each license allows you to identify one domain for your production environment and one domain for your staging or development environment. The rate estimates returned in the staging environment will have the word “Sandbox” appended to them.
Why isn’t the module working on my other website?
If you can successfully test your credentials using the Test Connection button (System > Configuration > Cerasis LTL Settings > Connection Settings) then you have one or more of the following licensing issues: 1) You are using the license key on more than one domain. The licenses are for single sites. You will need to purchase an additional license. 2) Your trial period has expired. 3) Your current license has expired and we have been unable to process your form of payment to renew it. Login to eniture.com and go to the My Licenses tab to resolve any of these issues.
Why were the shipment charges I received on my carrier invoices different than what was quoted by the module?
The rates will be the same if the shipment parameters used to obtain the quote are exactly the same as those that were used for the invoice. Compare the shipment parameters in the application with those on the invoice. Pay close attention to freight class, product weight, dimensions and various accessorial fees like residential delivery. Consider making changes as needed. Remember that the weight of packaging materials is included in the weight of the shipment and that your use of pallet or box size may have an impact on the shipment’s billable weight. If you are unable to reconcile the differences contact the carrier that issued the invoice and request assistance.
What happens when my shopping cart contains products that ship LTL and products that would normally ship FedEx or UPS?
If the shopping cart contains one or more products tagged to ship LTL freight, all of the products in the shopping cart are assumed to ship LTL freight. To ensure the most accurate quote possible, make sure that every product has a freight class, weight and dimensions recorded.
What happens if I forget to identify a freight classification for a product?
In the absence of a freight class, the module will attempt to calculate the freight classification using the density calculation method. To do so the products weight and dimensions must be recorded. This is not a reliable alternative and identifying the proper freight class will always return the most reliably accurate result.
How do I find out what freight classification to use for my products?
Refer to old invoices or request assistance from one of the carriers with whom you have an account relationship. You might also consider getting a subscription to ClassIT offered by the National Motor Freight Traffic Association (NMFTA). Visit them online at nmfta.org.
Why do I sometimes get a message that a shipping rate estimate couldn’t be provided?
There are several possibilities:
There wasn’t enough information about the weight or dimensions for the products in the shopping cart to retrieve a shipping rate estimate.
The Cortigo TMS web service isn’t operational.
Your Cortigo TMS account has been suspended or cancelled.
Your subscription to the application has expired because payment could not be processed.
There is an issue with the Eniture Technology servers.
There is an issue with the server that hosts your installation of Magento.
User’s Guide
If you are taking advantage of a trial subscription, the plugin will stop working when the trial period ends. Be sure to read the Manage Your License section to learn how to upgrade your subscription.
Overview
Setting up the application to display LTL freight quotes consists of the following steps:
Other information contained in this guide:
1. Download the LTL Freight Quotes module |
Return to top. |
When you pick a subscription package you will be presented with a registration form. The email address and password you enter will serve as your credentials to eniture.com. Use these to access your customer dashboard where you can download the extension, manage your licenses and update your payment information.
If you selected a trial subscription an email will be sent to the address provided. It contains a button you need to click on to verify that the email address you provided is a valid one. You must click this button to complete the activation of your account and the license. Check your junk folder for the email if it doesn’t appear in your inbox within a few minutes. Paid subscriptions are automatically activated and a verification email is not sent.
To download the installation file, login to eniture.com and select the Downloads tab of the customer dashboard. Next, click on the Download code link associated with the Cortigo LTL Freight Quotes module. Save it to a familiar location. You will need to navigate to the file during the installation process.

2. Prepare your server to perform the module installation |
Return to top. |
3. Install the module |
Return to top. |
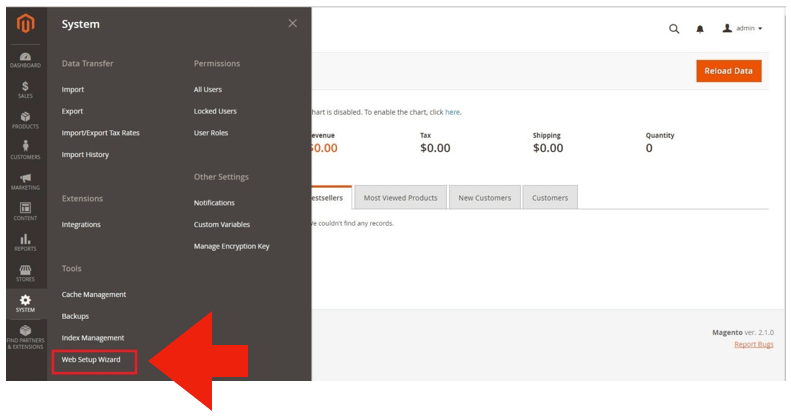
Extract the contents of the ZIP file you downloaded in Step 1. Put the Cortigo folder in the /app/code folder. Login to the Magento Admin Panel and navigate to System > Web Setup Wizard.
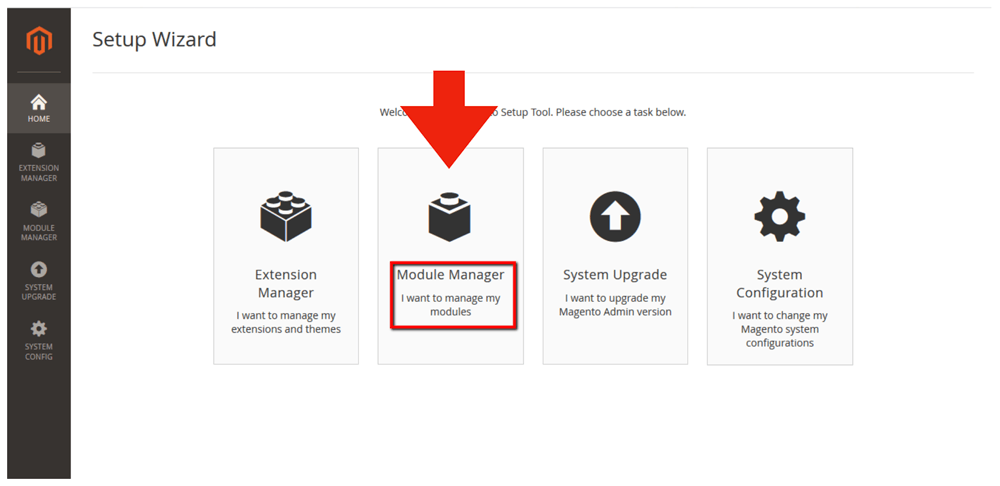
Click on the Component Manager tile.
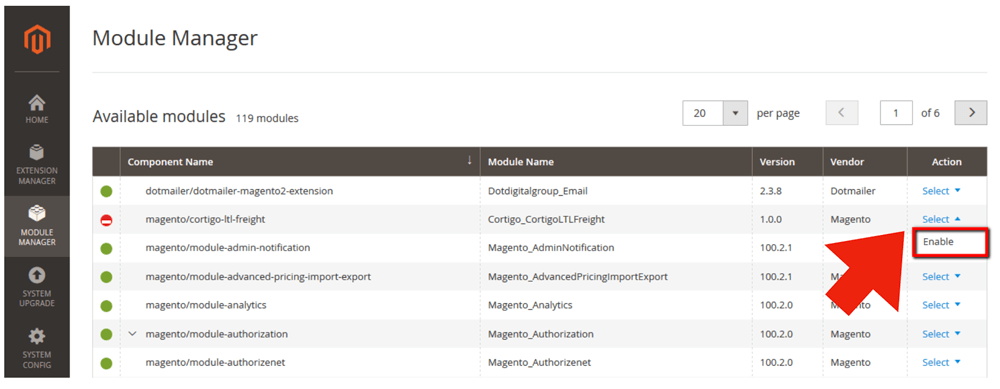
Locate the module by scrolling through the Component Name column and then click Select > Enable.
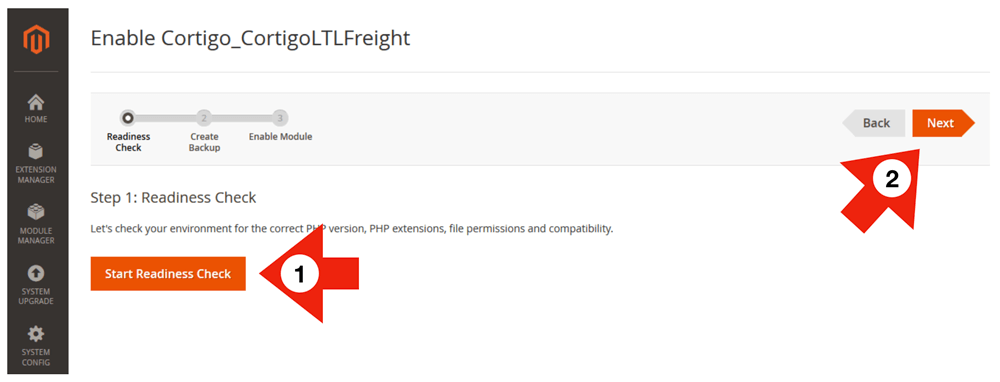
On the Step 1: Readiness Check page, click the Start Readiness Check button and after readiness is confirmed, click the Next button.
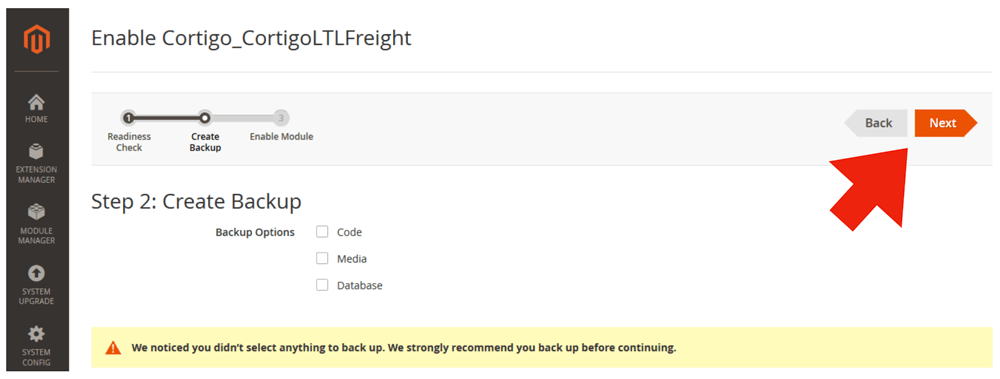
On the Step 2: Create Backup page, uncheck all the options and then click the Next button.
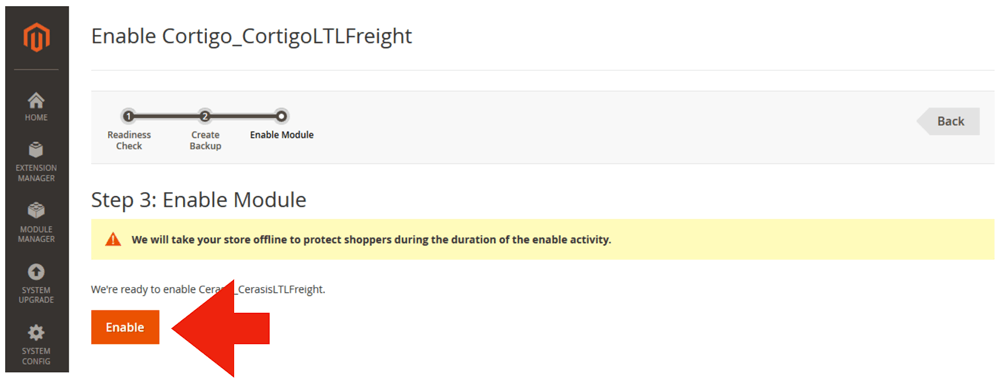
On the Step 3: Enable Module page, click the Enable button to continue.
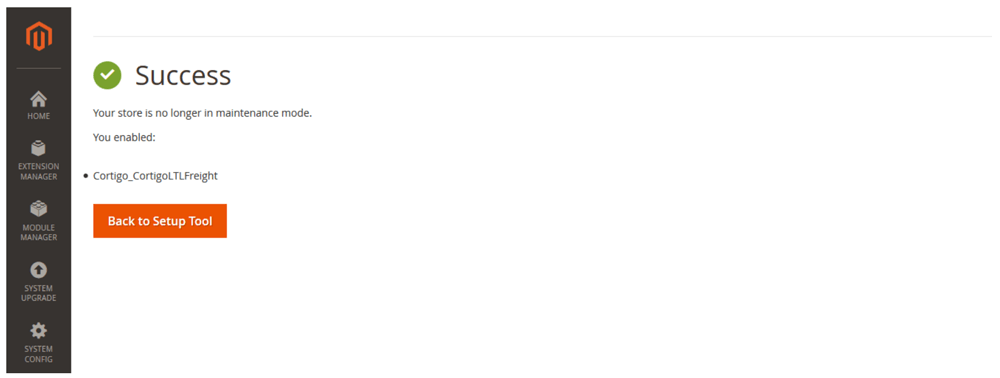
If you’ve installed the module correctly you will be presented with a success message.
4. Flush the Magento cache |
Return to top. |
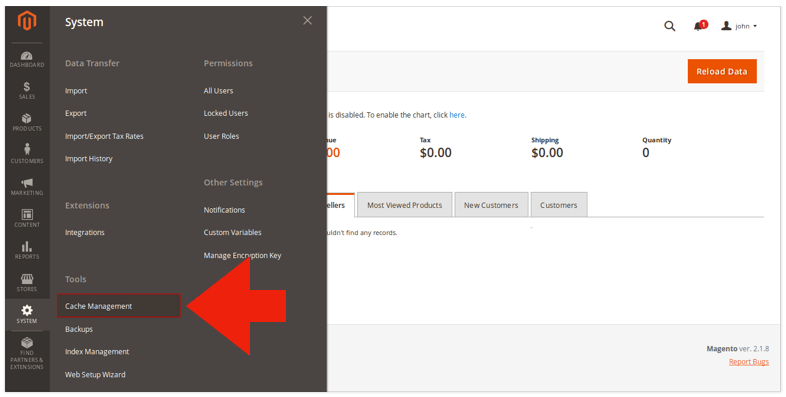
Select Cache Management from the System menu.
Click on the Flush Magento Cache button to empty the cache.
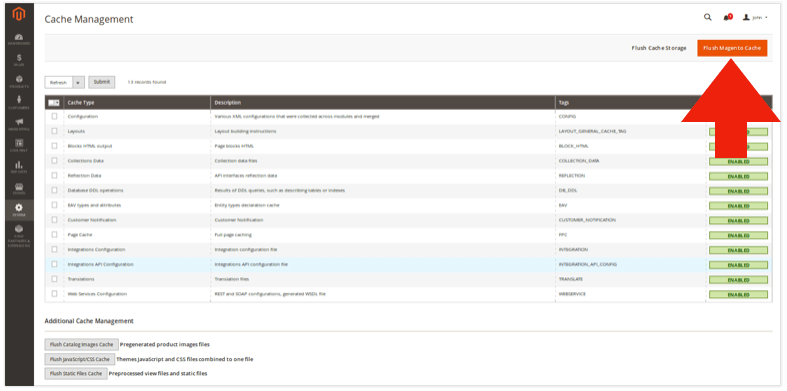
Complete the installation process by logging out, and then logging back into the store. If you fail to perform this step you will likely get a 404 – page not found error when trying to access the extension settings.
5. Get Your Cortigo API Access Key |
Return to top. |
If you already have a Cortigo TMS account and just need the API Access Key, email
support@cortigo.com to request it.If you don’t have a Cortigo TMS account, click here and complete the form to establish an account.
6. Enter and choose the module settings |
Return to top. |
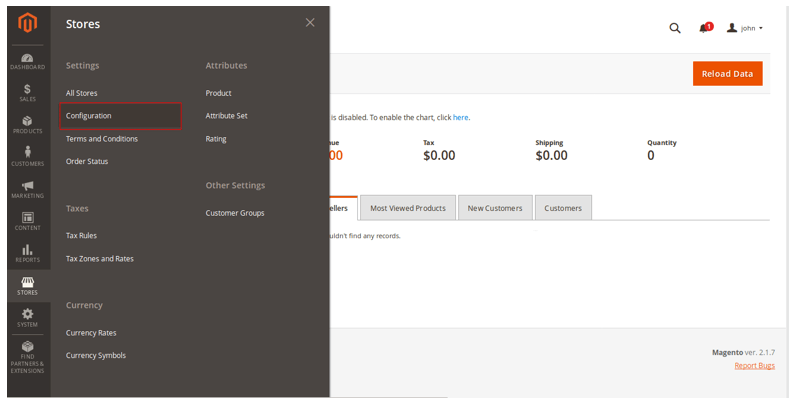
Navigate to Store > Configuration
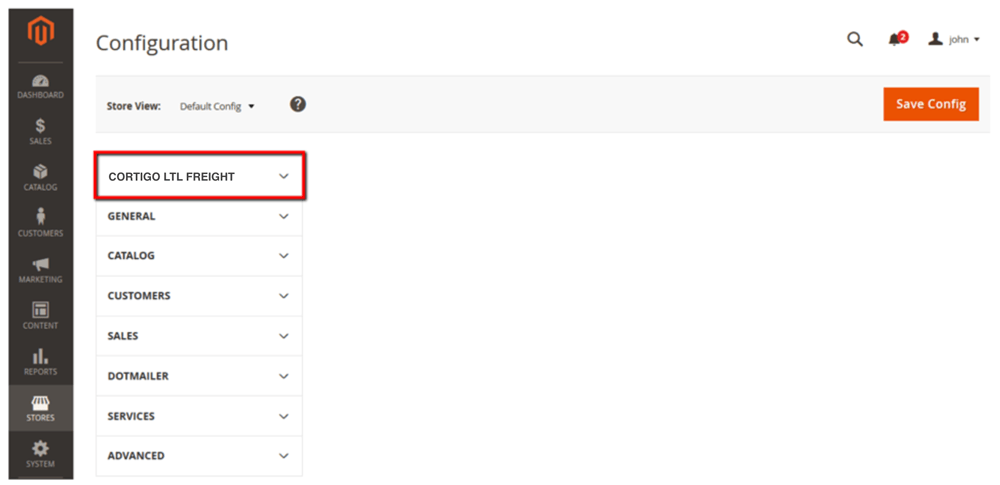
Click on the Cortigo LTL Freight entry on the left side of the page.
6a. Connection Settings | Return to top. |
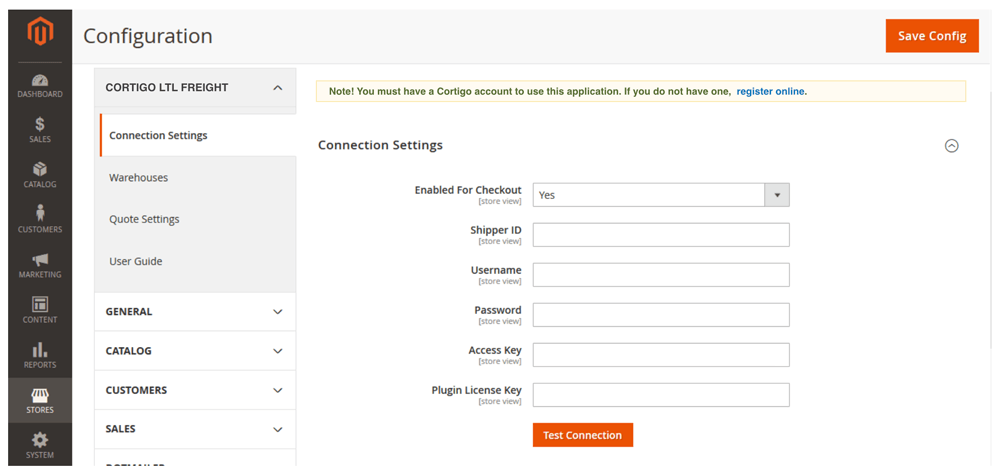
Click on the link for Connection Settings and enter the connection information.
| Enabled | (Yes|No) Controls whether or not the extension will display shipping rate estimates in the shopping cart. |
| Shipper ID | The Shipper ID you use to sign into the Cortigo TMS. |
| Username | The username you use to sign into the Cortigo TMS. |
| Password | The password you use to sign into the Cortigo TMS. |
| Access Key | The access key issued to you so you can utilize the Cortigo TMS API. |
| Plugin License Key | The plugin license key is issued by Eniture Technology to registered users only. If you don’t have a plugin license key login to your dashboard at eniture.com, or select a subscription package and register if you haven’t done so yet. |
When you’re done save your connection settings and then test them by clicking on the Test Connection button at the bottom of the section. A message will display telling you if the a connection to the Cortigo TMS servers was successful. If you receive an error, confirm the values you entered and try again. Be particularly attentive to capitalization. Most of the information you enter in this section is case sensitive.
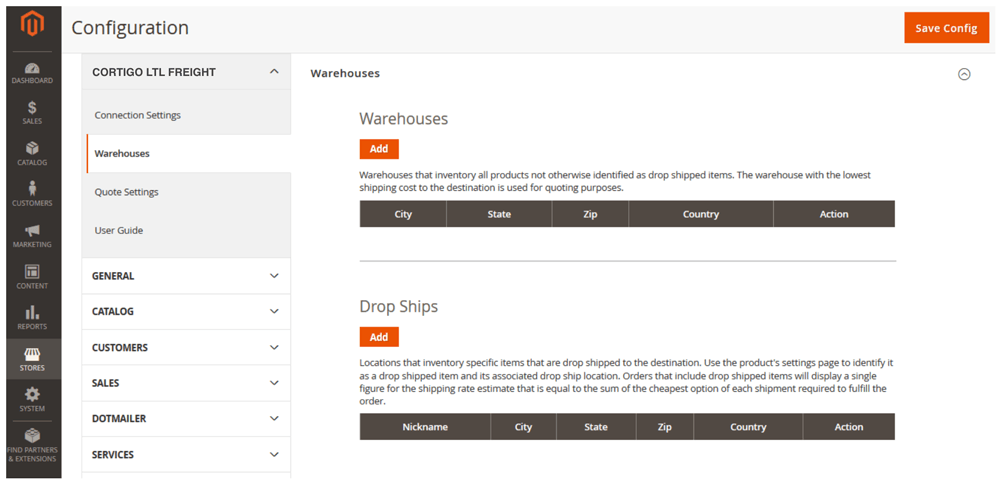
6b. Identify your warehouse and drop ship locations | Return to top. |
Click the Add button in the appropriate sections to add warehouse and drop ship locations. Warehouses should have a complete inventory of all products not otherwise identified as drop shipped items. If you have more than one warehouse defined, the warehouse closest to the shopper will be used to retrieve shipping rate estimates. You should define at least one warehouse, even if all of your products are drop shipped. This insures that quotes will be returned in the event the drop ship location was overlooked when the product entry was created.Drop ship locations usually represent vendors that supply items that you don’t inventory. These items are shipped directly to your customer on your behalf. When an order includes drop shipped items the shopping cart will display a single figure for the shipping rate estimate that is equal to the sum of the cheapest option for each shipment required to fulfill the order.
6c. Quote settings | Return to top. |
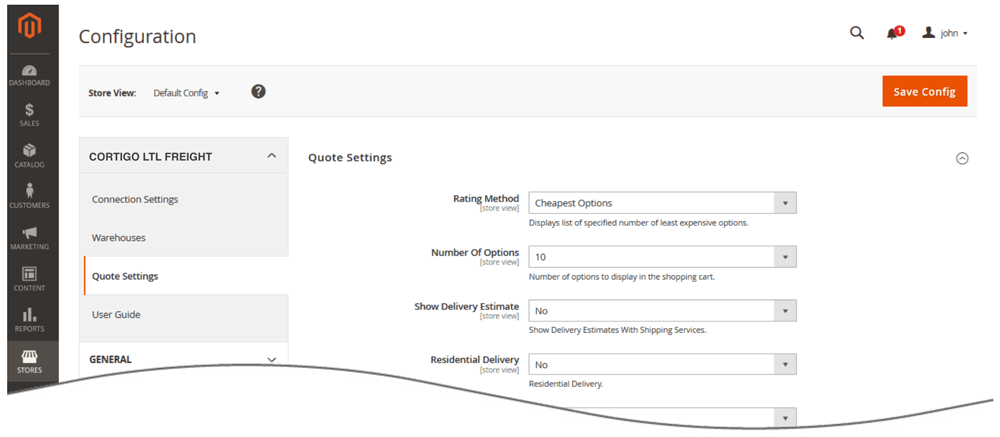
Click on the link for Quote Settings and make your selections.
| Rating Method | The rating method determines what will be displayed in the shopping cart. There are three rating methods: Cheapest Cheapest Options Average |
| Label As | Displays only when the Rating Method is set to Cheapest or Average. The entered value is used to describe the shipping charge in the shopping cart. If left blank, then the shipping charge is described as “Freight”. |
| Number Of Options | Displays only when the Rating Method is set to Cheapest Options or Average. Identifies how many of the quotes returned to the module should be included in the operation. |
| Show Delivery Estimate | Displays only when the Rating Method is set to Cheapest or Cheapest Options. When checked, the transit time estimate appears with the quote(s). |
| Residential Delivery | When checked, the quotes will include each carrier’s residential delivery fee. |
| Lift Gate Fee | When checked, the quotes will include each carrier’s lift gate delivery fee. |
| Cortigo Freight Carriers | Select the carriers you’d like included in the result set. To make multiple selections hold down the Crtl key (PC) or Command key (Mac) and click on the carrier. It’s strongly recommended that you include all carriers and let the Rating Method selection govern the what is seen in the shopping cart. Not all carriers service all orgin and destination points. If a carrier doesn’t service either one of the addresses, it is automatically omitted. Consider conferring with your Cerasis representative if you want to reduce the number of carrier responses. |
| Handling Fee / Markup | Increases the amount of each returned quote by a specified amount prior to displaying it/them in the shopping cart. The number entered will be interpreted as dollars and cents unless it is followed by a % sign. For example, entering 5.00 will cause $5.00 to be added to the quotes. Entering 5.00% will cause each quote to be multiplied by 1.05 (= 1 + 5%). |
| Allow for Own Arrangement | (Yes|No) This setting adds another option in the shopping cart that can be selected to indicate that the purchaser will make and pay for the LTL freight arrangements. When selected, the shipping charges included in the shopping cart are zero. |
| Text for Own Arrangement | This field only displays if the Allow for Own Arrangement setting is set to “Yes”. You can customize the text that is displayed in the shopping cart for the Own Arrangement option. For example, you may want it to appear as “Pickup Order” or “Hold for pickup”. |
| Return LTL quotes when an order’s parcel shipment weight exceeds 150 lbs | When checked, the LTL Freight Quote plugin will return quotes when an order’s total weight exceeds 150 lbs (the maximum permitted by FedEx and UPS), even if none of the products have settings to indicate that it will ship LTL. To increase the accuracy of the returned quote(s), all products should have accurate weights and dimensions. |
7. Product Settings |
Return to top. |
Now that the application settings have been established, it’s time enter the product settings. Repeat these instructions for every product that you want to ship via LTL freight. Select Products > Catalog > Products from Magento Admin Panel menu. Locate the product on the list and choose it by clicking on it. You’ll be delivered to the product’s details page.
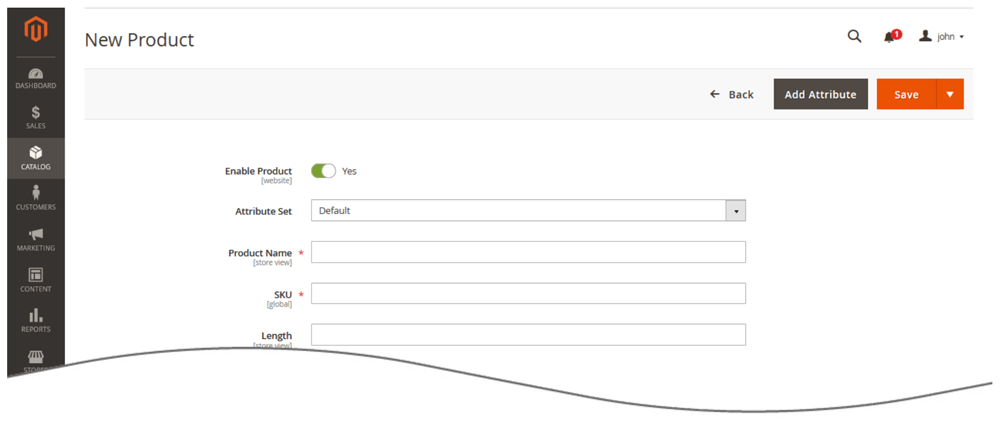
Pay close attention to the shipping related settings that are required. LTL quotes will not be retrieved if these settings are missing.
| Ship Via LTL Freight | Required. Select Yes to indicate that the item ships LTL freight. If set to No quotes for LTL freight may still appear during checkout if the total cart weight exceeds 150 LBS and the products in the cart have a freight class and weight associated with them. |
| Freight Class | Required. Select the products freight class. If you are unfamiliar with what a freight class is or how to identify it for a given product, click this link to access a related article in our knowledge base. |
| Weight | Required. Enter the weight of the product in pounds. It should include the weight of any packaging materials that may be required to ship the product, such as cardboard, bubble wrap and styrofoam peanuts. |
| Length | Enter the length of the product in inches. It should include any incremental inches added by packaging materials that may be required to ship the product. |
| Width | Enter the width of the product in inches. It should include any incremental inches added by packaging materials that may be required to ship the product. |
| Height | Enter the height of the product in inches. It should include any incremental inches added by packaging materials that may be required to ship the product. |
What your shopper sees |
Return to top. |
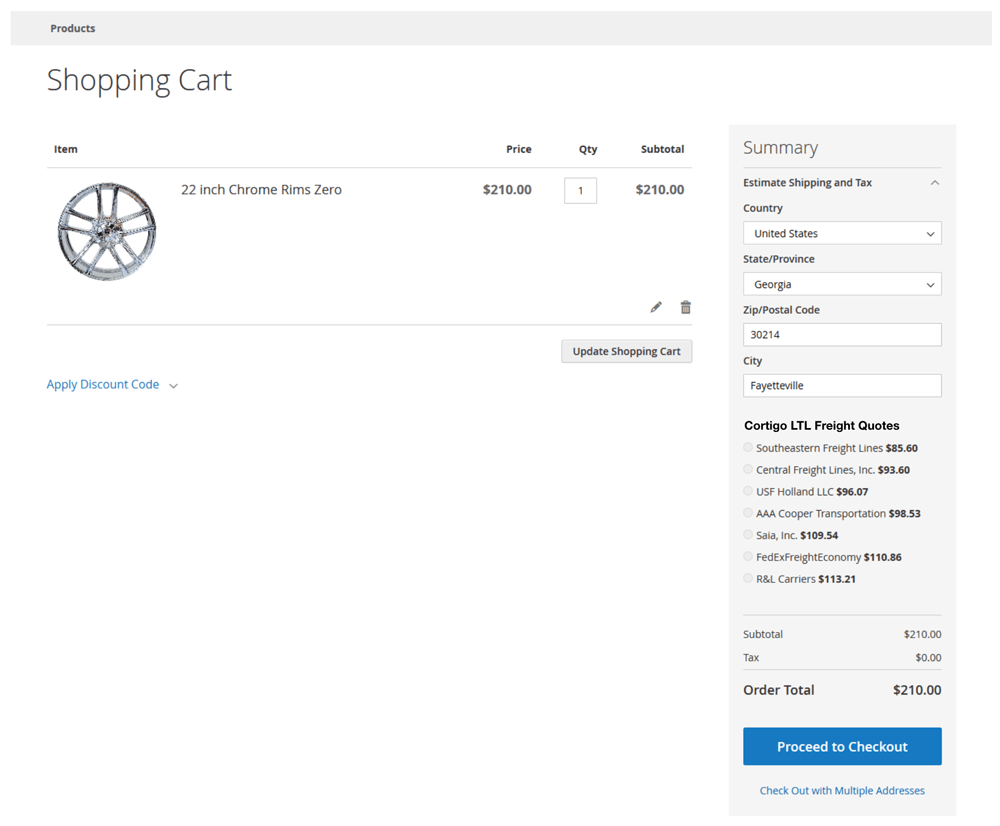
Once you’ve completed the preceding steps, your Magento store is ready to begin offering shipping options for LTL freight. To ensure the best possible outcome, it is highly recommended that freight class, weight and dimensions be entered for every product you sell. The exact presentation of the rates in the checkout process will depend on the options selected in the Quote Settings. The illustration below shows an example with multiple service options enabled.
Managing Your License |
Return to top. |
You can manage your license by signing into eniture.com with the email address and password you entered when you registered for the extension. After you sign in, My Account will be added to the navigation menu. Click on it to access the Dashboard for your account.

The most common uses of the Dashboard are to upgrade a trial subscription to a paid subscription, change the URL registered to a license, or to identify the URL of a staging or development site.
Upgrade to a paid subscription
If you fail to upgrade your trial subscription to a paid subscription before the trial expires, the extension will stop working. To upgrade, click on the My Licenses tab, locate the license, and click the Pay Now button.

Choose one of the subscription packages and then enter the information for your payment method. Your extension will be automatically renewed at the end of each subscription period unless you return to the Dashboard and cancel the subscription.
Change the URL registered to a license
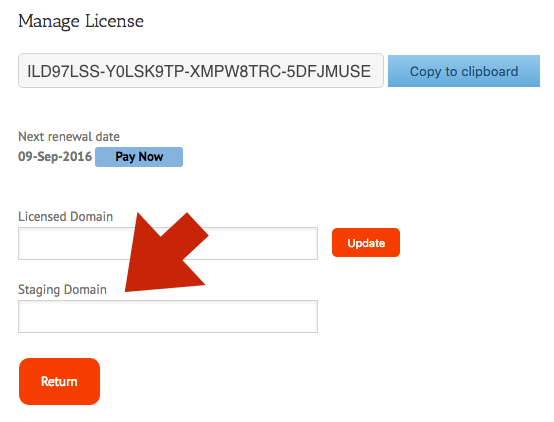
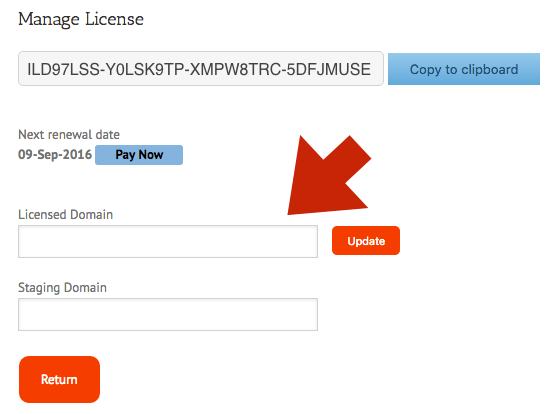
The license allows you to use the extension on a single website. To use the extension on additional websites, you must purchase additional licenses. You can change the URL registered on a license at any time. To do so, click on the My Licenses tab, locate the license, and click the Edit button. Enter the new URL into the Licensed Domain field and then click the Update button.
Identify a staging or development site
The license will allow one staging or development site. Quotes returned to this site will have the word “Sandbox” appended to them. To identify a staging site, click on the My Licenses tab, locate the license, and click the Edit button. Enter the new URL into the Staging Domain field and then click the Update button.
