Avoid the costs of shipping to invalid addresses by implementing the DIY Address Validation app for Shopify. The app doesn’t interfere with the Shopify checkout process and won’t add friction to your customer’s shopping experience. On Shopify’s Orders page, orders are instantly tagged as having valid or invalid ship-to addresses. Ship the orders with valid ship-to addresses immediately, and exercise caution on those orders that appear to have invalid addresses. Use the app settings to implement your preferences for automating or retaining control of the process for correcting or confirming what appear to be invalid ship-to addresses.
SETUP TUTORIAL (6 min)
Features
Monthly subscription rates range from $5 to $100 per month. (See below for details on plans.)
Transactional costs for U.S. addresses range from 1¢ to 4¢ per order depending on the active plan. (See below for details on plans.)
Works with any version of Shopify.
Doesn’t interfere with the Shopify checkout process so abandoned cart rates won’t increase due to increased friction.
Address validation happens instantly after an order is placed.
Immediately see the outcome of an order’s address validation on the Shopify Orders page so that you know which orders can be shipped immediately, and which shouldn’t be.
Enable options to automate the ship-to address correction or confirmation process so that it is completely hands-off.
Require customers that provide post office box addresses to update their ship-to address with a valid street address.
Use your own branding and customize the email notices sent to customers when an address correction or confirmation is required. No additional charges apply.
Free Trial Free
Thirty day free trial. Unlimited transactions.
Starter $5.00/mo.
Up to 125 transactions per monthly billing cycle.
If all 125 transactions are used, the effective rate is 4¢ per transaction. Transactions exceeding 125 are billed at 4¢ each if the Usage Charges setting is enabled (see the documentation)
Bronze $30.00/mo.
Up to 1000 transactions per monthly billing cycle.
If all 1000 transactions are used, the effective rate is 3¢ per transaction. Transactions exceeding 1000 are billed at 3¢ each if the Usage Charges setting is enabled (see the documentation)
Silver $60.00/mo.
Up to 3000 transactions per monthly billing cycle.
If all 3000 transactions are used, the effective rate is 2¢ per transaction. Transactions exceeding 3000 are billed at 2¢ each if the Usage Charges setting is enabled (see the documentation)
Gold $100.00/mo.
Up to 10,000 transactions per monthly billing cycle.
If all 10,000 transactions are used, the effective rate is 1¢ per transaction. Transactions exceeding 10,000 are billed at 1¢ each if the Usage Charges setting is enabled (see the documentation)
Current version: 1.0
Requirements
A Shopify storefront. All versions of Shopify are supported.
FAQs
Does the Validate Addresses app work for my Shopify plan?
Yes. It works for all versions of Shopify.
Will the Validate Addresses app cause my abandoned cart rate to increase?
No. The app doesn’t insert itself into the Shopify checkout process. This insures that it cannot impact your abandoned cart rate.
How much of my time will be required to use this app?
Most addresses will validate and you’ll be able to ship those orders immediately. If an address is invalid, you can enable settings to automatically initiate the process to have the customer correct or confirm the address. Most customers will respond to this process. In the rare cases that they don’t, you’ll want to intervene to ensure a successful outcome. This should be rare.
User’s Guide
1. Install the application from the Shopify App Store. |
Return to top. |
Log in to Shopify with the Store Owner credentials. You must be logged into Shopify as the Store Owner to perform this step because only the Store Owner can accept the charges associated with the app and authorize the permissions that are required by the app to function properly.
Click on Settings in the navigation menu that appears on the left of the screen.
Click on Apps and sales channels.
Click on the Customize your store button that appears above the top right hand corner of the list of installed apps. (Shopify constantly relabels this button, so it may be identified differently.)
You’ll be redirected to the Shopify App Store. Using the search field, search for “DIY Validate Addresses” or “eniture”.
Locate the DIY Validate Addresses app in the search results and click on it.
On the app’s listing page, click on the Add app button to initiate Shopify’s installation wizard.
Follow the prompts in the wizard until the installation process is complete.
2. Choose your subscription plan. |
Return to top. |
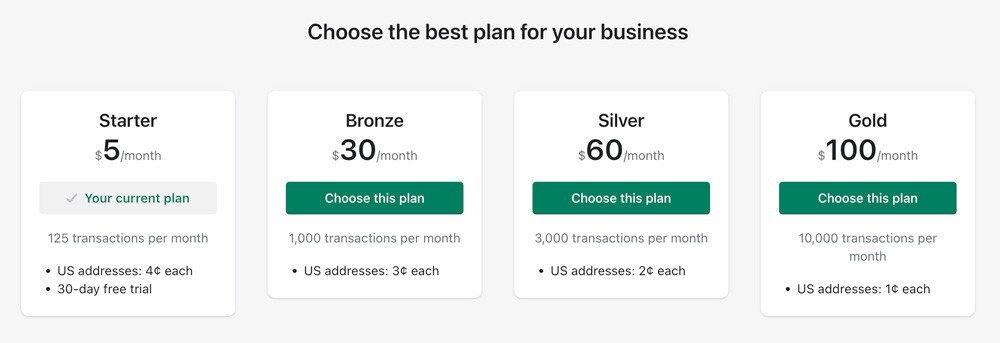
Click on Plans in the app’s navigation menu. You’ll be presented with a number of options. Click on the button labeled Choose this plan for the option that best suits for your needs. The app will stop working until the next billing cycle if the plan is depleted during the monthly billing cycle, unless you have the Usage Charges feature enabled. The Usage Charges feature is covered in the next section.
3. Usage settings. |
Return to top. |
Shopify has a billing mechanism it calls Usage Charges to administer charges that are transactionally based. Your selected plan is a wallet that pays for validated addresses. When the wallet is depleted, the app will stop working until the next billing cycle begins. You can extend the operation of the app within a billing cycle without upgrading to the next plan by enabling Usage Charges. Once your selected plan’s wallet is depleted, if the Usage Charge feature is enabled, additional address validations will be billed at the same effective transactional rate (1¢ to 4¢) as your selected plan. You can limit the charges for additional address validations by setting a Capped Amount. The app will stop performing address validations if the Capped Amount is reached.
Consider the following examples for the $5/month plan which allows for 125 transactions (orders) per month. For this plan, if Usage Charges are enabled and the Capped Amount has not been met, the ship-to address on additional orders will be validated at a rate of 4¢ each.
During the course of the monthly billing cycle, less than 125 orders with U.S. ship-to addresses are received.
During the course of the monthly billing cycle, the 125th order is received on the 20th day of the billing cycle and Usage Charges are not enabled.
During the course of the monthly billing cycle, the 125th order is received on the 20th day of the billing cycle and Usage Charges are enabled with a Capped Amount of $10. Over the monthly billing period, a total of 150 orders are received.
During the course of the monthly billing cycle, the 125th order is received on the 20th day of the billing cycle and Usage Charges are enabled with a Capped Amount of $10. During the monthly billing period, the 375th order is received on the 27th day.
During the course of the monthly billing cycle, the 125th order is received on the 20th day of the billing cycle and Usage Charges are enabled with a Capped Amount of $20. During the monthly billing period, 400 orders are received.
| Plan details | Provides information about your current plan and how much of it has been consumed. |
| Usage charges | Enable usage charge Enable this checkbox to allow usage charges to be billed so the app continues to function in the event that the plan’s wallet is fully consumed. Capped amount
Enter the amount (e.g. 10.00) that you want to enforce as a limit on usage charges during the billing period. |
4. Settings |
Return to top. |
| Order import settings | An order’s ship-to address will be validated when its payment status and fulfillment status first matches these settings.
Validate the ship-to address when the order payment status is…
Enable the checkboxes for the payment statuses you want to use to trigger an address to be validated. The most common choices are to enable Authorized and Paid. …and the fulfillment status is…
Enable the checkboxes for the fulfillment statuses you want to use to trigger an address to be validated. The most common choice is to enable Unfulfilled. |
| Tag settings | The values for the tags defined here are what will be seen on Shopify’s Orders page.
Address verified tag
Default: Address Verified. Customer confirmed tag
Default: Customer confirmed address. Merchant confirmed tag
Default: Merchant confirmed address. |
| Order Settings | Enable the checkboxes for the outcomes that, when met, will move an order from the app’s Order page to the app’s History page. The most common choice is to enable all options. |
| Address correction emails | Automatically send shoppers an address correction email if the ship-to address can’t be verified. Enable this setting if you want to automatically send the an address correction/confirmation email to the customer if the provided ship-to address appears to be invalid. I’ll initiate the sending of an address correction email myself.
Enable this setting if you want to examine addresses that appear to be invalid, and then have the app send an address correction/confirmation email to the customer if you are unable to resolve it. |
| Notification address | Enter the email address that should receive a notification anytime what appears to be an invalid ship-to address is used for an order. Leave blank if you don’t want to enable this feature. |
| Reply to address | Enter the email address that should receive replies from customers who receive emails requesting the correction or confirmation of their order’s ship-to address. Leave blank if you don’t want to enable this feature. |
At the top of this page is information regarding the structure of the various email templates. “Sort Codes” are variables that you can use to represent dynamic content in the email. For example, using “$FIRST_NAME” will insert the first name entered when placing the order where ever it occurs in the email template.
| Branding | Upload a logo to use in digital assets related to the address validation process. The logo should be of good quality and should not exceed 512 x 512 pixels. The file format must be a JPG, JPEG, or PNG. It will be used in the header of email correspondence sent to customer to request a correction to or confirmation of their order’s ship-to address. It may also be used on landing pages presented to the customer for the purpose of correcting or confirming the ship-to address, and subsequently thanking them. |
| Request address correction | This email template will be used anytime a correction or confirmation email regarding the ship-to address on an order is sent to the customer.
Subject
Enter the subject line you want to appear in the email. Use short codes to make the subject line dynamic. Email body
Enter the content of the email body you want to share with your customer. Use short codes to make the content dynamic. |
| Request street address | The request street address email template is used to request a street address when a P.O. Box was used during checkout. If you don’t ship to P.O. Boxes, you should enable this setting and complete the template.
Enable this email
Enable this checkbox if you don’t ship to P.O. Boxes and want this email to be sent to customers if they use a P.O. Box during checkout. Subject
Enter the subject line you want to appear in the email. Use short codes to make the subject line dynamic. Email body
Enter the content of the email body you want to share with your customer. Use short codes to make the content dynamic. |
| Notification of invalid address | The notification email template is used to inform the recipient that an order was placed with what appears to be an invalid ship-to address. It is enabled if the Notification address setting on the Email settings page is populated.
Subject
Enter the subject line you want to appear in the email. Use short codes to make the subject line dynamic. Email body
Enter the content of the email body you want to share with your customer. Use short codes to make the content dynamic. |
| Send test notification button | Clicking this button will prompt you for an email address to which to send a sample of your Request address correction email. Certain elements of the email sent, such as the salutation, will be programmed proxies for the actual information, but the subject line and overall content of the sample received will accurately reflect your email template. |
| Secondary street address settings | The “secondary street address” is typically an apartment, building, or suite number that is deemed significant for the delivery of shipments. Shipping to an address that has a secondary street address component without specifying it can result in address correction fees, redelivery fees, and even returned shipments (at your expense).
Tag orders as unverified
Default. Tag orders as verified
Choose this setting if you want orders with ship-to addresses that should have but are missing a secondary address component to be marked as valid/verified. |
| Confirmed or updated address message | These settings are used to generate a landing page that the customer will see after confirming or updating their ship-to address. The page is also presented if the customer makes additional attempts to confirm or update the ship-to address after previously confirming or updating it.
Upload logo
Upload an image you’d like to use for the landing page. Usually, it will be your company logo or another brand asset. Content
Enter the message you want the customer to see. Below the input field is a list of “shortcodes”. These are variables used to dynamically place related information. For example, including $ORDER_NO in the body of the content will cause the customer’s order number to appear there. |
5. What you see on Shopify’s Orders page. |
Return to top. |
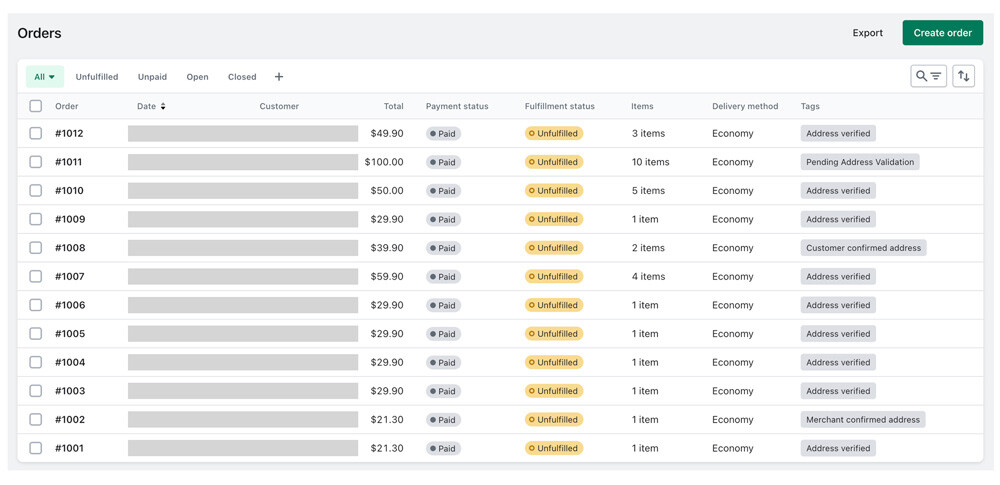
When viewing Shopify’s Orders page, the current status of the address validation process are evident in the Tags column. An order’s tag is updated instantly when its address validation status changes. Use the current status to inform you which orders to ship and which orders require additional attention.
6. Using the app’s Orders page. |
Return to top. |
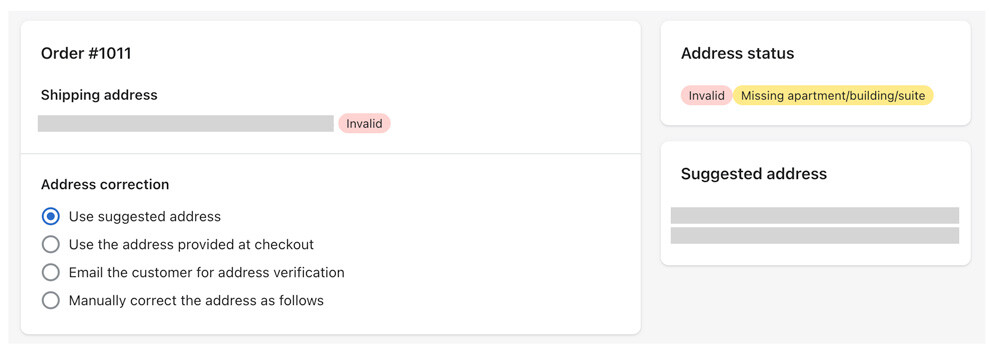
The app’s Orders page will list all of the store’s orders that haven’t been moved to the app’s History page. Most merchants will set their Order settings so that the page will list only orders that have an invalid address status.

7. The app’s History page explained. |
Return to top. |
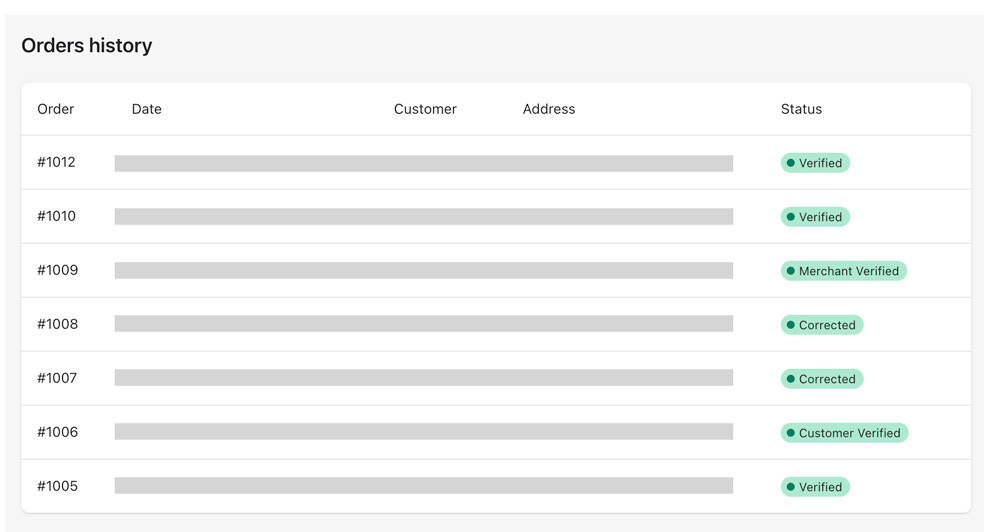
The app’s Orders history page list all of the orders that have been validated and…
- Whose validation status match the Order setting; or…
- That have been manually moved from the app’s Orders page.
The purpose of the page is to give an audit trail on how the ship-to address was validated. On this page it will be clear which ship-to addresses were…
- Validated programmatically because there was a match in the source database;
- Corrected by the customer or merchant from the original ship-to address provided during checkout;
- Confirmed by the customer or merchant that the original ship-to address provided during checkout was correct.
8. What your customer sees. |
Return to top. |
When your customer provides a ship-to address that appears to be invalid, the Request address correction email that is sent will resemble the following:
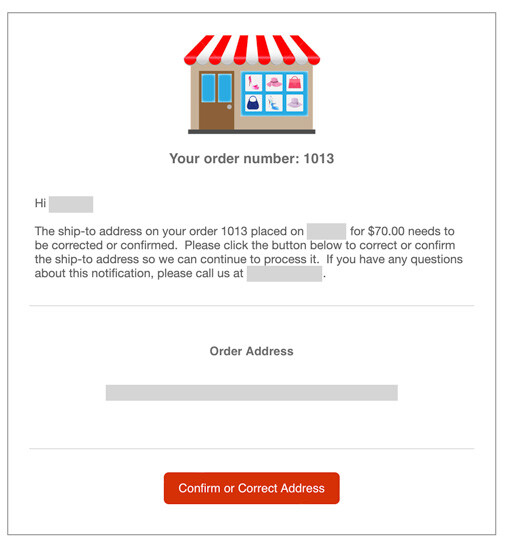
The exact content of the email will depend on how the relevant email template is defined.
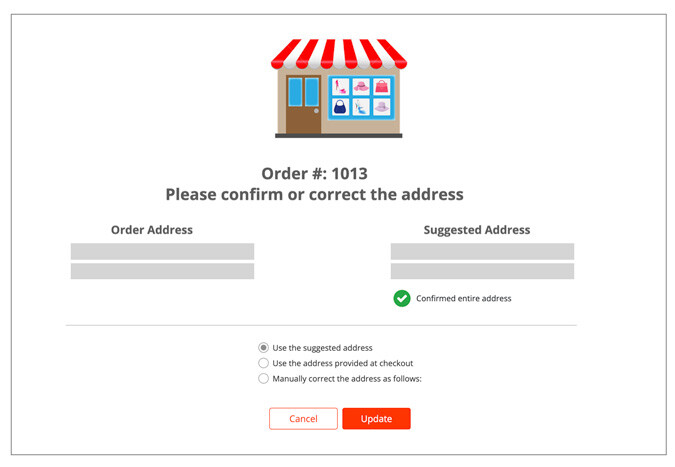
Most often, the customer will be given one of the following choices:
- Use the suggested address.
- Use the address provided at checkout.
- Manually correct the ship-to address.
The outcome of the customers action will be reflected immediately in Shopify.
The process flow and what the customer sees when a P.O. Box is provided for the ship-to address and a street address is required is very similar.

