Improve your conversion rate and the shopping experience of tax exempt shoppers by allowing them to declare their tax exempt status during the checkout process. Without this app tax exempt shoppers must contact you about their tax exempt status, limiting the ability to do business with them to your regular business hours. Allowing shoppers to declare their tax exempt status during the checkout process returns your store to a 24/7 operation, increases the likelihood of order capture, and eliminates headaches for everyone.
Basic Plan
Features
Turns your store into a 24/7 store front for tax exempt shoppers.
Increases sales by providing a better user experience to tax exempt customers.
Reduces your work load by enabling tax exempt declaration during checkout.
Easily replace the text on the widget to reflect your word and language preferences.
Receive email notifications of new customer orders with tax exempt declaration.
Current version: 1.0
Requirements
None.
FAQ’S
Will the plugin confirm a shopper’s tax exempt status?
No. It simply makes it more convenient for the shopper to indicate that they are tax exempt. You still need to perform the verification steps set forth by your governing body.
Can the plugin be used for VAT or other types of taxes?
If you’re calculating taxes using the Woocommerce tax settings, you can use the plugin to omit taxes from the order. The text seen in the Tax Exempt Status widget is fully customizable so you can adapt it to fit your particular situation and language preference.
Installation & User’s Guide
If you are taking advantage of a trial subscription, the plugin will stop working when the trial period ends. Be sure to read the Manage Your License section to learn how to upgrade your subscription.
Overview
Setting up the plugin consists of the steps listed below. Each step is bookmarked to the relevant section of the User’s Guide. In the heading of each section there is a Return to top link which will deliver you back to the list of steps.
Other information contained in this guide:
1. Register for the plugin License Key |
Return to top. |
Select a subscription package. Use the button at the top of the page to begin a free trial, or the buttons on the Features tab to begin a paid subscription. You’ll be presented with a registration form. The email address and password you enter will serve as your credentials to eniture.com. You’ll use these to gain access to the customer dashboard where you can download the plugin installation file, manage your license, and update your payment information.
If you’re starting with the free trial, you’ll receive a verification email. You must complete the verification step described in the email before you can access the customer dashboard. You’ll have immediate access to the customer dashboard if you choose to start with one of the paid subscriptions.
You’ll receive an email containing your license key. The license key will work for one production site and one staging site. You entered the domain for the production site when you completed the registration form. You can change the production site domain or add/update a staging site anytime from the customer dashboard.
To access the customer dashboard, login to eniture.com and click on the My Licenses tab. Click the Edit button associated with the license you want to update.

2. Retrieve the Installation File |
Return to top. |
If you downloaded the plugin installation file from the plugin directory on wordpress.org, you can skip this step. While logged into eniture.com with the credentials created in the previous step, click on the Downloads tab. Locate the plugin and then click the link to download the installation file. Save the file to a familiar location because you’ll need to navigate to it during the installation process.

3. Upload the Plugin Installation File |
Return to top. |
Login to the WordPress dashboard as the website administrator.
In the left sidebar, hover your mouse over the Plugins menu to display the sub-menu options.
Select Add New from the sub-menu options. The Add Plugins page will load.
At the top of the Add Plugins page, click on the Upload Plugin button.

Controls will appear in the middle of page that will allow you to chose and install the plugin application. Choose the Choose File button, navigate to the location where you saved the installation file and select it.

Click the Install Now button.
WordPress will display information about the installation progress at the bottom of the page. The plugin has been installed once the message Plugin installed successfully is displayed.
4. Activate the Plugin |
Return to top. |
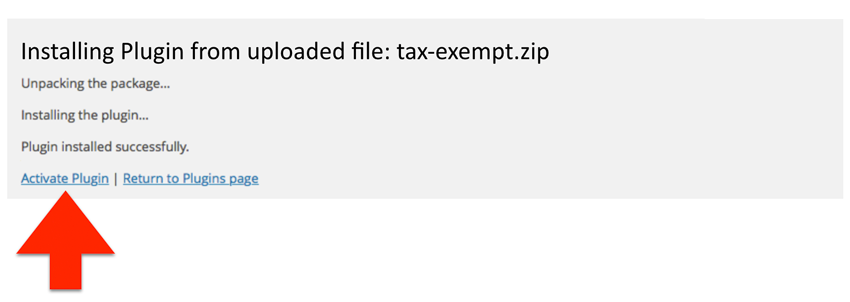
Once the plugin has been installed, it must be activated. If you are still on the same page that you were on at the end of the previous step, you can click the Activate Plugin link on the bottom of the page.
If you’ve already navigated away from that page, select Installed Plugins from the Plugins menu.

Locate the Tax Exempt Checkout plugin on the list and click the Activate link.

5. Connection Settings |
Return to top. |
Select Settings from the WooCommerce menu.
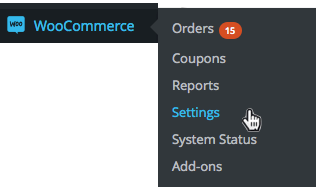
Click on the Tax Exempt tab to gain access to the plugin configuration settings. Use the links at the top of the page to navigate between the Connection and Settings pages. Start with the Connection Settings.

| Plugin License Key | The plugin license key is issued by Eniture Technology to registered users only. When you registered for a license, a license key was emailed to you. If you don’t have a license key, click the link to the right of this field to obtain one. |
The plugin’s License Key will be tied to a subscription. The Trial Plan will give you 15 days of free access to the plugin. The paid plan is available for a monthly or yearly subscription rate. To manage your License Key, including which plan is associated with it, see the section titled Managing your license. at the end of this User’s Guide.
When you’re done save your connection settings and then test them by clicking on the Test Connection button at the bottom of the page. A message will display at the top of the page letting you know if the plugin succeeded in establishing a connection to Eniture Technology’s servers. If you receive an error, confirm the license key you entered and try again. Be particularly attentive to capitalization.
6. Settings |
Return to top. |
If you don’t have visibility to the plugin’s navigation menu, select Settings from the WooCommerce menu.

Click on the Tax Exempt tab to gain access to the plugin configuration settings. Using the links at the top of the page, select Settings.
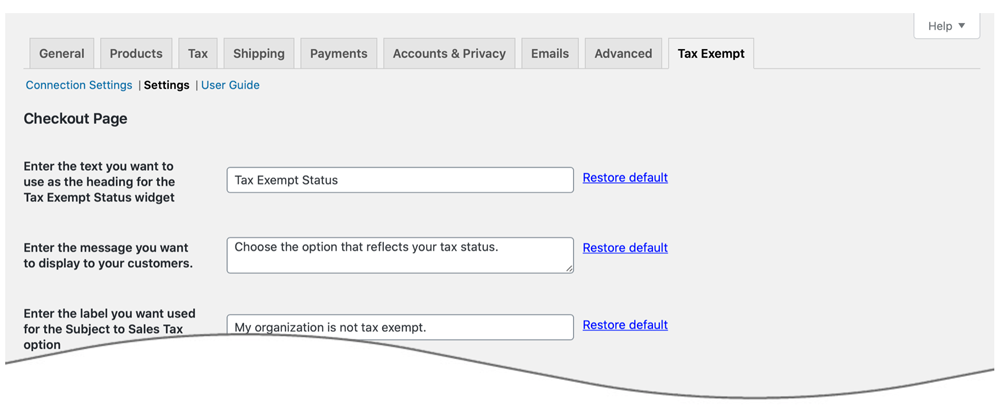
Here you’ll specify the wording and content you’d like presented on the Tax Exempt Status widget that appears on the Checkout page after the customer email field.
Refer to the image below to understand where each of the settings appears in the Tax Exempt Status widget.
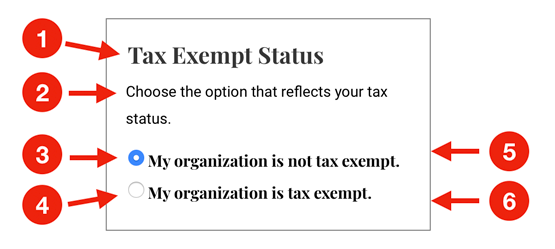
| 1 | Enter the text you want used for the header of the Tax Exampt Status widget. |
| 2 | Enter the message you want to display to your shopper. You can include HTML tags to format the message or provide a link to a page on your website. If you need to collect information from the individual about their tax exempt status (by providing a link to a form on your website, for example) or inform them about your process for confirming new customer’s tax exempt status, this is where you should do it. |
| 3 | Enter the label you want used for the Subject to Sales Tax option. The shopper will be charged sales tax if this option is selected and the ship-to address is located in an area for which you collect sales tax. |
| 4 | Enter the label you want used for the Tax Exempt option. The shopper will not be charged sales tax if this option is selected and the ship-to address is located in an area for which you collect sales tax. |
| 5 | Enter the HEX value for the color you want to use for the border around the Tax Exempt Status widget. You can use the Color Picker on w3schools.com as a resource if you aren’t familiar with HEX values. |
| 6 | Enter a numeric value for the desired width of the border for the Tax Exampt Status widget. |
| Email settings: Notification options | Use the radio buttons to choose your notification preference. |
| Email settings: Enter the email… | Enter the email addresses that should receive notices of tax exempt declarations. Separate multiple email addresses with a comma. |
What your shopper sees |
Return to top. |
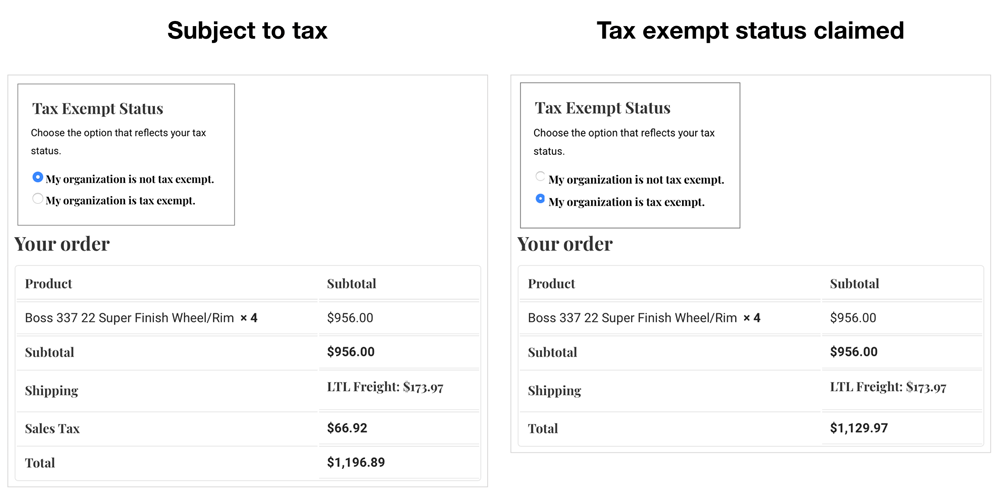
Your shopper will see the Tax Exempt Status widget on the Checkout page below the address fields and above the order summary. The exact appearance of the widget will depend on your settings.
What you see |
Return to top. |
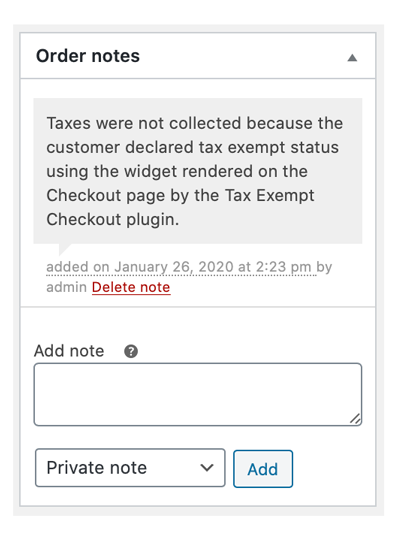
When a customer declares tax exempt status, you’ll see it reflected in the Order notes widget when viewing the order details page.
If you have the setting enabled to receive email notifications when a customer declares tax exempt status, you’ll receive an email from info@eniture.com. The email will resemble the following:

Managing Your License |
Return to top. |
You can manage your license by signing into eniture.com with the email address and password you entered when you registered for the plugin. After you sign in, My Account will be added to the navigation menu. Click on it to access the Dashboard for your account.

The most common uses of the Dashboard are to upgrade a trial subscription to a paid subscription, change the URL registered to a license, or to identify the URL of a staging or development site.
Upgrade to a paid subscription | Return to top. |
If you fail to upgrade your trial subscription to a paid subscription before the trial expires, the plugin will stop working. To upgrade, click on the My Licenses tab, locate the license, and click the Pay Now button.

Choose one of the subscription packages and then enter the information for your payment method. Your plugin will be automatically renewed at the end of each subscription period unless you return to the Dashboard and cancel the subscription.
Change the URL registered to a license | Return to top. |
The license allows you to use the plugin on a single website. To use the plugin on additional websites, you must purchase additional licenses. You can change the URL registered on a license at any time. To do so, click on the My Licenses tab, locate the license, and click the Edit button. Enter the new URL into the Licensed Domain field and then click the Update button.
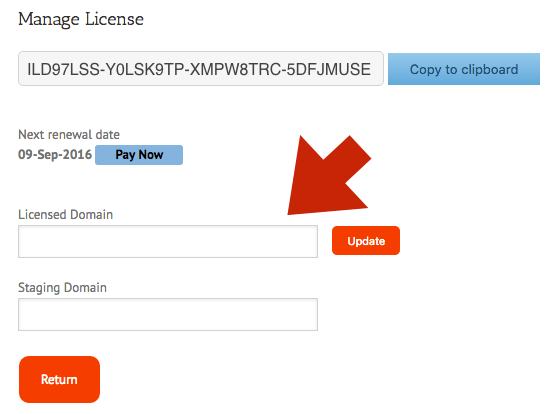
Identify a staging or development site | Return to top. |
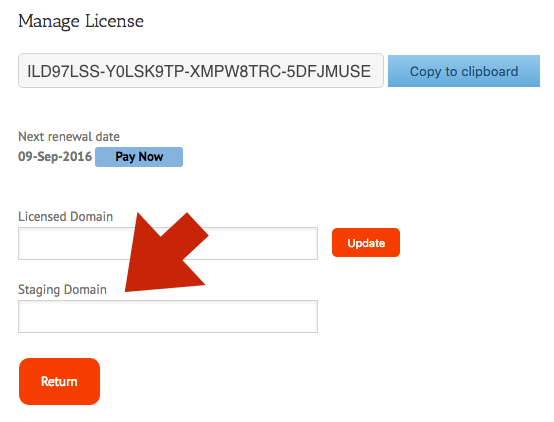
The license will allow one staging or development site. The word “Sandbox” will appear above the Tax Exempt Checkout widget on the staging site. To identify a staging site, click on the My Licenses tab, locate the license, and click the Edit button. Enter the new URL into the Staging Domain field and then click the Update button.
