This Woocommerce shipping calculator is a Distance x Rate calculator. If you are looking for a plugin to retrieve your negotiated carrier rates real-time, look over our complete list of Woocommerce plugins. We have a wide selection of plugins available for LTL freight and parcel carriers.
Using a shipping calculator to present shipping rates to your online shoppers is an excellent alternative when shipping costs aren’t available from your transportation providers in real-time. This plugin retrieves the distance between your shipping origins and your customer and applies a rate per unit of distance (mile or kilometer) to calculate the shipping rate estimate. Online merchants who use the following modes of transportation to ship or price online orders will find this plugin indispensable:
- Same day delivery services.
- Local delivery services.
- Courier services.
- Self-delivery service.
- Truckload (Full Truckload) service.
- Partial truckload service.
- Refrigerated truckload service.
- Flatbed truckload service.
- Intermodal freight.
- International air freight.
- Ocean freight.
- White-glove delivery service.
- Time-critical freight.
- Any type of transportation you want to be estimated with a distance x rate calculation.
The monthly subscription cost ranges from $5 to $30 per month depending on the volume of transactions. (See Section 6 of the User’s Guide.)
Supported origins: All countries.
Supported destinations: All countries.
Create separate shipping profiles for specific products or groups of products.
Define different rates for commercial and residential ship-to addresses. (US addresses only.)
Identify one or more shipping origin for each shipping profile.
Proxity of the ship-to address will be used for the selection of shipping origin in the event more than one shipping origin is defined in a shipping profile.
Support for orders that will require more than one shipping origin.
Define multiple shipping zones for each shipping profile.
Each shipping zone can have multiple shipping methods.
Trigger shipping methods by weight and/or dimensions
Set a minimum and maximum shipping rate for each shipping method.
Specify the distance unit of measure as miles or kilometers.
Full control over how the shipping method is named (viewed by your shoppers).
Have shipping rate estimates calculated per item or per shipment origin.
Current version: 2.0.6
Requirements
WooCommerce 5.7 or newer.
A license from Eniture Technology.
FAQs
How does this plugin work?
Depending on your settings, the plugin will identify the distance between the ship-from and ship-to address as either the route (driving) distance or as a straight line. It will multiply the distance by a rate you specify to calculate the shipping rate estimate. You can also specify a minimum and maximum rate, and only trigger the calculation to occur if certain conditions are met.
What countries will this plugin work for?
The plugin will work for any country.
What types of shipping methods does this plugin support?
The plugin isn’t specific to any type of shipping method. It simply calculates a shipping rate based on the distance between the ship-from and ship-to address and applies a rate per unit of distance (mile or kilometer). Therefore, you can use the plugin to approximate the shipping charges for any type of shipping or delivery. The plugin is best suited for types of shipping that don’t have a schedule of rates that can be retrieved real-time via an Application Programming Interface (API). Common types of shipping this plugin is used for include: Same day delivery services, local delivery services, courier services, self-delivery service, truckload (full truckload) services, partial truckload service, refrigerated truckload service, flatbed truckload service, intermodal freight, international air freight, ocean freight, white-glove delivery service, time-critical freight, brokered transportation services.
How am I billed for the plugin subscription?
After the free trial transactions expire or are depleted, the credit card you have on file will be charged for the plan selected in the plugin settings. Plans range from $5/month for 100 transactions (5¢ each), to $30/month for 3000 transactions (1¢ each). The plan will automatically renew at the end of the monthly billing cycle, or when the number of transactions is depleted. (Charges are billed in US dollars.)
How do I get a license key for the plugin?
You must register the plugin, regardless of whether you are taking advantage of the trial period or purchased a license. At the conclusion of the registration process, an email will be sent to you that will include the license key. You can also login to eniture.com using the username and password you created during the registration process and retrieve the license key from the My Licenses tab.
How do I change my plugin license from the trial version to one of the paid subscriptions?
Provided you have a credit card on file, the plugin license will automatically transition to a paid subscription after the trial transactions expire or are depleted. If you don’t have a credit card on file, the plugin will stop working. If you haven’t provided a credit card, follow the instructions in the article in our knowledge base titled, How To Update Your Credit Card On File.
How do I install the plugin on another website?
The plugin has a single site license. To use it on another website you will need to purchase an additional license. If you want to change the website with which the plugin is registered, login to eniture.com and navigate to the My Licenses tab. There you will be able to change the domain name that is associated with the license key.
Do I have to purchase a second license for my staging or development site?
No. Each license allows you to identify one domain for your production environment and one domain for your staging or development environment. The rate estimates returned in the staging environment will have the word “Sandbox” appended to them.
Why isn’t the plugin working on my other website?
If you can successfully test your credentials from the Connection page (WooCommerce > Settings > Distance Shipping Calculator > Connections) then you have one or more of the following licensing issues: 1) You are using the license key on more than one domain. The licenses are for single sites. You will need to purchase an additional license. 2) Your trial period has expired. 3) Your current license has expired and we have been unable to process your form of payment to renew it. Login to eniture.com and go to the My Licenses tab to resolve any of these issues.
Installation & User’s Guide
If you are taking advantage of a trial subscription, the plugin will stop working when the trial period ends. Be sure to read the Managing Your Eniture API Key section to learn how to upgrade your subscription.
Overview
Setting up the plugin consists of the steps listed below. Each step is bookmarked to the relevant section of the User’s Guide. In the heading of each section there is a Return to top link which will deliver you back to the list of steps.
Other information contained in this guide:
1. Register for the Eniture API Key |
Return to top. |
Click the Get a free 15 day trail button at the top of the page to register to use the plugin and gain access to the installation file. You don’t have to provide a credit card to gain access to the 50 free transactions. However, after the free transactions are depleted, the plugin will stop working until you upgrade to a paid subscription.
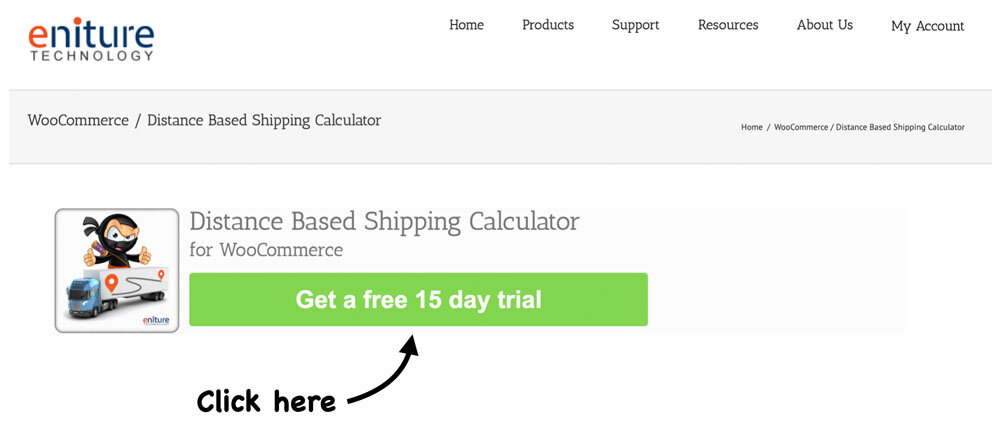
After you click the Get a free 15 day trail button, you’ll be presented with a registration form. The email address and password you enter will serve as your credentials to eniture.com. You’ll use these to gain access to the customer dashboard where you can download the plugin installation file, manage your Eniture API Key, and update your payment information.
If didn’t provide a credit card on the registration form, you’ll receive a verification email. To complete the registration process you will need follow the instructions in the email. Afterward you’ll gain access the customer dashboard.
If you provide a credit card on the registration form, you’ll have immediate access to the customer dashboard. Your credit card won’t be charged until you pick one of the paid subscription plans. You’ll select the subscription plan in the plugin settings described later in this guide.
After you register, you’ll receive an email containing your Eniture API Key. You can also retrieve your Eniture API Key by signing in to enitue.com and clicking on the My API Keys tab.
2. Using the Eniture API Key |
Return to top. |
The Eniture API Key will work for one production site and one staging site. You entered the domain for the production site when you completed the registration form. You can change the production site domain or add/update a staging site anytime from the customer dashboard. To update the registered production or staging site, login to eniture.com and click on the My API Keys tab.
3. Retrieve the Installation File |
Return to top. |
If you downloaded the plugin installation file from the plugin directory on wordpress.org, you can skip this step.
While logged into eniture.com, click on the Downloads link in the navigation menu. Locate the plugin and then click the link to download the installation file. Save the file to a familiar location because you’ll need to navigate to it during the installation process.
4. Upload the Plugin Installation File |
Return to top. |
Login to the WordPress dashboard as the website administrator.
In the left sidebar, hover your mouse over the Plugins menu to display the sub-menu options.
Select Add New from the sub-menu options. The Add Plugins page will load.
At the top of the Add Plugins page, click on the Upload Plugin button.

Controls will appear in the middle of page that will allow you to choose and install the plugin application. Click the Choose File button, navigate to the location where you saved the installation file and select it.

Click the Install Now button.
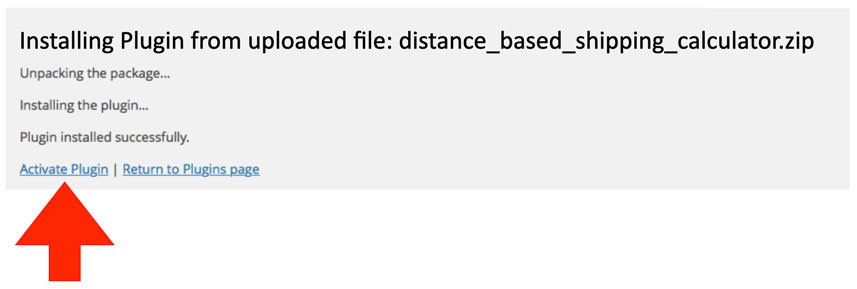
WordPress will display information about the installation progress at the bottom of the page. The plugin has been installed once the message Plugin installed successfully is displayed.
5. Activate the Plugin |
Return to top. |
Once the plugin has been installed, it must be activated. If you are still on the same page that you were on at the end of the previous step, you can click the Activate Plugin link on the bottom of the page.
If you’ve already navigated away from that page, select Installed Plugins from the Plugins menu.

Locate the Distance Based Shipping Calculator plugin on the list and click the Activate link.

6. Populate the plugin Settings page |
Return to top. |
Select Settings from the WooCommerce menu.
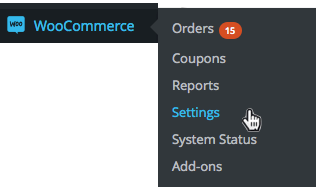
Click on the Distance Shipping Calculator tab to gain access to the plugin configuration settings. Use the links at the top of the page to navigate between the Settings and Shipping Rates settings. Start with the Settings page.
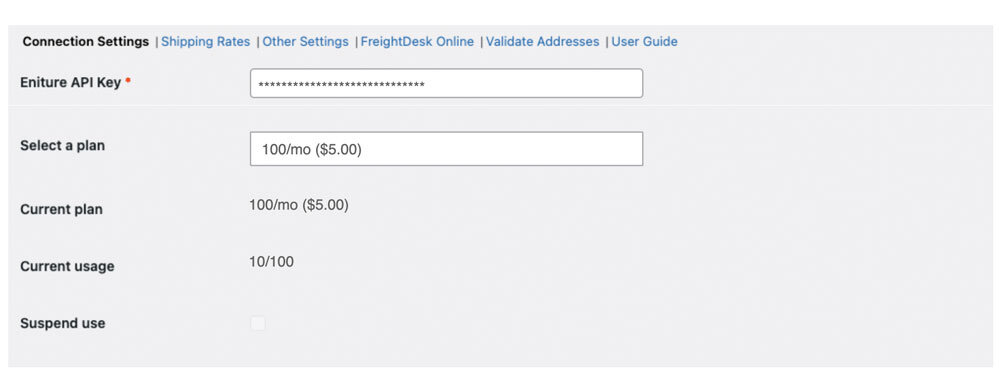
| Eniture API Key | The Eniture API Key is issued by Eniture Technology to registered users only. When you registered for the API key, it was emailed to you. You can also retrieve your Eniture API Key from the Customer Dashboard as described in the step, Register for the Eniture API Key, at the beginning of this guide. If you don’t have a Eniture API Key, click the link next to this field to obtain one. |
| Auto-renew | When the plugin is first installed, your active subscription will be the free trial plan. The free trial provides up to 50 free transactions in the current monthly billing period. The plan you select in the Auto-renew dropdown will become the subscription plan when the current billing period ends, or the 50 free transactions are depleted, which ever occurs first.
A transaction occurs each time the plugin looks up the distance between two points: the ship-from and ship-to addresses. You may have more than 1 shipping methods enabled in a shipping zone. As long as they all have the same ship-from and ship-to address, only 1 transaction occurs. The available monthly subscription plans are as follows: 100/mo ($5.00)
250/mo ($10.00) 500/mo ($15.00) 1,000/mo ($20.00) 3,000/mo ($30.00) Your choice of plans will be retained for the auto-renew option. You can change your auto-renew selection any time. Plans automatically renew at the end of the monthly billing cycle or upon the depletion of the current plan. To prevent a renewal, choose Disable from the list of options. Each time a plan renews, the credit card provided for the Eniture API Key will be charged. If you didn’t provide a credit card, or the one on-file fails, the plugin will stop working. |
| Current plan | Displays information about the current plan and the start and end dates of the current subscription period. |
| Current usage | Displays information about the consumption of the current plan. The date shown is the UTC timestamp of the last time the plugin retrieved the distance between a ship-from and ship-to address so that a shipping rate could be calculated. |
| Suspend use | Checking this box temporarily suspends the Distance Based Shipping Calculator plugin. It doesn’t permanently disable it and if the current monthly billing cycle expires, a new plan will be activated. To disable the plugin, deactivate it or choose Disable from the Auto-renew drop down. |
| Multi-shipment label | Based on your settings, there may be times when the plugin is calculating rates for multiple shipments. Enter the label you want to display in these situations. (e.g. Shipping) |
7. Define your Shipping Rates |
Return to top. |
If you don’t have visibility to the plugin’s navigation menu, select Settings from the WooCommerce menu.

Click on the Distance Shipping Calculator tab to gain access to the plugin configuration settings. Using the links at the top of the page, select Shipping Rates.

The image above shows the General Shipping Profile with nothing defined. For a point of reference, the following image is an example of the General Shipping Profile after it has been set up for a very simple scenario.
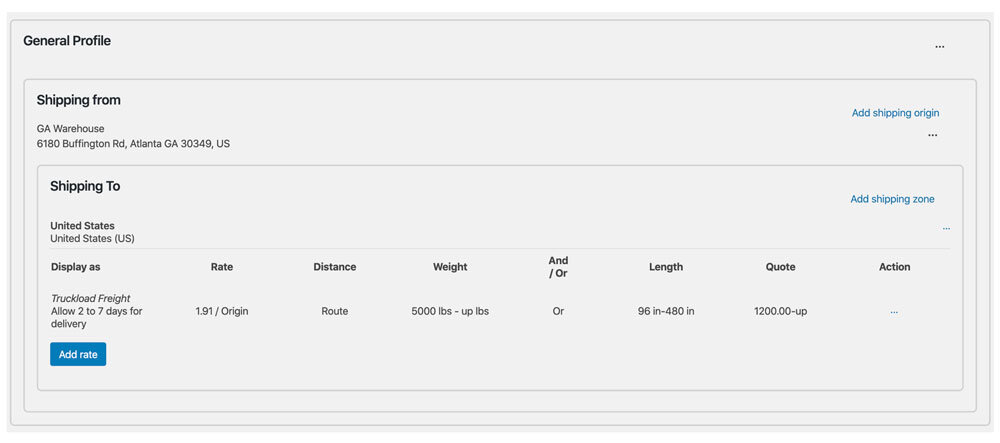
The plugin will allow you to create multiple shipping profiles. Each shipping profile can have one or more ship-from addresses and one or more shipping zones. Each shipping zone can have one or more shipping methods.
Below, steps 7a through 7d will walk you through how to create the simple completed shipping profile in the image above. Adapt the steps to meet your own unique requirements.
7a. Create a Shipping Profile |
Return to top. |
The General Profile always exists. By default, all of your products are included in the General Profile unless they are associated with another shipping profile. Products are associated with other shipping profiles by their Shipping Class or Product Tag. If you want, you can limit what is included in the General Profile to specific Shipping Classes or Product Tags by editing the General Profile settings.
To access the General Profile settings click on the menu icon at the right of the page.

You’ll be presented with a popup to use to modify the General Profile settings.
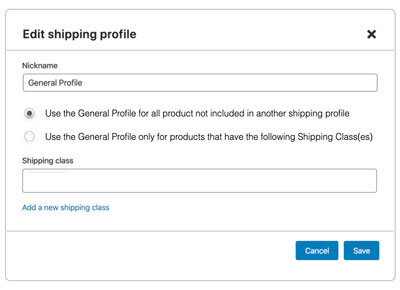
| Nickname | You can’t change the nickname of the General Profile |
| Include In Profile | Use the General Profile for all products not included in another shipping profile Choose this setting so that the General Profile contains all products not included in another shipping profile. This selection is highly recommended. A best practice is to move products that have unique shipping methods to other shipping profiles. Use the General Profile only for products that have the following Shipping Class(es)/Product Tag(s)
Choose this setting if you want to limit the General Profile to specific Shipping Classes or Product Tags. |
| Define profile by… | If you chose to limit the General Profile, select whether you will limit it by using Shipping Classes or Product Tags. |
| Shipping class/Product tag | If you chose to limit the General Profile to specific Shipping Classes or Product Tags, enter them here. |
You can create additional shipping profiles for items that have unique shipping requirements. To create additional shipping profiles, click on the Add new profile link.

You’ll be presented with a popup to use to create the new shipping profile.
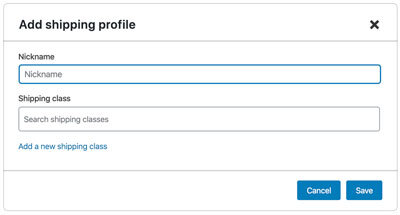
| Nickname | Enter a nickname for the shipping profile |
| Define profile by… | Identify if you will select the products in the shipping profile by using Shipping Classes or Product Tags. |
| Shipping class/Product tag | Enter the Shipping Classes or Product Tags for the products you want in this shipping profile. |
7b. Identify the Ship-From locations |
Return to top. |
You can define one or more ship-from locations in a shipping profile. When more than one location exists, the location with the closest proximity to the ship-to address will be selected for quoting purposes.
Click on the Add shipping orgin link.

You’ll be presented with a popup to collect information about the ship-from location.
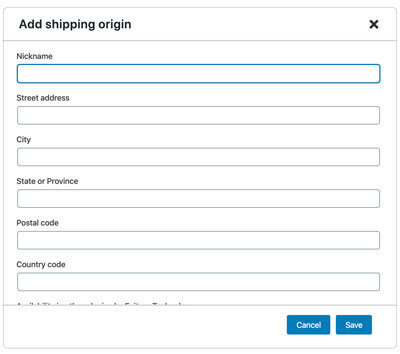
| Nickname | Enter a nickname for the ship-from location |
| Street address | Enter the street address for the location. Building, suite number, and apartment numbers are not necessary. |
| City | Enter the city name. |
| State or Province | Enter the abbreviation for the state or province. |
| Postal code | Enter the postal code. |
| Country code | Enter the two character abbriviation for the country. |
| Availability in other plugins by Eniture Technology | The Distance Based Calculator can add the ship-from location to the Small Package Quotes plugins or LTL Freight Quotes plugins published by Eniture Technology if they are installed on your website. It can be added as a warehouse or dropship location. Make your selection or choose Not available to avoid updating other plugins. |
7c. Create the Shipping Zones |
Return to top. |
You can create one or more Shipping Zones in each Ship-From location. When the Ship-To address matches the Shipping Zone, the Shipping Methods in the Shipping Zone will be triggered to provide a shipping rate.
Click on the Add shipping zone link.

Use the popup that to define the Shipping Zone.
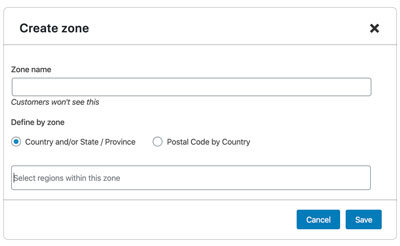
| Zone name | Enter a nickname for the shipping zone |
| Define by zone | Choose how you want to define the shipping zone. Use Country and/or State/Province to define it by country or down to the state level. Use Postal Code by Country if you want the shipping zone to be specific to certain postal codes. |
| Select regions within this zone | Start typing the name country or the state/province. A list of possible matches will appear. Select the one that describes your shipping zone. |
| List 1 postal code per line | This field will only be visible if you selected the Postal Code by Country option. Enter the postal codes you want to use to define the shipping zone. Enter each entry on a new line.
You can use wildcards, or if the postal code is fully numeric you can enter ranges. For example an entry of L4T* would include all postal codes that begin with L4T. An entry of 30003…30303 would include both of those postal codes and every one in between. |
7d. Define the Shipping Methods |
Return to top. |
A Shipping Zone can have one or more Shipping Methods. To define a Shipping Method, click the Add rate button in the Shipping Zone.
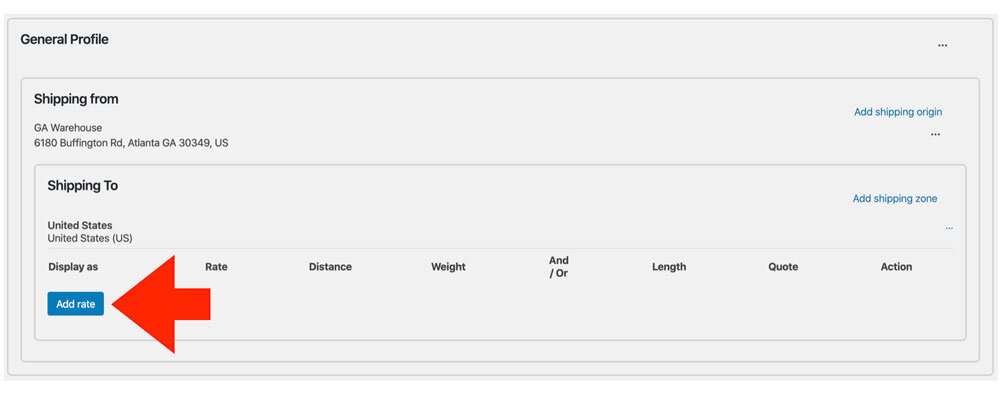
Use the popup to define your Shipping Method,
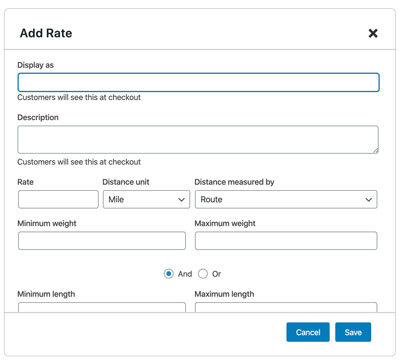
| Display as | Enter the label you want used for the shipping method. Usually this will be the type of shipping represented by the shipping method (e.g. Local Delivery, Truckload, Air Freight, etc.) |
| Rate description preferences | Don’t display a description with the Display As label Choose this option if you want only the text you entered for the Display As name to be presented to the customer. Display the distance between the ship-from and ship-to address
Choose this option if you want the distance between the ship-from and ship-to address to be presented to the customer after the Display As name. You can manipulate the distance presented to the customer by entering a positive or negative number in the Distance adjustment field found later in the settings. Display the custom description entered in the field below
Choose this option if you want to the text you enter in the Description field to be presented after the Display As name. |
| Description | Provide a description for the shipping method. This is commonly used to provide the shopper information on how long their order will be intransit. |
| Address Type | Addresses in the United States only. Identify the type of address(es) you want to offer the shipping rate to. Create one rate for commercial addresses, and afterward another for residential addresses if your shipping rates will differ by address type. |
| Default unknown addresses to | Addresses in the United States only. Identify how you want the ship-to address treated if the US Postal Service doesn’t have a record of it. (This rarely occurs, but when it does it is usually for one of the following reasons: 1) The address entered is incorrect; 2) The address is new -probably incomplete- construction; 3) The address belongs to a condemned structure that the post office doesn’t delivery mail to.) |
| Base Amount | The base amount to which the variable rate will be added. The plugin assumes the currency is that identified in Woocommerce > Settings > General > Currency options. |
| Rate | The rate to use to multiply the distance between the Ship-From and Ship-To addresses. The plugin assumes the currency is that identified in Woocommerce > Settings > General > Currency options. |
| Distance unit | Select Miles or Kilometers as the distance unit of measure. |
| Distance measured by | Quickest Route The distance used will represent the fastest over-the-road route between the ship-from and ship-to address. Shortest Route
The distance used will represent the shortest over-the-road route between the ship-from and ship-to address. Straight Line
The distance between the ship-from and ship-to address will be measured as a straight line. Select this option if the mode of transportation represented by the shipping method does not use roads. |
| Distance: Greater than or equal to | Enter the minimum distance to use to trigger the shipping method. When the distance between the ship-to and ship-from addresses equals or exceeds this figure, the shipping method will return a shipping rate (as long as the maximum distance threshold isn’t met).
Leave this field blank if you don’t want to use distance as a condition to use to retrieve a calculated shipping rate. Zero is a permitted value for this field. |
| Distance: Less than | Enter the maximum distance threshold. If the distance between the ship-to and ship-from addresses meets or exceeds this number, the shipping method won’t return a shipping rate. You don’t have to specify a maximum. Leave the field blank if you don’t wish to set a maximum distance.
If you don’t want to use distance as a condition to use to retrieve a calculated rate, leave both the Minimum distance and Maximum distance fields blank. |
| Weight: Greater than or equal to | Enter the minimum weight to use to trigger the shipping method. When the weight of the shopping cart equals or exceeds this figure, the shipping method will return a shipping rate (as long as the maximum weight threshold isn’t met).
The plugin assumes the unit of measure (e.g. lbs or kg) is that which is identified in Woocommerce > Settings > Products > Measurements. |
| Weight: Less than | Enter the maximum weight threshold. If the weight of the cart meets or exceeds this number, the shipping method won’t return a shipping rate. You don’t have to specify a maximum. Leave the field blank if you don’t wish to set a maximum weight.
The plugin assumes the unit of measure (e.g. lbs or kg) is that which is identified in Woocommerce > Settings > Products > Measurements. |
| And | Or | The fields after these options are related to length. Identify how length should be evaluated in relation to weight. |
| Length: Greater than or equal to | Enter the minimum length to use to trigger the shipping method. Leave it blank if length is not a consideration.
The plugin assumes the unit of measure (e.g. in or cm) is that which is identified in Woocommerce > Settings > Products > Measurements. |
| Length: Less than | Enter the maximum length allowed for this shipping method. Leave it blank if length is not a consideration or if there is no maximum.
The plugin assumes the unit of measure (e.g. in or cm) is that which is identified in Woocommerce > Settings > Products > Measurements. |
| Distance adjustment | Use this field if you want to manipulate the distance that the plugin identifies between the ship-from and ship-to addresses. You can enter a positive or negative number. The adjustment will impact the calculated shipping rate. If you enabled the Display the distance between the ship-from and ship-to addresses setting, the adjustment will also be reflected in what the customer sees. The plugin prevents the distance between ship-from and ship-to addresses from being a value less than zero or presenting a negative shipping rate. |
| Rate adjustment | Use this field if you want to manipulate the shipping rate the plugin calculates. You can enter a positive or negative number. Enter a number (e.g. 5.00 or -5.00) to adjust the shipping rate by an amount of currency. Follow the number with a percent sign (e.g. 5.0% or -5.0%) to make a percentage change to the rate. The plugin prevents a negative shipping rate from occuring. |
| Minimum shipping quote | Enter the minimum amount you want quoted for shipping. If the calculated rate is below the minimum, the minimum will be used as the shipping quote. |
| Maximum shipping quote | Enter the maximum amount you want quoted for shipping. If the calculated rate is above the maximum, the maximum will be used as the shipping quote. |
| Cart Value Settings | Minimum Value Of Cart Enter in currency (e.g. 5.00) a minimum value of the Cart for which this shipping method will apply. If all other conditions are met, and the value of the Cart is greater than this number, then the shipping method will be presented as an option during checkout. Maximum Value Of Cart
Enter in currency (e.g. 100.00) a maximum value of the Cart for which this shipping method will apply. If all other conditions are met, and the value of the Cart is less than or equal to this number, then the shipping method will be presented as an option during checkout.
The value of all the items in the Cart
Choose this option if the value of the Cart should include everything in the Cart.
The value of the items in the Cart associated with this shipping method
Choose this option if the considered value of the Cart should include only the items that are members of this shipping profile.
|
| How to apply the calculated shipping rate | The calculated shipping rate is for the contents of the Cart Choose this option if you want the calculated shipping rate to be presented for the contents of the Cart. Multiply the calculated shipping rate by the number of items in the Cart before applying the minimum and maximum quote values
Choose this option if you want the calculated shipping rate to be multiplied by the number of items in the Cart before applying the minimum and maximum quote values. Multiply the calculated shipping rate by the number of items in the Cart after applying the minimum and maximum quote values
Choose this option if you want the calculated shipping rate to be multiplied by the number of items in the Cart after applying the minimum and maximum quote values. Just show a flat rate, do not calculate rates based on distance.
Use a flat rate for shipping. The distance between the ship-from and ship-to addresses will not be considered in the calculation. To offer Free Shipping, set the Base Amount and Rate to zero. |
8. Other Settings |
Return to top. |
| Multi-shipment label | If the plugin settings result in more than one shipping rate, you can specify what is presented. Enter the text you want to be displayed to represent the shipping rate. |
| In the case of a Cart that will result in multiple shipments… | Add the calculated shipping rates together and display the total as the shipping rate Choose this option to have the calculated shipping rate to be a sum of all of the calculations. Only display the most expensive calculated shipping rate and discard the others
This option will present only the most expensive result during the checkout process, and the other calculated shipping rates will be discarded. Only display the cheapest calculated shipping rate and discard the others
This option will present only the least expensive result during the checkout process, and the other calculated shipping rates will be discarded. If the quoted shipping profiles include…
This option will allow you to exclude certain shipping profiles (they won’t contribute to the quoted shipping rate) when another is also active in the Cart. |
| Error management | Don’t quote shipping if one or more items in the Cart are members of a Shipping Profile that will not return a shipping rate Enable this setting if you don’t want a shipping rate estimate provided if one isn’t available for one or more items in the Cart. For example, an item in the Cart may have settings that return a shipping quote only within a specified radius of the ship-from address. If the ship-to address is outside of the radius, then a shipping quote for the item will not be calculated. Enabling this setting will result in no shipping quotes provided to the shopper (which would prevent the shopper from completing the checkout process). Leaving the setting disabled will result in a shipping quote based on the other items in the Cart (which would allow the shopper to advance through the checkout process). |
9. Enable the Plugin (WooCommerce 3.0 or later only) |
Return to top. |
Select Settings from the WooCommerce menu.

Click on the Shipping tab and select the option for Shipping Zones.
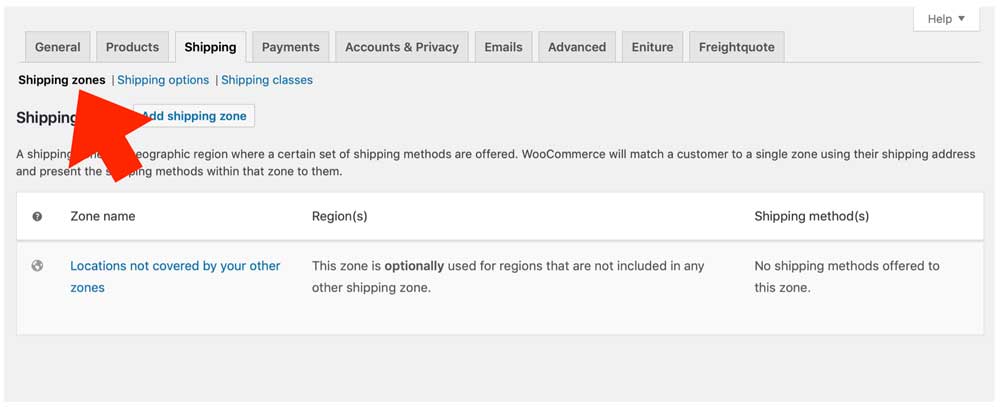
The shipping method needs to be added to a shipping zone. If an appropriate shipping zone isn’t already defined, click the Add shipping zone button and define one. If the correct one already exists, move your mouse pointer over the name of the zone to reveal the Edit link and click on it.
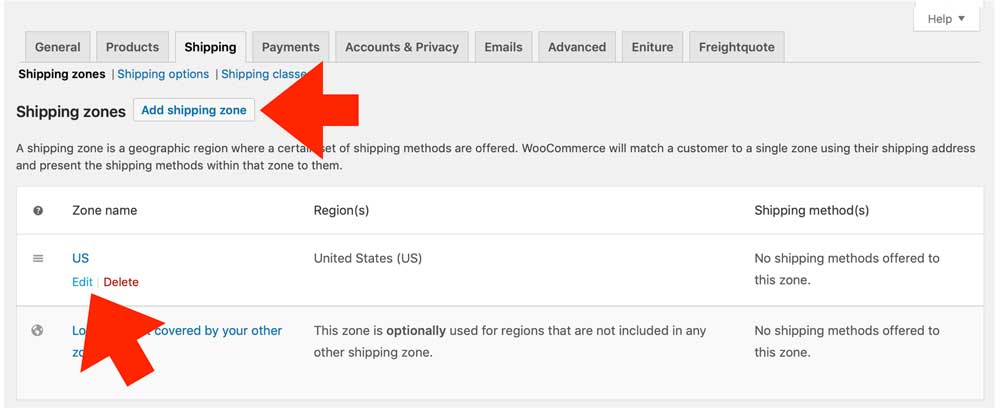
Now add the shipping method to the zone. Click on the Add shipping method button…

…select the Distance Based Shipping Calculator option from the drop down list of shipping methods…
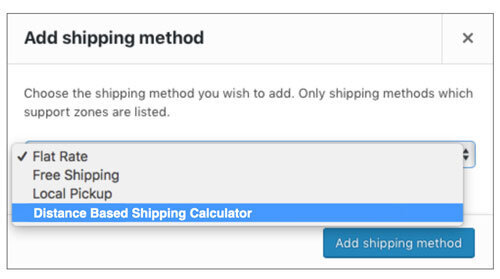
…and click on the Add shipping method button.
Repeat this process for each shipping zone you want to the plugin to return quotes for. Because the plugin has its own concept of shipping zones, you can activate it for a very broad zone in the Woocommerce > Shipping settings, and dial in what happens in narrower shipping zones in the plugin. The plugin will return rate estimates between any two addresses, any where in the world.
10. Product Settings |
Return to top. |
Navigate to your product list in the WordPress Dashboard by selecting Products from the Products menu.
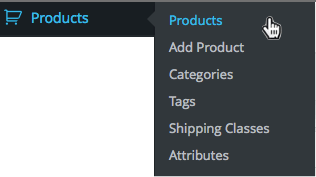
Select the product from the list that you want the plugin to provide shipping quotes for. Once you’re on the Edit Product page, locate the Product Data region and click on the Shipping option to access the product’s shipping characteristics.
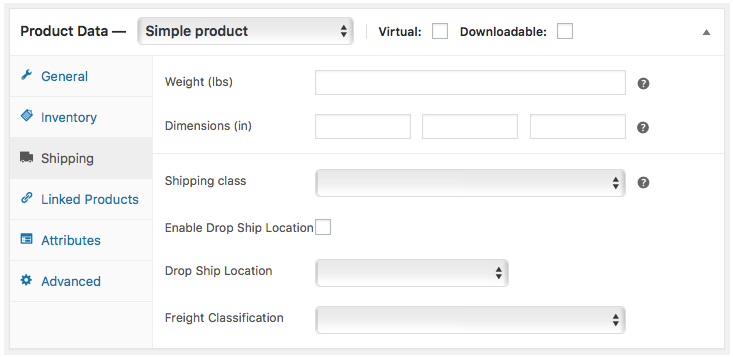
The fields you see here will vary depending on the plugins you have installed. The instructions below are relevant only to the fields that affect the behavior of the Distance Based Shipping Calculator.
| Weight | Enter the weight of the product in pounds. |
| Dimensions | Enter the dimensions of the product. Not required if none of the shipping methods are enabled for dimensions. |
| Shipping Class | If you have Shipping Classes that are being used to include products in specific Shipping Profiles, this field is important. Identify the Shipping Class you have associated with a specific Shipping Profile. |
If your product is a Variable Product, set the shipping parameters for each product variation on the Variations page.
When you are done click the Update button located in the Publish widget located at the top right of the page.
What Your Customer Sees |
Return to top. |
To facilitate the successful conclusion of an online purchase the plugin always attempts to return an estimate of shipping charges. If multiple products are in the shopping cart and some are missing weight, dimensions or both, the plugin will use what is available to obtain the shipping rate estimates. For example, if you have two products in the shopping cart and the first has weight and dimensions and the second does not, the shipping rate estimate will be based solely on the first product. The plugin will fail to return shipping rate estimates only when none of the products in the shopping cart have weights or dimensions recorded. Please note that shipping rate estimates will be increasingly inaccurate the more omissions there are to the weight and dimensions of products in the shopping cart.
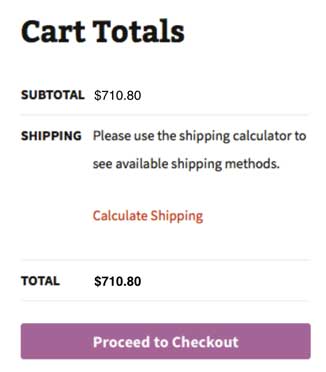
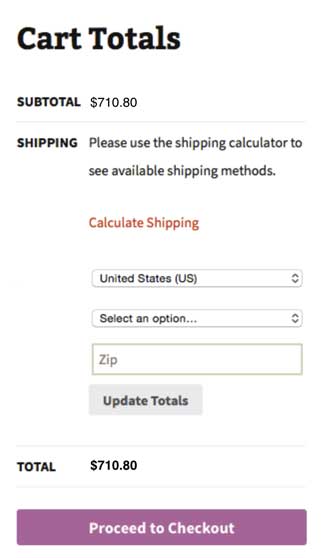
The shopping cart won’t display shipping rate estimates the first time the shopper views the shopping cart because it isn’t aware of the ship-to address. The user will be prompted to click on the Calculate Shipping Cost link to provide some of this information. The cart page only prompts for Country, State/Province, and Postal Code. This information is vague and the shipping rates will change on the Checkout page after the actual ship-to address is known.
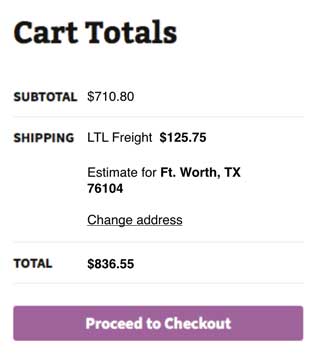
The illustration below assume the Shipping Method has been labeled, “LTL Freight”.
| Appearance of shopping cart when viewed by a shopper who is not logged in to the website. | Appearance of the shopping cart after the user clicks on the Calculate Shipping link. |
 |
 |
After the user provides the ship to information, the shopping cart will display the shipping rate estimate based on the settings entered in the plugin.
| Appearance of shopping cart when viewed immediately after the ship to information is provided. | |
 |
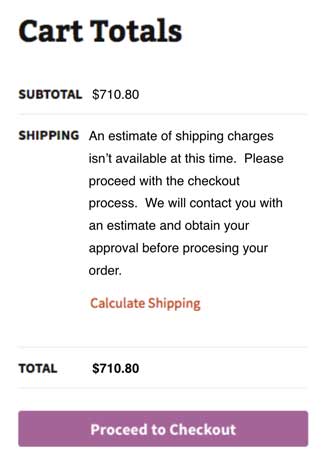
If the plugin is unable to display shipping rate estimates, a message will display. Typical reasons why a quote may not be displayed include: 1) Insufficient data on the products in the shopping cart, such as weight or dimensions or freight class; 2) Invalid credentials due to a password change, an expired license, or a suspended account; 3) An invalid or incomplete ship to address was provided; or 4) The carrier’s web service is not operational.
| Appearance of shopping cart when the plugin is unable to display shipping rate estimates. | |
 |
Managing Your Eniture API Key |
Return to top. |
You can manage your Eniture API Key by signing into eniture.com with the email address and password you entered when you registered for the plugin. After you sign in, My Account will be added to the navigation menu. Click on it to access the Dashboard for your account.

Use the links below to navigate to documents in the knowledge base related to common topics of interest.


