
The Real Time Shipping Quotes plugin for WooCommerce retrieves your negotiated shipping rates, takes action on them according to the plugin settings, and displays the results as shipping options during checkout. The plugin can be configured to quote parcel and LTL freight shipments. See the Providers tab below for a list of supported shipping companies.
Setup Tutorial & Demo (6 min)
Features Unique to LTL Freight Providers
Retrieves your negotiated LTL freight rates for the enabled LTL freight provider.
Supported origins: United States and/or Canada depending on the capabilities of the enabled LTL freight provider.
Supported destinations: United States and/or Canada depending on the capabilities of the enabled LTL freight provider.
Customize the text used to label LTL freight quotes displayed to shoppers.
Options for how to offer lift gate delivery including an option to require lift gate delivery when the address type is identified as residential.
Specify the weight of your handling unit (e.g. pallet) so that it is accounted for in the shipping quote.
Identify the maximum weight per handling unit to extrapolate the number of handling units to account for in the shipping quote.
Features Unique to Parcel Shipping Providers
Retrieves your negotiated parcel rates for the enabled parcel shipping provider.
Supported origins: United States and/or Canada depending on the capability of the enabled provider.
Supported destinations: Any country that Fedex, Purolator, or UPS provide service to. Some UPS resellers available in the app will not return a quote to destinations outside the United States.
Select which services to offer to your shoppers.
Mark up or mark down individual services by a dollar amount or percentage.
Retrieve hyper-accurate parcel quotes even when charges are based on dimensional weight when using the built in packaging algorithm. Use of the optional Standard Box Sizes feature required.
Elect to include insurance in the shipping quotes when specific products are in the shopping cart.
Features Common to LTL Freight and Parcel Shipping Providers
Elect to display the carrier’s transit time or estimated delivery date with the rate estimate.
Define multiple warehouse locations.
Identify products that drop ship from vendors.
Always quote shipments as going to commercial or residential addresses or have the app automatically detect the address type to dynamically include the residential delivery fee in the shipping quotes.
Choose not display shipping quotes if a post office box is detected.
Mark up quotes by a dollar amount or percentage.
Support for products that ship hazardous material.
Offer an option for in-store pick up based on the customer’s distance from your warehouse.
Offer local delivery based on the customer’s distance from your warehouse.
Charge a fee for local delivery.
Dynamic presentation of LTL freight and parcel rates when both types of providers are enabled.
Everything in the Basic Plan, plus…
Enable up to three shipping providers.
Everything in the Standard Plan, plus…
Enable up to five shipping providers.
LTL Freight Providers
Central Transport (Origins: USA | Destinations: USA)
GlobalTranz/WWEX Group (Origins: USA | Destinations: Canada, USA)
Unishippers/WWEX Group (Origins: USA | Destinations: Canada, USA)
Worldwide Express/WWEX Group (Origins: USA | Destinations: Canada, USA)
Parcel Shipment Providers
Worldwide Express/WWEX Group (Origins: Canada, USA | Destinations: Any country serviced by UPS)
Current version: 1.0
Requirements
An established account with the shipping company or companies you intend to enable in the plugin.
FAQs
How do I get support for this application?
The knowledge base is the best 24/7 resource for support. Click here to go to the knowledge base. You can open a support ticket by emailing support@eniture.com. Customer support can also be contacted by phone at 404-369-0680 x2 on business days between 9:00 AM and 5:00 PM Eastern Time. If you get voicemail, leave a message and we will return your call.
How do I get an account?
Instructions for how to obtain an account with a shipping provider is available in the app. Follow the steps to enable the shipping provider to see the instructions for that provider.
Why are the shipment charges I received on the invoices from my carriers different than what was quoted by the plugin?
Common reasons include a difference in the quoted versus billed shipment parameters (weight, dimensions, freight class), or additional services (such as residential delivery) were required. Compare the details of the invoice to the shipping settings on the products included in the shipment. Consider making changes as needed. Remember that the weight of the packing materials is included in the billable weight for the shipment. If you are unable to reconcile the differences call the freight carrier for assistance.
Why do I sometimes get a message that a shipping rate estimate couldn’t be provided?
There are several possibilities:
The most common reason is that one or more of the products in the shopping cart didn’t have its shipment parameters (weight, dimensions, freight class) adequately populated. Check the settings for the products on the order and make corrections as necessary.
The city entered for the shipping address may not be valid for the postal code entered. A valid City+State+Postal Code combination is required to retrieve a rate estimate.
Your shipment exceeded constraining parameters of the provider’s web service.
The shipment destination isn’t serviced by the provider.
The provider’s web service isn’t operational.
Your account with the provider has been suspended or cancelled.
There is an issue with the Eniture Technology servers.
There is an issue Shopify’s servers.
How do I determine the freight class for my product(s)?
The easiest thing to do is to contact your provider and ask for assistance. However, the official source is the National Motor Freight Classification (NMFC) directory maintained by the National Motor Freight Transportation Agency (NMFTA.org). You can purchase a hard copy of the directory or obtain an online subscription to it from their web site.
How does the density calculator work?
The density calculator will calculate a freight class by performing a calculation using the product weight and dimensions as inputs. In most cases the returned freight class will match the product’s (commodity’s) freight class as recorded in the National Motor Freight Classification (NMFC) directory. However, this is not always true and in the event there are differences, the freight class recorded in the National Motor Freight Classification (NMFC) directory takes precedence. An incorrectly identified freight class can result in unexpected shipping charges and even fees. You are solely responsible for accurately identifying the correct freight class for your products. If you need help doing this, contact your LTL freight provider for assistance.
Installation & User’s Guide
If you are taking advantage of a trial subscription, the plugin will stop working when the trial period ends. Be sure to read the Managing Your Eniture API Key section to learn how to upgrade your subscription.
Overview
Setting up the plugin consists of the steps listed below. Each step is bookmarked to the relevant section of the User’s Guide. In the heading of each section there is a Return to top link which will deliver you back to the list of steps.
- Register for the Eniture API Key.
- Download the installation file.
- Install the plugin.
- Activate the plugin.
- Enter the Eniture API Key.
- Connect to the shipping provider’s API.
- Enable the 3PL’s carriers. (3PL integrations only.)
- Choose the desired quote settings.
- Identify your warehouse and drop ship locations.
- Other Settings.
- Address Type Settings.
- Add the plugin to the shipping zone.
- Enter the product shipping parameters.
Other information contained in this guide:
1. Register for the Eniture API Key |
Return to top. |
Use the Get a free 15 day trial button at the top of the page to begin a free trial.
To start a paid subscription, select the Features tab and click on the button for the desired subscription plan.

In either case, you’ll be presented with a registration form. The email address and password you enter will serve as your credentials to eniture.com. You’ll use these to gain access to the customer dashboard where you can download the plugin installation file, manage your license, and update your payment information.
If you’re starting with the free trial, you’ll receive a verification email. You must complete the verification step described in the email before you can access the customer dashboard. You’ll have immediate access to the customer dashboard if you choose to start with one of the paid subscriptions.
You’ll receive an email containing your license key. The license key will work for one production site and one staging site. You entered the domain for the production site when you completed the registration form. You can change the production site domain or add/update a staging site anytime from the customer dashboard. To access the customer dashboard, login to eniture.com.
Related resources:
How To Obtain Your Eniture API Key
Add Your Staging Site To The Eniture API Key
Change The Domain On Your Eniture API Key
2. Download the Installation File |
Return to top. |
Skip this step if you downloaded the plugin installation file from the plugin directory on wordpress.org.
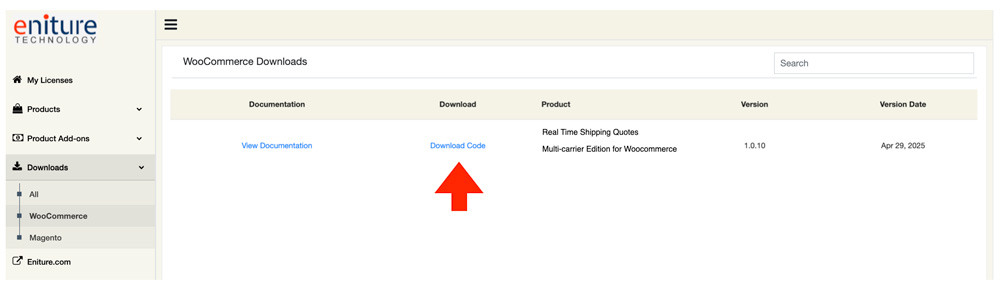
To download the plugin installation file, log into eniture.com with your email address and password. Click on Downloads in the navigation menu. Locate the plugin and then click the Download Code link.
3. Install the Plugin |
Return to top. |
Login to the WordPress dashboard as the website administrator.
In the left sidebar, hover your mouse over the Plugins menu to display the sub-menu options.
Select Add New from the sub-menu options. The Add Plugins page will load.
At the top of the Add Plugins page, click on the Upload Plugin button.

Controls will appear in the middle of page that will allow you to choose and install the plugin application. Choose the Choose File button, navigate to the location where you saved the installation file and select it.

Click the Install Now button.
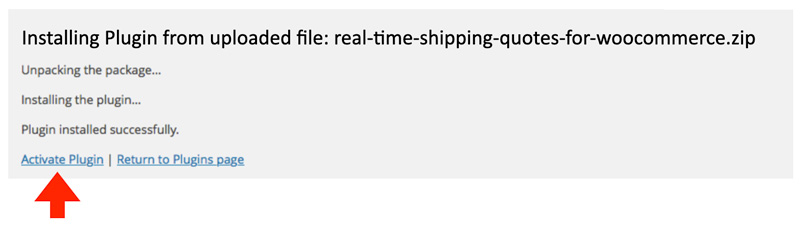
WordPress will display information about the installation progress at the bottom of the page. The plugin has been installed once the message Plugin installed successfully is displayed.
4. Activate the Plugin |
Return to top. |
Once the plugin has been installed, it must be activated. If you are still on the same page that you were on at the end of the previous step, you can click the Activate Plugin link on the bottom of the page.
If you’ve already navigated away from that page, select Installed Plugins from the Plugins menu.

Locate the Real Time Shipping Quotes for WooCommerce plugin on the list and click the Activate link.

5. Enter the Eniture API Key. |
Return to top. |
Select Settings from the WooCommerce menu.

Select the Real Time Shipping Quotes tab at the top of the page.
Click on Eniture API Connection in the plugin’s navigation menu, and then enter the API key you obtained in Step 1 of these instructions.
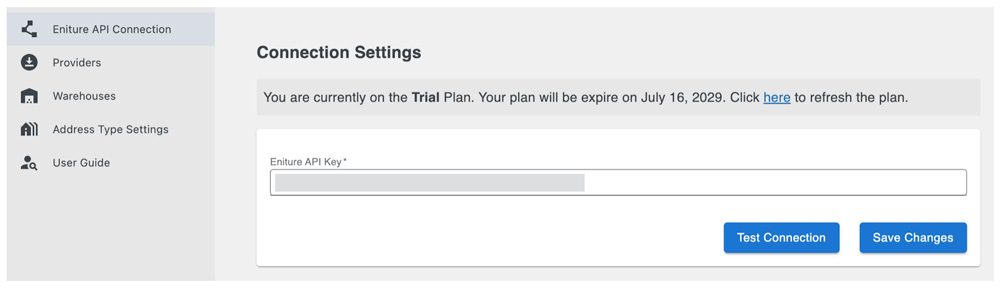
Save and test the API key. An alert will confirm if the test was successful. If it was unsuccessful, verify the API key and make sure that it hasn’t expired.
How To Obtain Your Eniture API Key
Where To Find Your Eniture API Key
6. Connect to your shipping provider’s API. |
Return to top. |
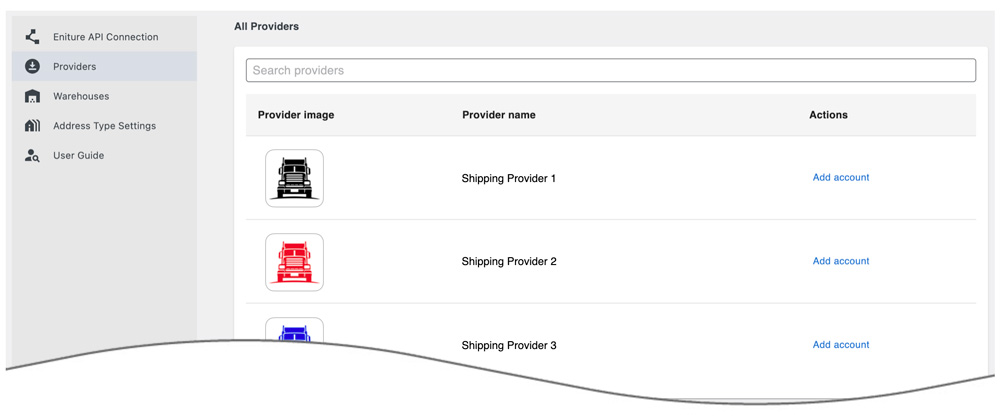
Click on Providers in the plugin’s navigation menu. The Providers page lists the shipping providers available in the plugin. Click the Add account link for the shipping provider you want to enable in the plugin.
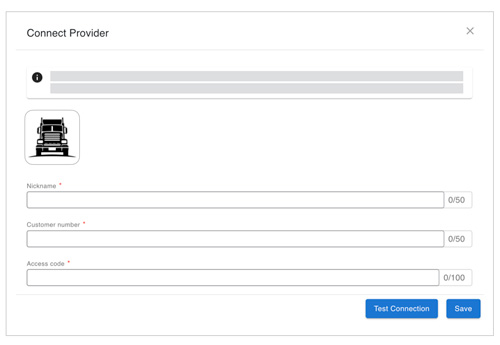
Enter the API credentials for your account with the shipping provider. The information required differs for each provider. Click on the name of the shipping provider in the list below for instructions on how to obtain your API credentials. The instructions will open in a new tab in your browser. After successfully establishing the connection, return to this User’s Guide and complete the remaining steps.
List of supported providers
7. Enable the 3PL’s carriers. (3PL freight integrations only.) |
Return to top. |
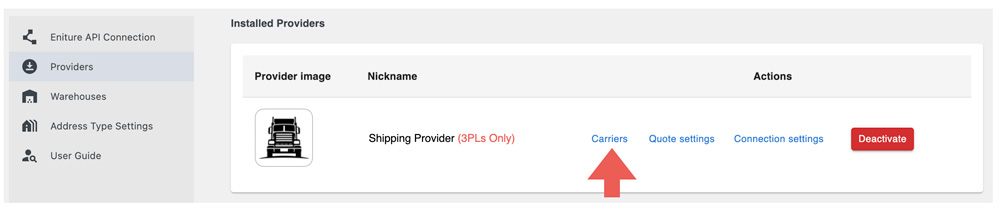
The integration for a 3PL (a.k.a. third-party logistics provider) has an additional settings page that lists the freight carriers in its portfolio. Skip this step if the shipping provider enabled in the previous step is not a 3PL.
On the Providers page, locate the shipping provider in the list of installed providers. Click on the Carriers link.
Enable as many as many carriers as possible, disabling only those that you refuse to do business with. A benefit of using a 3PL is the ability to take advantage of aggressive pricing offered by asset-based LTL freight providers who want to increase shipping volumes in specific lanes. The more carriers that are enabled, the more often aggressive pricing can be taken advantage of.
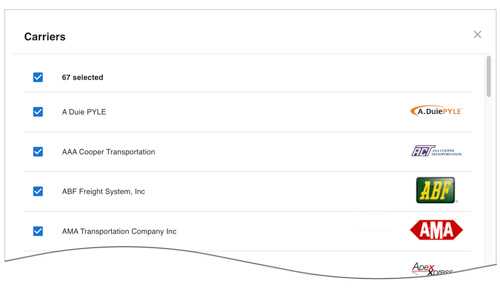
Click the Save button at the bottom of the page to save your selections.
8. Choose the desired quote settings. |
Return to top. |
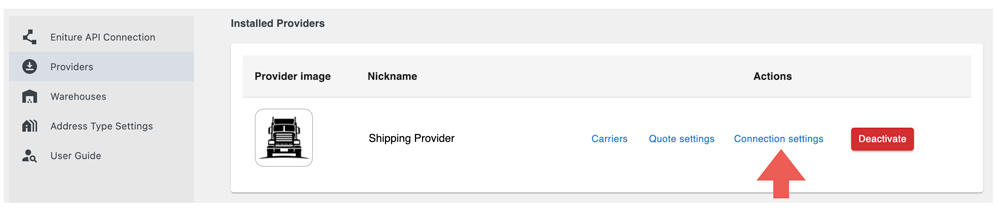
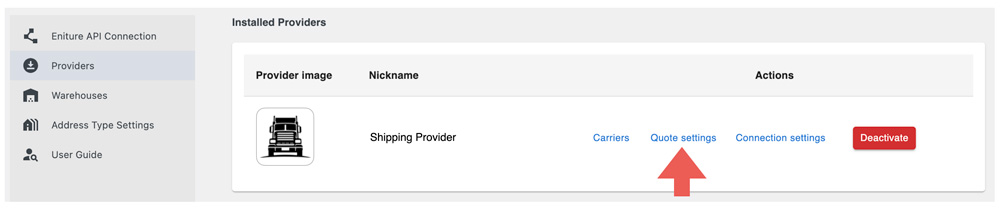
A shipping provider’s quote settings determine the unique behavior of its integration. The quote settings for a given provider apply only to that provider although other providers can have similar settings. For example, all of the providers have a setting for Handling fee/markup. A handling fee entered for Provider A will have no effect on Provider B. To access the Quote Settings page, on the Providers page, locate the shipping provider in the list of installed providers and click on its Quote settings link.
Click on the name of the provider in the list below to access instructions for the quote settings specific to that provider. The instructions will open in a new tab in your browser. Afterward, return to this User’s Guide to continue with the remaining steps.
List of supported providers
9. Identify your warehouse and drop ship locations. |
Return to top. |
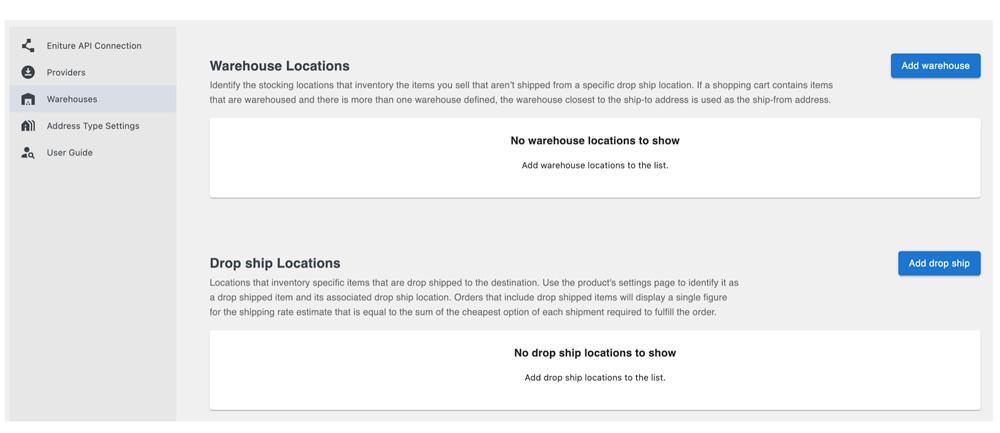
The plugin allows for two types of stocking locations: 1) Warehouse locations; 2) Drop ship locations. A product can be assigned to a dropship location. When a product is assigned to a drop ship location, shipping rate estimates will always be quoted from that location. All products not assigned to a drop ship location are considered to be available at the warehouses. If you have more than one warehouse defined, the warehouse closest to the ship-to address will be used as the ship-from address.
A best practice is to define at least one warehouse, even if all your products are drop shipped. If all your products are drop shipped (you have no warehouses), make the highest volume drop ship location a warehouse. This ensures that shipping rate estimates will still be returned in the event a product was added to your catalog and its drop ship location wasn’t identified.
Follow the instructions below to add a warehouse of drop ship location:
| Nickname | Enter a nickname for the location. The nickname is only visible on the Warehouses page and on the Order Details page after an order is placed. It isn’t visible to visitors to your online store. |
| Address | Enter the street address for the location. The street address is particularly important if you intend to use the In-store Pick Up or Local Delivery features because it is used to determine the distance between the location and the ship-to address. |
| Apartment | If the location has a building, suite, or apartment number enter it here. |
| Postal Code | Enter the postal code for the location. Use only the 5-digit ZIP code for US addresses. |
| City | Enter the name of the city for the location. |
| State | Enter the standardized two character abbreviation for the state of province. |
| Country | Enter the standardized two character abbreviation for the country. |
| Handling Fee / Markup | Increases the amount of the quote received for this location by a specified amount prior to displaying it/them in the shopping cart. The number entered will be interpreted as dollars and cents unless it is followed by a % sign. For example, entering 5.00 will cause $5.00 to be added to the quotes. Entering 5.00% will cause each quote to be multiplied by 1.05 (= 1 + 5%).
Note: The plugin has four settings that can be used to mark up shipping quotes. They are applied to shipping quotes in the following order: 1) Product-specific Mark Up (Product settings); 2) Location-specific Handling Fee / Mark Up (Warehouse settings); 3) Service-specific Mark Up (Quote settings); and 4) General Handling Fee / Mark Up (Quote settings).
|
9a. In-store pick up settings |
Return to top. |
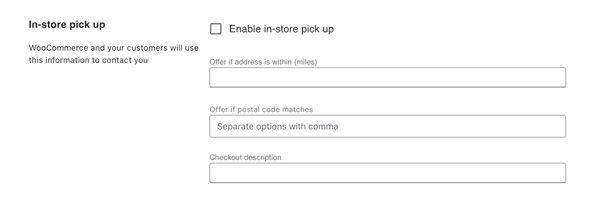
| Enable in-store pick up | Check the box to enable the in-store pick up feature. |
| Offer if address is within (miles) | The distance in miles within which you’d like to offer in-store pick up. The distance is route miles (driving distance). Leave blank if you don’t want to use distance to determine if in-store pick up should be offered. If both distance and postal codes are used as evaluation criteria, in-store pick up will display if either condition is satisfied. |
| Offer if postal code matches | Enter the postal codes to which you’d like to offer in-store pick up. Enter only the five digit ZIP Code for US addresses. Separate postal codes with a comma. Leave blank if you don’t want to use postal codes to determine if in-store pick up should be offered. If both distance and postal codes are used as evaluation criteria, in-store pick up will display if either is satisfied. |
| Checkout description | Enter the description to use to identify the option in the checkout process. The most obvious candidate is In-store pick up, but you can make it anything you’d like. When the option for in-store pick up is displayed during checkout, it will be appended with the distance between the “ship-to” and “ship-from” addresses, and the address of the stocking location. |
9b. Local delivery settings |
Return to top. |
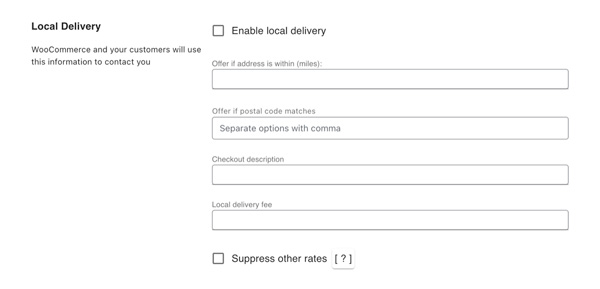
| Enable local delivery | Check the box to enable the local delivery feature. |
| Offer if address is within (miles) | The distance in miles within which you’d like to offer local delivery. The distance is route miles (driving distance). Leave blank if you don’t want to use distance to determine if local delivery should be offered. If both distance and postal codes are used as evaluation criteria, local delivery will display if either is satisfied. |
| Offer if postal code matches | The postal codes to which you’d like to offer local delivery. Enter only the five digit ZIP Code for US addresses. Separate postal codes with a comma. Leave blank if you don’t want to use postal codes to determine if local delivery should be offered. If both distance and postal codes are used as evaluation criteria, local delivery will display if either is satisfied. |
| Checkout description | The description to use to identify the option in the checkout process. The most obvious candidate is Local delivery, but you can make it anything you’d like. |
| Local delivery fee | Enter the amount to charge for local delivery. Leave blank to offer local delivery for free. |
| Suppress other rates | Check the box to show only the option for local delivery when the criteria for doing so (distance or postal code) is met. Only the rates from this app will be suppressed. If you have other shipping methods enabled for your store, they will be unaffected by this setting. Leave the box unchecked to have local delivery offered in addition to the shipping options normally displayed by the app. |
10. Other Settings. |
Return to top. |
| Weight threshold | Weight threshold Enter the weight threshold for LTL freight in pounds. If the default of all the items in the Cart is set to Quote as a parcel shipment, and the weight of the Cart reaches the threshold, a quote for LTL freight will be generated. Continue to display parcel rates when the weight threshold is met.
Choose this option if you want parcel rates to continue to be presented on the checkout page after the weight threshold has been met. Suppress parcel rates when the weight threshold is met.
Choose this option if you don’t want parcel rates to be presented on the checkout page after the weight threshold has been met. |
| Offer own arrangement as an option | Enable this checkbox if you’d like your customers to have the option of arranging their own shipments. It will appear as a free option on the checkout page.
For LTL only
Select this option if customers should be limited to making their own arrangements only for LTL freight. For Parcel only
Select this option if customers should be limited to making their own arrangements only for parcel shipments. For Both (LTL and Parcel)
Select this option if you want your customers to have the ability to make arrangements for either type of transportation. |
| Text for own arrangment | Enter the text the customer will see for the option to arrange their own shipping. |
11. Select the address type settings. |
Return to top. |
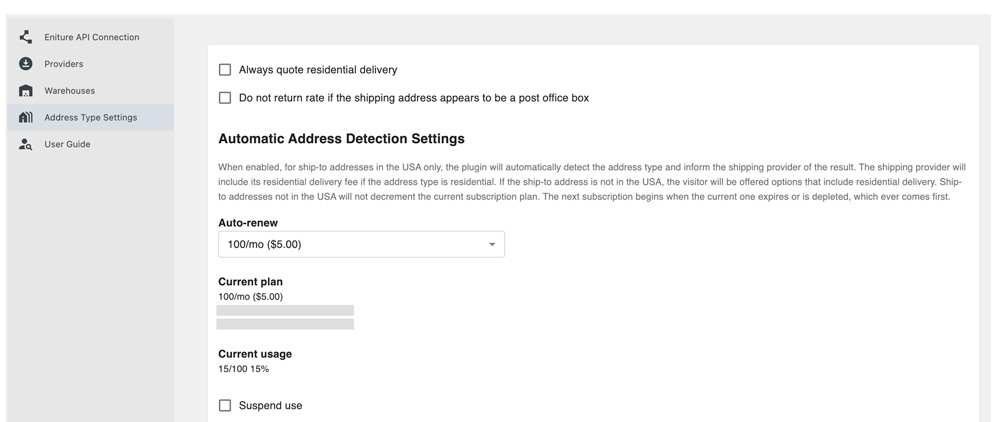
| Always quote residential delivery | When checked, quotes will always include the carrier’s residential delivery fee. |
| Do not return a rate if the shipping address appears to be a post office box | When checked, quotes will not be returned if the address appears to be a post office box. String matches are used for this purpose if the Automatic Address Detection Settings is not in use. If the Automatic Address Detection Settings is in use then the USPS will definitively identify if the address is a P.O. Box. |
| Auto-renew | Choose a subscription plan. It will be billed to the same payment method you used to subscribe to the the plugin. The subscription for the Automatic Address Detection Settings will renew each month, or when the number of transactions is depleted, which ever comes first. |
| Suspend use | Enable this checkbox if you want to temporarily disable the Automatic Address Detection Settings. |
| Auto-detect residential addresses. | Enable this checkbox to have the plugin identify residential addresses. |
| Default unconfirmed addresses to: | Select Residential or Commercial. In rare cases the plugin may be unable to confirm the address type. This occurs when a match for the address can’t be found in the USPS database. Invalid ship-to addresses are the most common reason for this. In extremely rare cases an address may be valid, but the match found in the USPS database has a low confidence metric. Choose how you want addresses treated in these cases. Choose what you want the address type to be in these cases. |
| Address type disclosure | Inform the shopper when the ship-to address is identified as residential address Choose this setting if you want your customer to know that their ship-to address has been identified as a residential address. Don’t disclose the address type to the shopper
Choose this setting if you don’t want your customer to know that their ship-to address has been identified as a residential address. |
12. Add the plugin to the shipping zone (WooCommerce 3.0 or later only) |
Return to top. |
Select Settings from the WooCommerce menu.
Click on the Shipping tab and select the option for Shipping Zones.
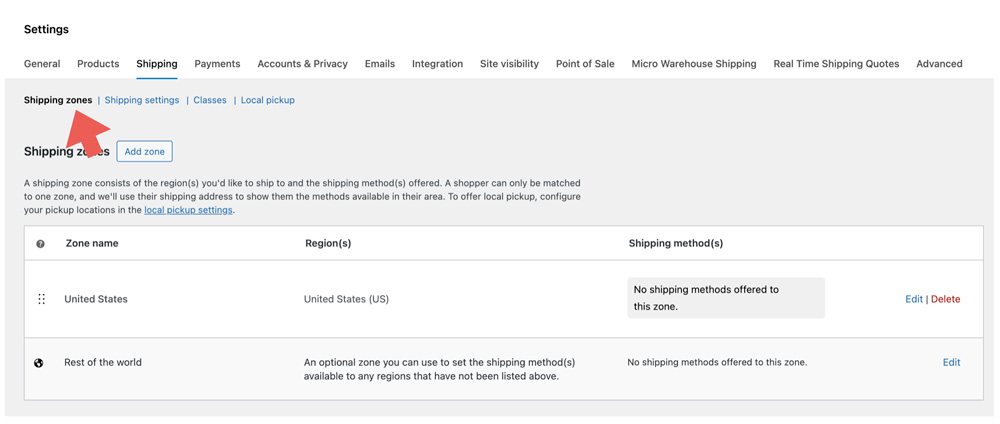
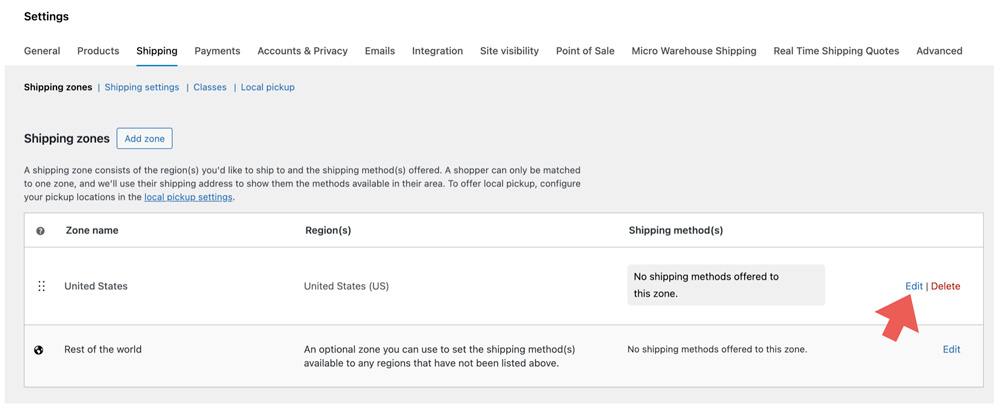
The shipping method needs to be added to a shipping zone. If an appropriate shipping zone isn’t already defined, click the Add shipping zone button and define one.
Click on the Edit link to add the plugin to the shipping zone.
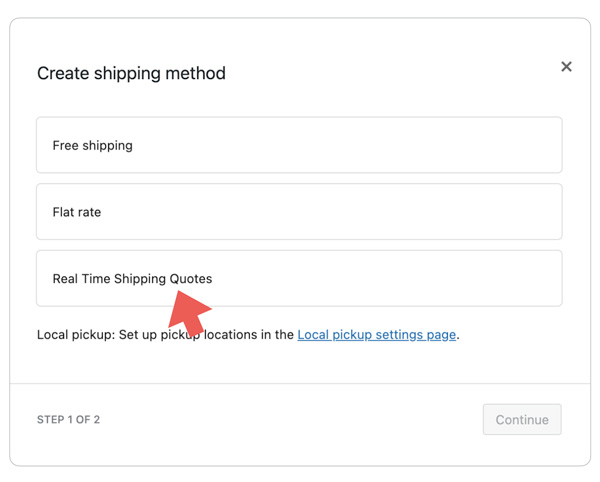
…select the Real Time Shipping Quotes option from the drop down list of shipping methods and then click on the Continue button.
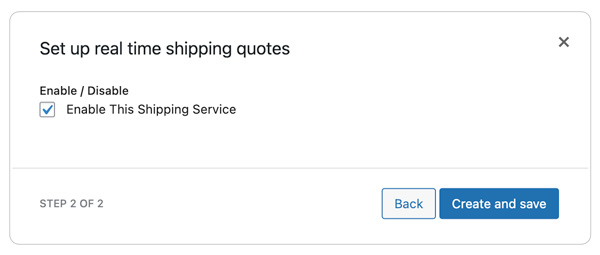
Enable the checkbox and click the Create and save button.
Repeat this process for each shipping zone you want to the app to return quotes for. You should test each zone to make sure the geography defined by the shipping zone is supported by the app.
13. Product Settings |
Return to top. |
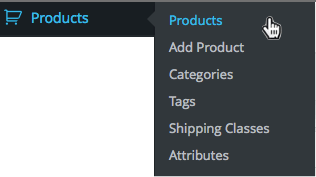
Navigate to your product list in the WordPress Dashboard by selecting Products from the Products menu.
Select the product you want to enter shipping parameters for. Once you’re on the Edit Product page, locate the Product Data region and click on the Shipping option to access the product’s shipping characteristics.
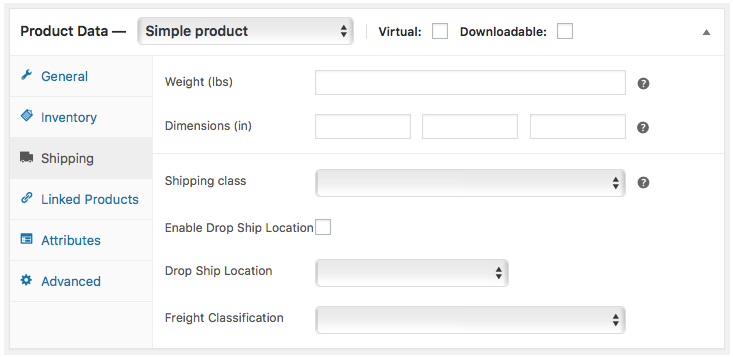
| Weight | Enter the weight of the product in pounds. |
| Dimensions | Enter the dimensions of the product in inches. The length field is used to determine if the shipment will be subject to oversized charges. |
| Shipping Class | If the product will be quoted as shipping with a pracel carrier (e.g. FedEx or UPS) select the No shipping class option.
If you the product will be quoted as shipping with an LTL Freight carrier, select the LTL Freight option. |
| Enable Drop Ship Location | This option will only be visible if there are drop ship locations defined. Refer to Step 9: Define Warehouse and Drop Ship Locations for instruction on how to define drop ship locations.
Check this box if this product ships from a drop ship location. |
| Drop Ship Location | This option will only be visible if there are drop ship locations defined. Refer to Step 9: Define Warehouse and Drop Ship Locations for instruction on how to define drop ship locations.
If the product is drop shipped, select the drop ship location from the list of options. |
| Freight Classification | This option will only be visible if an integration for an LTL freight provider is enabled.
Select the freight class for the product from the list of options. If you utilize both small package (parcel) and LTL freight shipping methods, you should identify the freight class for all products, even those that normally ship small package (parcel). The last option in the list of freight classifications is Density Based. In most cases this is an industry accepted alternative for identifying the freight class of an item or shipment. Validate the returned quotes if using this setting. There are exceptions in the NMFC Freight Classification Directory that can render the density calculator results invalid for particular commodities. To be used successfully the product must have its weight and dimensions populated in the Shipping sub-panel. |
| NMFC Number | Usually an NMFC number is not required to get an LTL freight quote. However, in certain circumstances, an LTL freight provider may require it for individual accounts. If you are required to provide a commodity’s NMFC number to obtain an LTL freight quote, enter it here. Otherwise, leave this blank. |
| Markup | Use this field to modify the shipping quotes returned by the plugin. Enter a dollar amount (e.g. 1.00 or -1.00) to increase or decrease the shipping quotes. The amount of the adjustment will be multiplied by the quantity of the item in the Cart. Enter a percentage (1.0% or -1.0%) to have a percentage of the item’s price added to or subtracted from the shipping quotes. When a percentage is entered and there is more than one of the item in the Cart, the percentage will be applied to the extended price (quantity x price).
Note: The app has four settings that can be used to mark up shipping quotes. They are applied to shipping quotes in the following order: 1) Product-specific Mark Up (Product settings); 2) Location-specific Handling Fee / Mark Up (Warehouse settings); 3) Service-specific Mark Up (Quote settings); and 4) General Handling Fee / Mark Up (Quote settings).
|
| Hazardous material | The Standard Plan is required to use this feature. If you aren’t on the Standard Plan or higher, the words Standard plan required will appear adjacent to the settings header, and the fields associated with the feature will be inaccessible.
Enable this checkbox if the item is subject to a hazardous material fee. |
| Standard Box Sizes Settings | These settings are relevant if you have the Standard Box Sizes add-on plugin installed and an integration enabled in the plugin for parcel quotes. The add-on plugin will allow you to define the boxes you inventory for shipping, and select the best one for the checkout.
Ship as its own package
Enabling this setting prevents the item from being combined with other items into one of the standard box sizes. The item will be included in the shipment as its own package with the weight and dimensions specified. Items with this setting enabled are not fed to the Standard Box Sizes packaging algorithm and do not decrement the current plan. Allow vertical rotation
Enabling this setting allows the item to be rotated while identifying a packaging solution involving standard box sizes. This setting provides the most flexibility for arriving at a packaging solution. This item ships as multiple packages
When this setting is enabled, the product will be added to the Items that ship as multiple packages section of the Box Sizes page. The section appears below the list of standard box sizes. Locate the product there to record boxes that contain the materials and parts that the item is comprised of. Items with this setting enabled are not fed to the Standard Box Sizes packaging algorithm and do not decrement the current plan. |
If your product is a Variable Product, set the shipping parameters for each product variation on the Variations page.
When you are done click the Update button located in the Publish widget located at the top right of the page.
What Your Customer Sees |
Return to top. |
To facilitate the successful conclusion of an online purchase the plugin always attempts to return an estimate of shipping charges. If multiple products are in the shopping cart and some are missing weight, dimensions or both, the plugin will use what is available to obtain the shipping rate estimates. For example, if you have two products in the shopping cart and the first has weight and dimensions and the second does not, the shipping rate estimate will be based solely on the first product. The plugin will fail to return shipping rate estimates only when none of the products in the shopping cart have weights or dimensions recorded. Please note that shipping rate estimates will be increasingly inaccurate the more omissions there are to the weight and dimensions of products in the shopping cart.
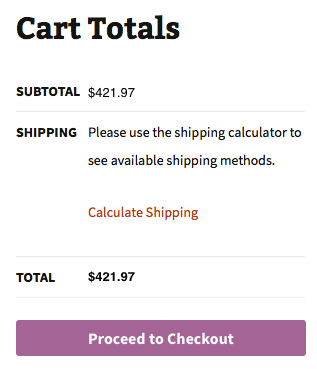
The shopping cart won’t display shipping rate estimates the first time the shopper views the shopping cart because it isn’t aware of the ship to address. The user will be prompted to click on the Calculate Shipping Cost link to provide this information.
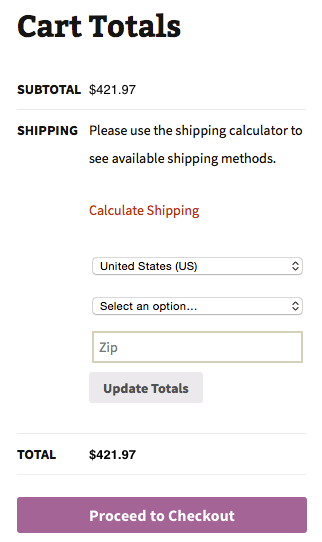
| Appearance of shopping cart when viewed by a shopper who is not logged in to the website. | Appearance of the shopping cart after the user clicks on the Calculate Shipping link. |
 |
 |
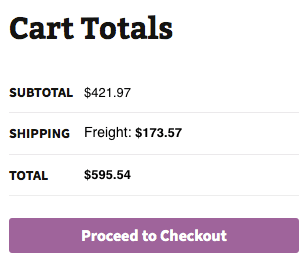
After the user provides the ship to information, the shopping cart will display the shipping rate estimate based on the settings entered in the plugin.
| Appearance of shopping cart when viewed immediately after the ship to information is provided. | |
 |
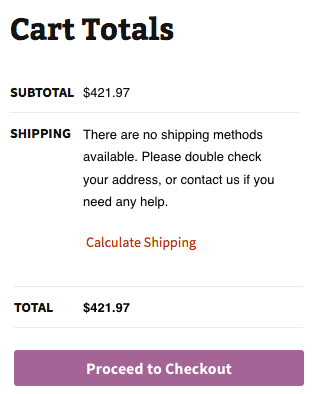
If the plugin is unable to display shipping rate estimates, a message will display. Typical reasons why a quote may not be displayed include: 1) Insufficient data on the products in the shopping cart, such as weight or dimensions or freight class; 2) Invalid credentials due to a password change, an expired license, or a suspended account; 3) An invalid or incomplete ship to address was provided; or 4) The carrier’s web service is not operational.
| Appearance of shopping cart when the plugin is unable to display shipping rate estimates. | |
 |
Managing Your Eniture API Key |
Return to top. |
You can manage your Eniture API Key by signing into eniture.com with the email address and password you entered when you registered for the plugin. After you sign in, My Account will be added to the navigation menu. Click on it to access the Dashboard for your account.

Use the links below to navigate to documents in the knowledge base related to common topics of interest.
Shipping with FreightDesk Online |
Return to top. |
- How capture the cost of shipping on orders placed online.
- How to ship the order, including how to create the shipping label (or Bill Of Lading in the case of LTL freight), schedule the carrier to pick up the shipment, and update the customer with the tracking number.
Quoting plugins, like this one, provide a solution for the first challenge. What are your options for the second challenge?
Option 1 – The carrier’s website: You can log into the carrier’s website and manually enter all of the relevant information. Carrier websites are free to use since the carrier makes money when you use them to deliver an order. However, if you have more than a handful of orders each day this approach is time consuming and ripe for data entry errors which can be costly to correct.
Option 2 – Use a plugin with “print-label” capabilities: It’s possible to find a plugin for certain shipping providers that will both generate quotes during the checkout process, and allow the merchant to print a shipping label. These plugins have very limited functionality and are usually an acceptable option only for merchants with very simple shipping needs and a low volume of shipments. They also require that the individuals responsible for preparing shipments have access to the ADMIN area of WooCommerce, which is not an acceptable arrangement to many merchants.
Option 3 – Cloud-based Shipping Platforms: The next step up in capability are cloud-based shipping systems that will connect to your online store and retrieve the details of your orders, thereby eliminating the need for much of the manual data entry. Many of these shipping systems have arrangements with postal and parcel carriers that can provide the merchant with significant discounts. Where these systems excel is in the efficiency of the fulfillment process. That translates in to a much higher volume of shipments per unit of time. These systems are relatively inexpensive and the reduction in the amount of labor and time it takes to ship your orders will pay dividends.
Option 4 – FreightDesk Online: FreightDesk Online (freightdesk.online) is also a cloud-based shipping system. It enjoys all of the benefits of other cloud-based offerings but expands the solution in two ways:
- It makes use of the detailed information collected by Eniture Technology’s quoting plugins (like this one) such as the packaging solution and the additional services included in the shipping option chosen when the order was placed.
- It provideds merchants access to more than two dozen LTL freight providers in addition to the typical postal and parcel integrations offered by other cloud-based solutions.
These expanded capabilities will deliver you closer to true “click-and-ship” shipping than any other alternative, whether you’re shipping with a postal carrier, a parcel carrier, or an LTL freight provider.
How to connect your WooCommerce store to FreightDesk Online |
Return to top. |
First, if you don’t already have one, register for a FreightDesk Online account (https://freightdesk.online/register). You can connect multiple online stores to FreightDesk Online, even if they use different e-commerce platforms, so you don’t have to create separate FreightDesk Online accounts for each one.
The pricing for FreightDesk Online is á la carte. You’ll be able to pick a separate plan for parcel (and postal) shipments, and for LTL freight shipments based on the anticipated volume for each type of shipping. Your monthly subscription rate will be comprised of these two selections. You can begin a 30-day trial of both types of shipping by selecting Trial in the corresponding dropdown fields on the registration form.
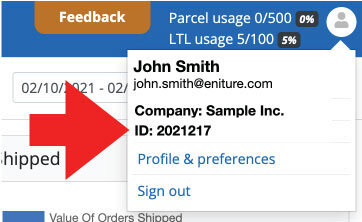
After you complete the registration process, log into FreightDesk Online. Click on your avatar located in the top right-hand corner of the browser window. Copy your FreightDesk Online ID which will be located below your company name.
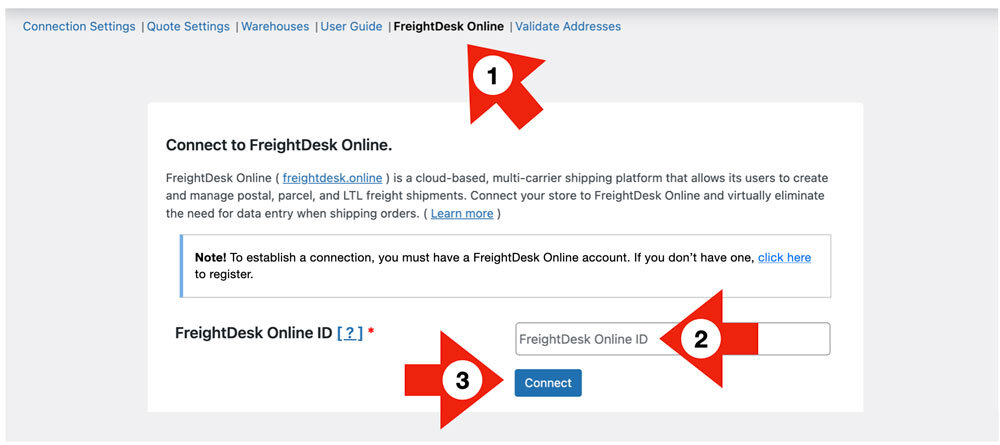
Return to the plugin settings and click on the FreightDesk Online tab. Enter your FreightDesk Online ID and click the Connect button.
Complete the connection by granting any permissions that you’re prompted for.
Next, return to FreightDesk Online. Navagate to Settings > Connections. Locate the store in the list of Connected Marketplaces and click on its Show/Edit link. Update the marketplace’s connection settings using the instructions below.
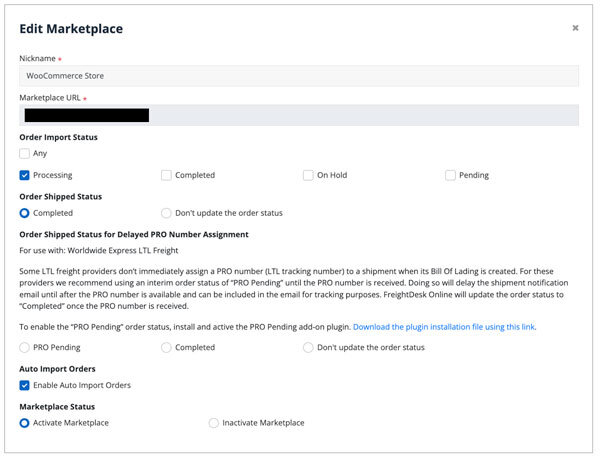
| Nickname | Enter a nickname you’d like to use to represent the connection to this store. Be aware that the nickname will be used to identify the store if you enable FreightDesk Online’s shipment tracking email notifications. It is used as the value for the “{Merchant}” mail-tag. |
| Marketplace URL | This field will be prefilled with the URL of the store that was connected to FreightDesk Online. You can not edit this field. To disable the connection, chose the Inactive Marketplace status option at the bottom of the page. |
| Order Import Status | This setting is used to filter which orders are imported into FreightDesk Online. Processing is typically the only order status enabled. |
| Order Shipped Status | Choose Completed if you want an order status seen in WooCommerce to be automatically updated to “Completed” when the shipping label or Bill Of Lading is printed. If you’d prefer to manually update the order status in WooCommerce, choose the option Don’t update the order status. |
| Order Shipped Status for Delayed PRO Number Assignment | You can ignore this setting if you won’t be connecting Worldwide Express to FreightDesk Online as an LTL freight provider. If you will be, then please read the information provided on-screen and install the add-on plugin. The add-on plugin will add “PRO Pending” as an additional order status in WooCommerce and will delay the order status from being updated to “Completed” until after a PRO number becomes available for the shipment. This is usually by 10:30 AM Eastern Time the next business day. |
| Auto Import Orders | Enable this setting if you’d like newly placed orders with the status(es) you identified in the Order Import Status setting to be automatically imported in to FreightDesk Online. The alternative is to initiate the import manually each time using the |
| Marketplace Status | Select Activate Marketplace to enable the store’s connection to FreightDesk Online. To disable it, choose Inactive Marketplace. |
When you’re done editing your marketplace settings, click the Test Connection button to verify the connection to the store, and then Update to save the settings and return to the Settings > Connections page.
Now that you’ve connected FreightDesk Online, unfulfilled orders can be imported in to FreightDesk Online for processing. To view them, log into FreightDesk Online and click on Orders in the navigation menu. If you have the Enable Auto Import Orders setting enabled, your orders will populate automatically. If not use the Import Orders button to manually initiate the process.
You’ll need to connect your shipping providers before you can start shipping your orders using FreightDesk Online. Connecting your shipping providers is also done on the Settings > Connections page. You can find a quick start guide in FreightDesk Online by navigating to Help > Getting Started. Short instructional videos are also sprinkled through FreightDesk Online. Click on the movie camera icon to view the video.
Using Validate-Addresses.com |
Return to top. |
Validate-Addresses.com is a cloud-based application that validates the ship-to address on online orders. The validation happens after the order is received so there isn’t additional friction during the checkout process that could increase the Cart abandonment rate. Shipping to an invalid address is costly. Shipping providers charge hefty fees to follow up on and correct undeliverable addresses, and additional transportation charges will be incurred if the shipment has to be redirected to a different terminal for delivery. If the shipment is returned to the shipper, the transportation charges will double in addition to the fees. Validate-Addresses.com costs as little as 1¢ per order and can be the difference between making money, or losing hundreds of dollars on an order.
– Benjamin Franklin
How does Validate-Addresses.com work?
As soon as the order is placed, the order status is set to Pending Address Validation (a new order status that will be added to your store) until after Validate-Addresses.com confirms that the ship-to address is valid. If the ship-to address is valid, then the order status is changed to Processing and the order notes are updated to document that the ship-to address was good. The time between an order being placed and the validation of the ship-to address is typically 2 to 3 seconds.
Validate-Addresses.com can be configured to automatically email the customer if the order’s ship-to address is invalid, provide the customer with options on how to correct it, or the option to confirm it as entered. If the customer corrects the address, the address is rechecked. If the corrected address is valid, or if the customer confirmed the address as entered, the order status in WooCommerce is updated to Processing and the order notes are updated to document the event. The merchant’s involvement in this process is completely hands off. The order status will remain Pending Address Validation until the address is corrected or confirmed so the merchant knows not to ship the order.
There will be times when an order’s ship-to address can’t be validated and the customer fails to respond to the email notices about the invalid ship-to address. (You can configure these notices to reflect your brand and customize the message.) In these cases the merchant can contact the customer and if the outcome is favorable, override the Pending Address Validation status in Validate-Addresses.com. Afterward, the order status in WooCommerce will be updated to Processing, and the address will be added to the merchant’s address book so that future orders using the address won’t be flagged as invalid.
How to connect your WooCommerce store to Validate-Addresses.com |
Return to top. |
Register for a Validate-Addresses.com account (https://validate-addresses.com/register). You can connect multiple online stores to Validate-Addresses.com, even if they use different e-commerce platforms, so you don’t have to create separate accounts for each one.
After you complete the registration process, log into Validate-Addresses.com. Navagate to Settings > Connections. On the Connections page, click on the +Add Marketplace button. A modal will appear on the right side of your screen. Click on the tile that represents WooCommerce. Enter the URL of your store and then click the Connect bottom located at the bottom of the modal.
Click the Approve button to grant the permissions requested by Validate-Addresses.com. You’ll need to log into the WordPress site if you aren’t being recognized as an authorized user.
If you aren’t redirected to the Settings > Connections page, use the navigation menu to arrive there. You should see your store listed in the list of Connected Marketplaces. Click on its Show/Edit link located in the right margin of the page. Update the marketplace’s connection settings using the instructions below.
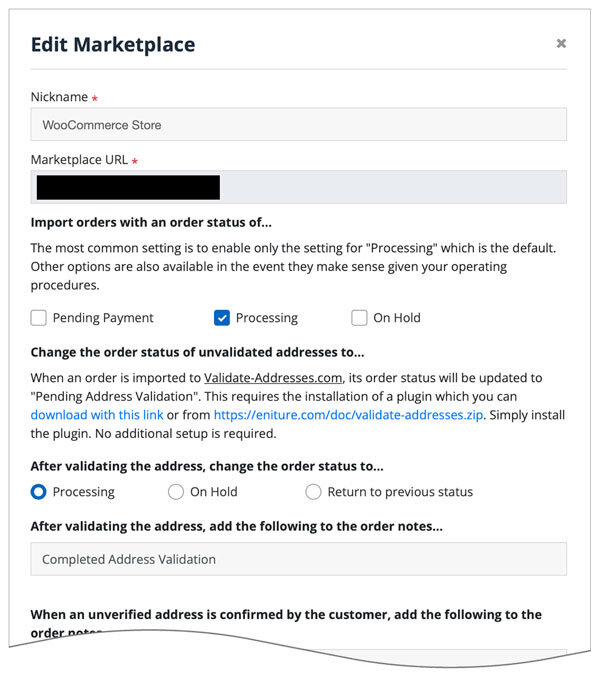
| Nickname | Enter a nickname you’d like to use to represent the connection to this store. |
| Marketplace URL | This field will be prefilled with the URL of the store you entered to initiate the connection. You can not edit this field. To disable the connection, chose the Inactive Marketplace status option at the bottom of the page. |
| Import orders with a status of… | This setting is used to identify the orders are to be imported into Validate-Addresses.com. Processing is typically the only order status enabled. |
| Change the order status of unvalidated addresses to… | The installation of a plugin is required to set an order’s status to Pending Address Validation while the validation of the ship-to address is pending. You can use this link to download the installation file or the link provided in the onscreen instructions. Simply install the plugin. No additional setup is required. |
| After validating the address, change the order staus to… | Select how the order status should be updated once the ship-to address has been validated. Processing is the most common choice. |
| After validating the address, add the following to the order notes… | Enter the text you’d like inserted into the order notes when Validate-Addresses.com succeeds at validating the address. |
| When an unverified address is confirmed by the customer, add the following to the order notes… | Enter the text you’d like inserted into the order notes when Validate-Addresses.com is unable to validate the address but the customer confirms it to be correct as entered. |
| When an unverified address is confirmed by the merchant, add the following to the order notes… | Enter the text you’d like inserted into the order notes when Validate-Addresses.com is unable to validate the address but the merchant (you) intend to ship the order to the ship-to address entered. |
| Marketplace Status | Select Activate Marketplace to enable the store’s connection to Validate-Addresses.com. To disable it, choose Inactive Marketplace. |
When you’re done editing your marketplace settings, click the Test Connection button to verify the connection to the store, and then Update to save the settings and return to the Settings > Connections page.
Now that you’ve connected Validate-Addresses.com, orders that meet your settings will automatically propagate the system. Orders that have ship-to addresses that were validated, corrected, or confirmed will appear on the Validate-Addresses.com History page and their status will appear as Processing on the WooCommerce Orders page. Orders with ship-to addresses that require attention will appear on the Validate-Addresses.com Orders page and their status on the WooCommerce Orders page will be Pending Address Validation. Use the Validate-Addresses.com Orders page to work on the ship-to address of orders that require attention.
To enable the ship-to address correction/confirmation process, which begins with an email to the customer when an invalid address is provided, you must first configure your outbound mail server settings. In Validate-Addresses.com navigate to Settings > Email Setup. Afterward, navigate to Settings > Email Template to customize the content of the email your customer will receive.