The Unishippers Small Package Quotes plugin retrieves your negotiated parcel rates, takes action on them according to the plugin settings, and displays the results as shipping options in the WooCommerce cart and checkout page. Unishippers (unishippers.com ) is a third party logistics company that gives its customers access to UPS and over 60 LTL freight carriers through a single account relationship. To establish a Unishippers account, call 1-866-998-7447 or complete the new account request form.
Setup Tutorial & Demo (10:30 min)
Basic Plan
Live negotiated rates displayed in the cart and checkout page.
Supported origins: Canada, United States
Supported destinations: Any country to which UPS provides service.
Choose which UPS services to offer to your shoppers.
Mark up individual UPS services by dollar amount or percentage.
Option to always include the residential delivery fee.
Identify one warehouse and multiple drop ship locations.
Compatible with the Residential Address Detection plugin which automatically includes the residential address delivery fee when the Ship To address is a residence. (US addresses only.)
Use the optional Standard Box Sizes feature to retrieve hyper-accurate rate estimates supported by step-by-step graphic illustrations of the packaging solution.
Support for individual items that ship as multiple packages. (Requires use of the optional Standard Box Sizes feature)
Embed a handling charge in the displayed rates to recover the cost of packaging materials or other shipping related expenses.
Works intelligently with Eniture Technology’s LTL Freight Quotes plugins to identify when orders should be quoted as parcel shipments and when they should be quoted as LTL freight shipments.
Standard Plan
Everything in the Basic Plan, plus…
Define multiple warehouses.
The warehouse closest to the shopper is used as the shipment origin to keep shipping costs low and delivery times fast.
Support for products that ship as hazardous material.
Specify an order cut off time and have it reflected in the estimated delivery date.
Extend estimated delivery dates to account for lead times in manufacturing and/or fulfillment.
Identify the days of the week you ship orders and have it reflected in the estimated delivery date.
Advanced Plan
Everything in the Standard Plan, plus…
Use transit time to limit when Ground service is offered.
Offer in-store pick up based on the shopper’s ZIP code or distance to the warehouse.
Offer local delivery based on the shopper’s ZIP code or distance to the warehouse.
Identify a charge for local delivery.
Current version: 2.1.3
Requirements
WooCommerce 5.7 or newer.
A Unishippers Customer Number .
A Unishippers issued UPS account number.
Your username and password to Unishipper.
A Unishippers issued Request Key.
An API key from Eniture Technology.
FAQs
How do I get an API key for the plugin?
You must register your installation of the plugin, regardless of whether you are taking advantage of the trial period or purchased an API key outright. At the conclusion of the registration process an email will be sent to you that will include the API key. You can also login to eniture.com using the username and password you created during the registration process and retrieve the API key from the My Licenses tab.
How do I change my plugin API key from the trial version to one of the paid subscriptions?
Login to eniture.com and navigate to the My Licenses tab. There you will be able to manage the licensing of all of your Eniture Technology plugins. Refer to the Documentation tab on this page for more thorough instructions.
How do I install the plugin on another website?
The plugin has a single site API key. To use it on another website you will need to purchase an additional API key. If you want to change the website with which the plugin is registered, login to eniture.com and navigate to the My Licenses tab. There you will be able to change the domain name that is associated with the API key.
Do I have to purchase a second API key for my staging or development site?
No. Each API key allows you to identify one domain for your production environment and one domain for your staging or development environment. The rate estimates returned in the staging environment will have the word “Sandbox” appended to them.
Why isn’t the plugin working on my other website?
If you can successfully test the plugin from the Connection page (WooCommerce > Settings > Unishippers > Connections) then you have one or more of the following issues: 1) You are using the API key on more than one domain. The API keys are for single sites. You will need to purchase an additional API key. 2) Your trial period has expired. 3) Your current API key has expired and we have been unable to process your form of payment to renew it. Login to eniture.com and go to the My Licenses tab to resolve any of these issues.
Why are the quotes I receive on my website different than what I’m paying for postage?
The quoted rates will match the amount you pay for postage provided the same shipping parameters are used. If they differ, examine the product weight and dimensions you have entered into your website. Consider making changes as needed. Remember that the weight of packaging materials is included in the weight of the shipment and that your use of box size may also have an impact on the shipment’s billable weight.
Why do I sometimes get a message that a shipping rate estimate couldn’t be provided?
There are several possibilities:
UPS has restrictions on a shipment’s maximum weight, length and girth which your shipment may have exceeded.
There wasn’t enough information about the weight or dimensions for the products in the shopping cart to retrieve a shipping rate estimate.
The city entered for the shipping address may not be valid for the postal code entered. A valid City+State+Postal Code combination is required to retrieve a rate estimate. Contact us by phone (404-369-0680) or email (support@eniture.com) to inquire about solutions to this problem.
The Unishippers web service isn’t operational.
Your subscription to the application has expired because payment could not be processed.
There is an issue with the Eniture Technology servers.
There is an issue with your server(s).
Installation & User’s Guide
If you are taking advantage of a trial subscription, the plugin will stop working when the trial period ends. Be sure to read the Managing Your Eniture API Key section to learn how to upgrade your subscription.
Overview
Setting up the plugin consists of the following steps:
- Download the installation file.
- Install the plugin application file.
- Activate the plugin.
- Create credentials for the Unishippers RateLink API.
- Connect the plugin
- Quote settings
- RAD (Residential Address Detection)
- Identify your warehouse and drop ship locations
- Enter your boxes.
- Enable the plugin.
- Configure your products.
Other information contained in this guide:
1. Download the Installation File |
Return to top. |
On the Features tab of this webpage (you’re currently on the Documentation tab) is a list of available subscription plans and a description of the features included in each one. Click on the green button associated with the plan you want to subscribe to. The image below shows where to click to sign up for a monthly subscription to the plugin’s Basic Plan. There is also a button for a free 15 day trial beneath the name of the plugin at the top of the page.

You will be presented with a registration form. The email address and password you enter will serve as your credentials to eniture.com. Use these to gain access to your customer dashboard where you can download the plugin installation file, manage your licenses and update your payment information. When you download the plugin installation file, be sure to save it to a familiar location. You will need to navigate to the file during the installation process.
2. Install the Plugin Application File |
Return to top. |
Login to the WordPress dashboard as the website administrator.
In the left sidebar, hover your mouse over the Plugins menu to display the sub-menu options.
Select Add New from the sub-menu options. The Add Plugins page will load.
At the top of the Add Plugins page, click on the Upload Plugin button.

Controls will appear in the middle of page that will allow you to chose and install the plugin application. Choose the Choose File button, navigate to the location where you saved the installation file and select it.

Click the Install Now button.
WordPress will display information about the installation progress at the bottom of the page. The plugin has been installed once the message Plugin installed successfully is displayed.
3. Activate the Plugin |
Return to top. |
Once the plugin has been installed, it must be activated. If you are still on the same page that you were on at the end of Step 2, you can click the Activate Plugin link on the bottom of the page.

If you’ve already navigated away from that page, select Installed Plugins from the Plugins menu.

Locate the Small Package Quotes – Unishippers Edition plugin on the list and click the Activate link.

4. Create credentials for the Unishippers RateLink API |
Return to top. |
To connect to the Unishippers RateLink API you first need to create credentials for it. To do so you must have the following:
- Your Unishippers customer number (this starts with a capital letter U)
- The contact phone number or contact email address associated with your Unishippers customer number
Follow this link (http://uone-billing.unishippers.com/uone/signup.do) to access and complete the Unshippers RateLink API registration page.
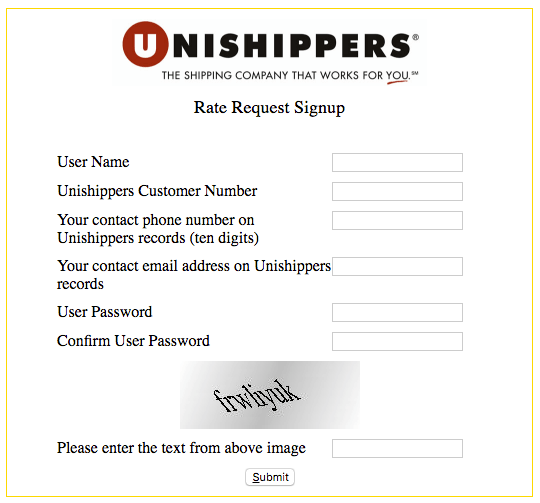
| User Name | Enter a user name for use with the Unishippers RateLink API. This is completely separate from other user names that you have for Unishippers.com or UPS.com. |
| Unishippers Customer Number | Enter your Unishippers customer number. It will begin with the letter “U”. |
| Your contact phone number on Unishippers records | Enter the phone number associated with your Unishippers customer number. |
| Your contact email address on Unishippers records | Enter the email address associated with your Unishippers customer number. |
| User Password | Enter a password to use in conjunction with the user name entered at the top of this form. Limit the password to eight characters. Although you may think you succeeded in creating a longer password, anything longer that eight characters will result in an unsuccessful connection to the API. |
| Confirm User Password | Re-enter a password entered in the User Password field. |
| Please enter text from above image | Enter the text that appears in the image above this field. |
5. Connection Settings |
Return to top. |
Select Settings from the WooCommerce menu.
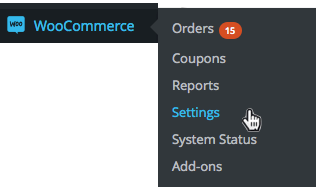
Click on the Unishippers tab to gain access to the plugin configuration settings.
The Connection Settings page is used to establish the plugin’s connection to Unishippers’ web services. What is required depends on whether you will connect to Unishippers’ New API or Legacy API. The Which API will you connect to? setting will determine whether you will complete this step using the instructions in section 5a, or 5b.
| Which API will you connect to? | New API Choose this option if you obtained a Client ID and Client Secret to use when connecting to the Unishippers API. Instructions on how to obtain these is presented earlier in this guide. If you select this option, proceed to Step 5a. Legacy API
Choose this option if you have credentials to Unishippers’ legacy API. If you select this option, proceed to Step 5b. |
5a. Connect to Unishippers’ New API |
Return to top. |
The instructions in this section are relevant only if you selected the New API option for the Which API will you connect to? setting.
Enter the information prompted for, then click Save Settings.
| Client ID | Enter the Client ID you received for the New API. |
| Client Secret | Enter the Client Secret you you received for the New API. |
| Username | Enter the username you use to log in to the Unshippers website. |
| Password | Enter the password you use to log in to the Unishippers website. |
| Eniture API Key | Enter the API Key you obtained from Eniture Technology. If you don’t have one, click the link to the right of this field to obtain one.
Related documents:
How To Obtain Your Eniture API Key |
After saving the settings, click the Test Connections button. You will see a success message if your credentials validated. If the connection fails, correct the credentials and try again.
The Eniture API Key will be tied to a subscription. The Trial Plan will give you 15 days of free access to the Basic Plan. Two other plans are available; the Standard Plan and the Advanced Plan. The features associated with each plan are listed on the Features tab of this web page. Each plan is available for a monthly or yearly subscription rate. To manage your Eniture API Key, including which plan is associated with it, see the section titled Managing your Eniture API Keys at the end of this User’s Guide.
5b. Connect to Unishippers’ Legacy API |
Return to top. |
The instructions in this section are relevant only if you selected the Legacy API option for the Which API will you connect to? setting.
Enter the information prompted for, then click Save Settings.
<
| Unishippers Customer Number | Your Unishippers customer number. It will begin with the letter “U”. |
| UPS Account Number | Your Unishippers issued UPS account number. |
| Username | The username you created in Step 4 of these instructions when you registered to use the Unishippers RateLink API. |
| Password | The password you created in Step 4 of these instructions when you registered to use the Unishippers RateLink API. |
| Request Key | (optional) An ASCII string (of your choosing) that the system will return to you in the response to enable tracking of the request through the Unishippers PriceLink API system. |
| Eniture API Key | Enter the API Key you obtained from Eniture Technology. If you don’t have one, click the link to the right of this field to obtain one.
Related documents:
How To Obtain Your Eniture API Key |
After saving the settings, click the Test Connections button. You will see a success message if your credentials validated. If the connection fails, correct the credentials and try again.
The Eniture API Key will be tied to a subscription. The Trial Plan will give you 15 days of free access to the Basic Plan. Two other plans are available; the Standard Plan and the Advanced Plan. The features associated with each plan are listed on the Features tab of this web page. Each plan is available for a monthly or yearly subscription rate. To manage your Eniture API Key, including which plan is associated with it, see the section titled Managing your Eniture API Keys at the end of this User’s Guide.
6. Quote Settings |
Return to top. |
If you don’t have visibility to the plugin’s navigation menu, select Settings from the WooCommerce menu.

Click on the Unishippers tab to gain access to the plugin configuration settings. Using the links at the top of the page, select Quote Settings.
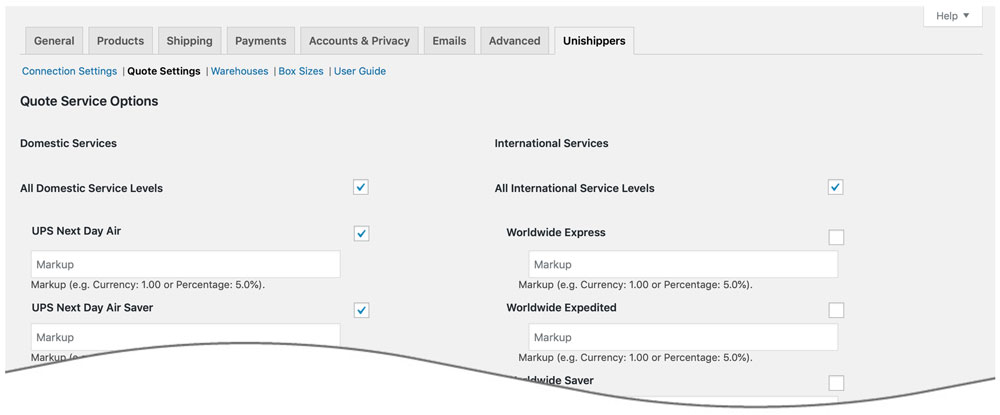
| Quote Service Options | Place checkmarks next to the UPS domestic, international and contract services you want to display in your shopping cart at checkout. For a description of the service guarantees for each option go to ups.com and retrieve the current year’s Service Guide. You must have an agreement in place with UPS to use the Contract Services.
Beneath each service is a markup field. You can enter a dollar amount (e.g. 5.00) or percentage (e.g. 3.5%) in the field if you’d like to mark up the rate returned for that service. You can also enter a negative value if you want to mark down the rate. Later in the Quote Settings there is a general Handling Fee / Mark Up field that will be applied to all returned rate estimates. The service level markups are applied before the general setting. |
| Don’t sort shipping methods by price | By default, the plugin will display all returned shipping quotes (including those coming from other plugins / shipping methods) by price in ascending order. You can disable this behavior by checking this box. If you do, shipping quotes from each shipping method will be ordered as they appear in the Woocommerce > Settings > Shipping > Shipping Zone. |
| Package rating method when Standard Box Sizes isn’t in use | Quote each item as shipping as its own package. Select this option if you want each item in the Cart to be quoted as its own package. Combine the weight of all items without dimensions and quote them as one package while quoting each item with dimensions as shipping as its own package.
This option will sum the weight of all the items in the Cart that are missing dimensions and treat them as a single package. The billable weight of this package will be its actual weight. Items in the Cart that have dimensions will be quoted as shipping as their own package. The billable weight of these packages will be the greater of the dimensional or actual weight as per the carrier’s service guidelines. Quote shipping as if all items ship as one package up to 70 LB each
Rates for shipping will be based on weight only. If the total weight of the Cart exceeds 70 LB, the total weight of the Cart will be divided by 70 to determine the number of packages, and each package will have the same weight. Quote shipping as if all items ship as one package up to 150 LB each
Rates for shipping will be based on weight only. If the total weight of the Cart exceeds 150 LB, the total weight of the Cart will be divided by 150 to determine the number of packages, and each package will have the same weight. Use the default Eniture packaging algorithm.
Prior to introduction of Standard Box Sizes, the plugin used a modified volume calculation to approximate a virtual box for the contents of the Cart. It helped determine if the billable weight of the shipment would be based on dimensional or actual weight. The Standard Box Sizes feature is more accurate, but the default packaging algorithm can be an acceptable alternative in some cases. |
| Delivery Estimate Options | Don’t display delivery estimates Only the shipping rate for the enabled services will display when this option is selected. Display the estimated number of days until delivery
The estimated days until delivery will be displayed after each enabled service name and before the rate estimate.Weekend days and holidays are included in the estimate. For example, if an overnight shipment is quoted with a ship-date of a Thursday, the estimated number of days until delivery will be one. But if the same overnight shipment is quoted with a ship-date of a Friday, the estimated number of days until delivery will be three to include Saturday and Sunday; and provided that the following Monday is not a holiday.The shipment date will be the date of the order, unless you are using the Order Cut Off Time or Fulfillment Offset Days feature to adjust the shipment date. Display estimated delivery date
The date and time of the estimated delivery date will be displayed after each enabled service name and before the rate estimate. Weekend days and holidays are accounted for. For example, if an overnight shipment is quoted with a ship-date of a Friday, the estimated delivery date date will be the following Monday, provided that the following Monday is not a holiday.The shipment date will be the date of the order, unless you are using the Order Cut Off Time or Fulfillment Offset Days feature to adjust the shipment date. |
| Cut Off Time & Ship Date Offset | The Standard Plan is required to use these features. If you aren’t on the Standard Plan the words Standard Plan required will be displayed. Click on the Standard Plan required text to upgrade your plan and gain access to these features.
The features are only relevant if you have Show Delivery Estimates enabled. Workdays are Monday through Friday except for the public holidays on which the carrier does not provide pick up service. Order Cut Off Time
Enter the cut off time for orders. When the plugin requests shipping quotes, it identifies a shipment date. The estimated delivery date is dependent on the ship date. The cut off time allows you to postpone an order’s shipment date by one workday. Orders received before the cut off time are quoted using the order date as the ship date. Orders received after the cut off time use the next workday as the ship date. Fulfillment Offset Days
Enter the number of days to offset the ship date. When the plugin requests shipping quotes, it identifies a ship date. The estimated delivery date is dependent on the ship date. This setting allows you to postpone the ship date by a specified number of workdays. Example 1 Example 2 What days do you ship orders?
Identify the days of the week on which you ship orders. The ship date used for the rate request will be modified accordingly, which may affect the expected delivery date. |
| Ground transit time restrictions | The Advanced Plan is required to use this feature. If you aren’t on the Advanced Plan the words Advanced plan required will be displayed. Click on the Advanced plan required text to upgrade your plan and gain access to the feature.
This feature is commonly used by merchants who sell perishable products and need to prevent Ground service from displaying as an option when the shipment transit time exceeds a certain number of days. Enter the number of transit days to restrict ground service to. Leave blank to disable this feature.
In the box provided, enter the maximum number of days your products can be in transit. Leave blank to disable this feature. Restrict by the calendar days in transit
Pick this option to if you want to include weekends and holidays when determining if Ground service will be displayed. Choose this option if you always ship orders at the first opportunity to do so. Restrict by the carrier’s in transit days metric
Pick this option to apply the rule based on the carrier’s in transit days estimate. Carriers identify the in-transit days as business days. Choose this option if you hold orders until a ship date occurs upon which the order can be shipped and not be delayed by weekends or holidays. |
| Always quote as residential delivery | When checked, the quotes returned quotes will include the residential delivery fee.
This setting is binary. When it is enabled, every ship-to address will be quoted as being to a residential address and include the residential delivery fee. When it is disabled, every ship-to address will be quoted as being to a commercial address. To have the address type determined dynamically during checkout, install the Residential Address Detection add-on plugin and refer to the instructions in this guide for “RAD (Residential Address Detection)”.
|
| Use my standard box sizes | Through the use of an addon plugin titled Standard Box Sizes, you can define your standard box sizes which the plugin will use to identify the optimal packaging solution. The result is hyper-accurate shipping rate estimates. The packaging solution is saved as a step-by-step graphical illustration which is accessed from the Order Details page. If the message “Click here to add the Standard Box Sizes module.” is present, then the add on plugin is not installed. Click on the link to install it if you’d like to use this feature, or click (Learn more) to find out more information on this feature. If you have a Box Sizes option in the plugin navigation links, then you already have the add on plugin installed. Refer to Step 8 for instructions. |
| Hazardous material settings | The Standard Plan or higher is required to use this feature. If you aren’t on the Standard Plan or higher the words Standard plan required will be displayed. Click on the Standard plan required text to upgrade your plan and gain access to the feature.
Only quote ground service for hazardous materials shipments
Check this box if you only want ground service quoted in the event that one or more of the products in the shopping cart is identified as hazardous material. Ground Hazardous Material Fee
Enter in the amount that should be added to the ground rate estimate in the event that one or more of the products in the shopping cart is identified as hazardous material. The fee will only be added once per shipment. Air Hazardous Material Fee
Enter in the amount that should be added to the air service estimates in the event that one or more of the products in the shopping cart is identified as hazardous material. The fee will only be added once per shipment. A special agreement/contract may be required to use air services to ship hazardous materials. |
| Handling Fee / Mark Up | Increases the amount of each returned quote by a specified amount prior to displaying it/them in the shopping cart. The number entered will be interpreted as dollars and cents unless it is followed by a % sign. For example, entering 5.00 will cause $5.00 to be added to the quotes. Entering 5.00% will cause each quote to be multiplied by 1.05 (= 1 + 5%).
Note: The plugin has four settings that can be used to mark up shipping quotes. They are applied to shipping quotes in the following order: 1) Product-specific Mark Up (Product settings); 2) Location-specific Handling Fee / Mark Up (Warehouse settings); 3) Service-specific Mark Up (Quote settings); and 4) General Handling Fee / Mark Up (Quote settings).
|
| Enable Logs | Enable the checkbox to have API transactions logged on the Logs page. The plugin’s navigation will only display an entry for Logs when this setting is enabled. The page will contain as many as 25 of the most recent transactions. |
| Allow other plugins to show quotes | (Yes|No) Permit or prevent the display of shipping rates from other plugins. |
| Checkout options if the plugin fails to return a rate | Choose how you want the cart to behave if the plugin fails to return shipping rates. You can allow the customer to complete the transaction, or prevent the customer from continuing. The text area below each option allows you to customize the message that will display in the cart. |
7. RAD (Residential Address Detection) |
Return to top. |
The RAD (Residential Address Detection) option in the plugin navigation menu will be present only if the Residential Address Detection add-on plugin is installed and activated.
| Subscription Selection | Auto-renew Choose a plan that best meets your needs. The credit card associated with quote plugin license will be billed immediately and the plan will become your current plan. Your choice will be retained for the auto-renew option. You can change your auto-renew selection at any time. Plans automatically renew at the end of every monthly billing cycle or upon the depletion of the current plan. To prevent a renewal, choose Disable from the list of options. Current plan
Displays information about the current plan and the start and end dates of the current subscription period. Current Usage
Displays information about the consumption of the current plan. The date shown is the UTC timestamp of the last time a residential address detection event occurred. Suspend use
Checking this box temporarily suspends the Residential Address Detection plugin. It does not permanently disable it and if the current monthly billing cycle expires, a new plan will be activated. To disable the plugin, deactivate it or choose Disable from the Auto-renew drop down. |
| Default Unconfirmed Addresses | Default unconfirmed addresses to In rare cases, the plugin may be unable to confirm the address type. This occurs when a match for the address can’t be found in the USPS database. Invalid addresses are the most common reason for this. In extremely rare cases an address may be valid, but the match found in the USPS database has a low confidence metric. Choose how you want addresses treated in these cases. Residential
Choose this setting if you want unconfirmed addresses to be treated as residential. Commercial
Choose this setting if you want unconfirmed addresses to be treated as commercial. Address type disclosure
This setting allows you to choose whether or not to inform the shopper when the ship-to address has been quoted as a residential address. Inform the shopper when the ship-to address is identified as residential
Recommended. Choose this setting when you want to inform the shopper that their ship-to address has been identified as a residential address. Don’t disclose the address type to the shopper
Choose this setting if you don’t want to inform the shopper when their ship-to address has been identified as a residential address. |
| Do not return rates if the shipping address appears to be a post office box | Enable this setting if you don’t want the plugin to present shipping quotes when the ship-to address appears to be a post office box. Addresses in the United States will rely on metadata provided by the USPS for this determination. String matching, which is less reliable, will be used for addresses in other countries. |
| Address Type Overrides | This section will allow you to set the address type of specific addresses. When an address appears in this table, the address type recorded is used for quoting purposes and the USPS database is not consulted. To add an address, click on the Add new address link and complete the form. |
8. Define Warehouse and Drop Ship Locations |
Return to top. |
If you don’t have visibility to the plugin’s navigation menu, select Settings from the WooCommerce menu.

Click on the Unishippers tab to gain access to the plugin configuration settings. Using the links at the top of the page, select Warehouses.
Click the Add button in the appropriate sections to add warehouse and drop ship locations. On the Basic Plan you can define one warehouse and multiple drop ship locations. To define multiple warehouse locations you must be on the Standard Plan or higher.
Warehouses should have a complete inventory of all products not otherwise identified as drop shipped items. If you have more than one warehouse defined, the warehouse closest to the shopper will be used to retrieve shipping rate estimates. You should define at least one warehouse, even if all of your products are drop shipped. This insures that quotes will be returned in the event the drop ship location was overlooked when the product entry was created.
Drop ship locations usually represent vendors that supply items that you don’t inventory. These items are shipped directly to your customer on your behalf. When an order includes drop shipped items the shopping cart will display a single figure for the shipping rate estimate that is equal to the sum of the cheapest option for each shipment required to fulfill the order.
Warehouses vs. Drop Ship Locations
How the Plugin Presents Quotes with Multiple Shipment Origins
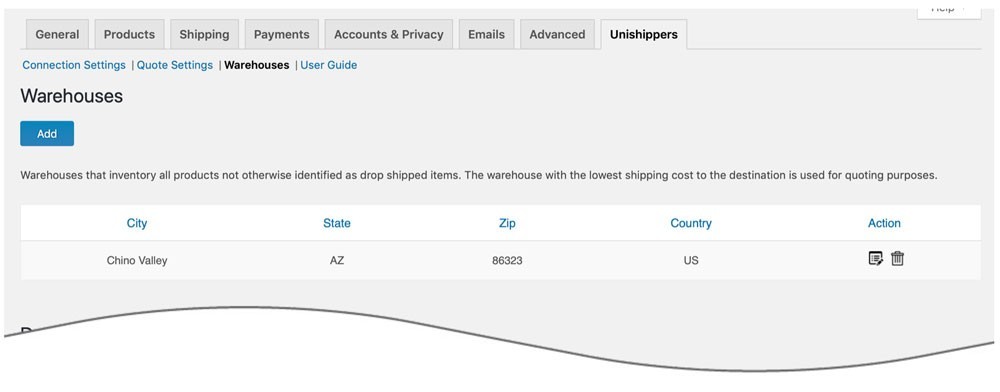
| Steet Address | Optional. Enter the street address for the location. This will be displayed along with the city, state, and postal code when the setting for in-store pick up is enabled. |
| ZIP | Enter the postal code for the location. Enter only the five digit ZIP Code for US addresses. |
| City | The plugin will attempt to prefill the City based on the postal code. Edit it if the prefilled value is incorrect. |
| State | The plugin will attempt to prefill the State based on the postal code. Edit it if the prefilled value is incorrect. |
| Country | The plugin will attempt to prefill the Country based on the postal code. Edit it if the prefilled value is incorrect. Use only the two character standardized country code. |
8a. In-store pick up settings |
Return to top. |
The Advanced Plan is required to use this feature. If you aren’t on the Advanced Plan the words Advanced plan required will appear adjacent to the settings header, and the fields associated with the feature will be inaccessible.
In-store pick up can be offered as an option in the checkout process based the shopper’s postal code or proximity. It will only be offered if the feature is enabled and only one stocking location (warehouse or drop ship location) is involved in providing a quote. The settings for In-store pick up are visible on the page used to add or edit a warehouse or drop ship location.
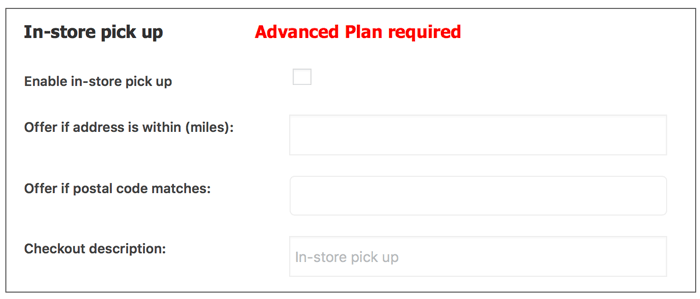
| Enable in-store pick up | Check the box to enable the in-store pick up feature. |
| Offer if address is within (miles) | The distance in miles within which you’d like to offer in-store pick up. The distance is route miles (driving distance). Leave blank if you don’t want to use distance to determine if in-store pick up should be offered. If both distance and postal codes are used as evaluation criteria, in-store pick up will display if either is satisfied. |
| Offer if postal code matches | The postal codes to which you’d like to offer in-store pick up. Enter only the five digit ZIP Code for US addresses. Leave blank if you don’t want to use postal codes to determine if in-store pick up should be offered. If both distance and postal codes are used as evaluation criteria, in-store pick up will display if either is satisfied. |
| Checkout description | The description to use to identify the option in the checkout process. The most obvious candidate is In-store pick up, but you can make it anything you’d like. |
| Phone number | Enter the phone number to display in the description of the in-store pickup option. |
8b. Local delivery settings |
Return to top. |
The Advanced Plan is required to use this feature. If you aren’t on the Advanced Plan the words Advanced plan required will appear adjacent to the settings header, and the fields associated with the feature will be inaccessible.
Local delivery can be offered as an option in the checkout process based the shopper’s postal code or proximity. It will only be offered if the feature is enabled and only one stocking location (warehouse or drop ship location) is involved in providing a quote. Local delivery can display as a free option or have a charge associated with it. Other shipping options provided by the app can be suppressed when local delivery is to be offered. The settings for Local delivery are visible on the page used to add or edit a warehouse or drop ship location.
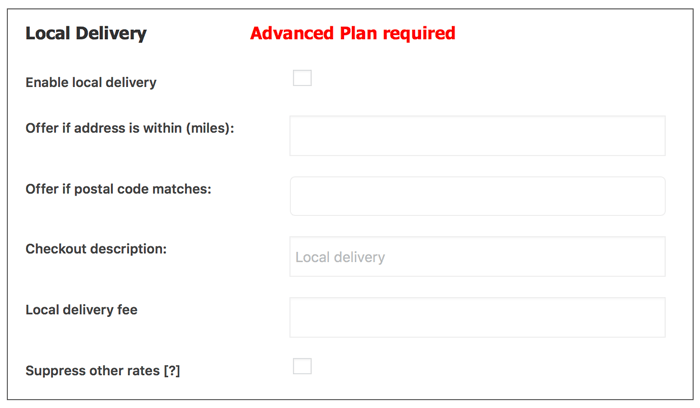
| Enable local delivery | Check the box to enable the local delivery feature. |
| Offer if address is within (miles) | The distance in miles within which you’d like to offer local delivery. The distance is route miles (driving distance). Leave blank if you don’t want to use distance to determine if local delivery should be offered. If both distance and postal codes are used as evaluation criteria, local delivery will display if either is satisfied. |
| Offer if postal code matches | The postal codes to which you’d like to offer local delivery. Enter only the five digit ZIP Code for US addresses. Leave blank if you don’t want to use postal codes to determine if local delivery should be offered. If both distance and postal codes are used as evaluation criteria, local delivery will display if either is satisfied. |
| Checkout description | The description to use to identify the option in the checkout process. The most obvious candidate is Local delivery, but you can make it anything you’d like. |
| Local delivery fee | Enter the amount to charge for local delivery. Leave blank to offer local delivery for free. |
| Suppress other rates | Check the box to show only the option for local delivery when the criteria for doing so (distance or postal code) is met. Leave unchecked to have local delivery offered in addition to the shipping options normally displayed by the app. |
9. Enter your boxes |
Return to top. |
The Standard Box Sizes feature is optional and will allow you to retrieve hyper-accurate shipping rate estimates. With the Standard Box Sizes feature enabled, you can identify:
- The sizes of the boxes you inventory.
- The rotational property of items that can be packed in a box with other items.
- Items that ship as their own package (Can’t be packed in a box with other items).
- Items pre-packaged to ship in more than one box.
When items in the cart can be packaged together, the app will identify the best box(es) to use for the order and send the packaging solution to the carrier when requesting rates. The packaging solution is saved as a step-by-step graphical illustration which you can access from the Order Details page. Use the step-by-step instructions to pack the order exactly as it was quoted.
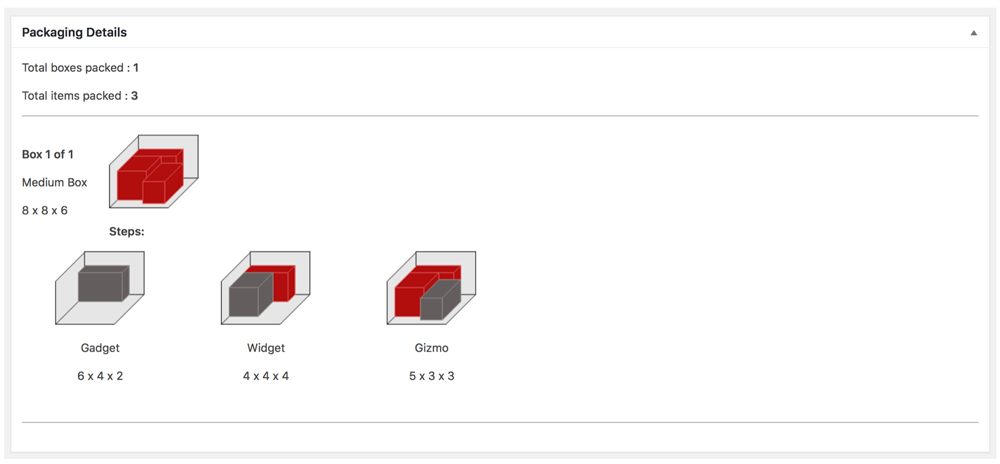
If you elect not to use the Standard Box Sizes feature, a free built-in algorithm will be used to identify a packaging solution for the order. The built-in algorithm will create as large of a box as needed (but within the carrier’s service guidelines) to accommodate all of the items in the cart. The built-in algorithm will be sufficient for some merchants, particularly those whose shipping charges are not affected by dimensional weight rules.
Dimensional weight is an extremely important factor when calculating rates for parcel services. Have a clear understanding of the topic when deciding whether or not to use the Standard Box Sizes feature. (Learn more about dimensional weight)
If you have the Standard Box Sizes plugin installed, Box Sizes will appear as an option in the plugin navigation menu. If it doesn’t and you want to use this feature, go to the Standard Box Sizes product page where you can learn more and download the plugin installation file.

9a. Identify your standard box sizes |
Return to top. |
If you don’t have visibility to the plugin’s navigation menu, select Settings from the WooCommerce menu.

Click on the Unishippers tab to gain access to the plugin configuration settings. Using the links at the top of the page, select Box Sizes.
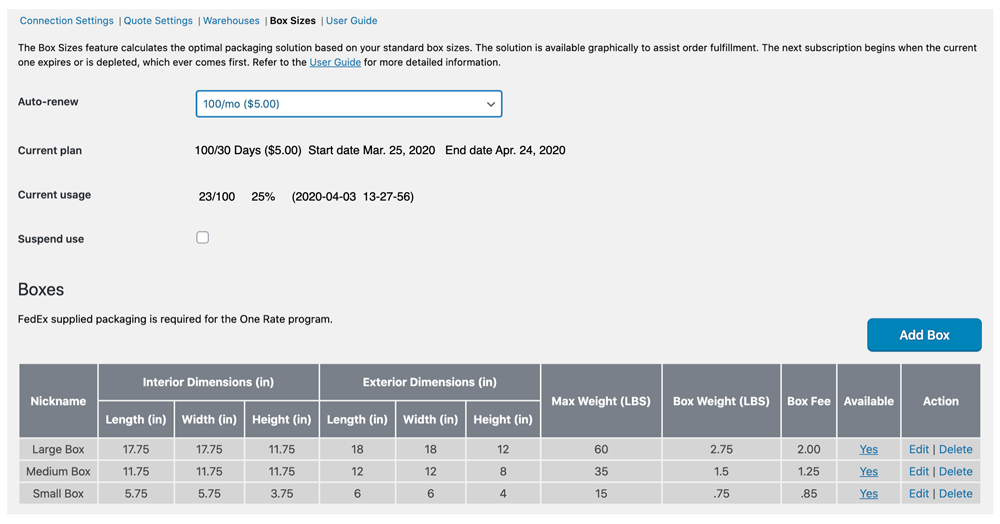
Below is an excerpt from the Standard Box Sizes User’s Guide to assist you with populating the associated settings.
| Auto-renew | Choose a plan that best meets your needs. The plugin comes with a free 15 day trial, or 100 transactions, which ever comes first. After the trial expires, the credit card associated with quote plugin license will be billed and the plan selected will become your current plan. Your selection will be retained for the auto-renew option. You can change your auto-renew selection at any time. Plans automatically renew at the end of every monthly billing cycle or upon the depletion of the current plan. To prevent a renewal, choose Disable from the list of options. |
| Current plan | Displays information about the current plan and the start and end dates of the current subscription period. |
| Current usage | Displays information about the consumption of the current plan. The date shown is the UTC timestamp of the last time a packaging solution was identified.
The current plan is decremented only when the packaging algorithm is used to identify a packaging solution using your list of standard box sizes. The packaging algorithm is not used (and therefore the current plan is not charged) for items that have the setting Ships as own package or This item ships as multiple packages enabled. These settings appear on the Product > Shipping page. |
| Suspend use | Checking this box temporarily suspends the Standard Box Sizes plugin. It does not permanently disable the feature and if the current monthly billing cycle expires, a new plan will be activated. To disable the plugin, deactivate it or choose Disable from the Auto-renew drop down. |
| Optimization mode | The packaging algorithm arrives at a solution by prioritizing whether to minimize the amount of empty space in the packages (e.g. boxes) or by minimizing the number of packages in the shipment. For example, the packaging solution may yield two boxes with 5% of empty space when space utilization is prioritized, or one larger box with 20% of empty space if the number of packages is prioritized.
Maximize space utilization
Choose this option if you want the packaging algorithm to prioritize space utilization when arriving at a packaging solution. Minimize the number of packages
Choose this option if you want the packaging algorithm to prioritize the number of packages (fewer is better) when arriving at a packaging solution. |
To add a box, click the Add Box button. A popup will display prompting you for the following information about the box:
| Nickname | Enter a nickname for the box. The nickname will be used to identify the box in the graphical illustration of the packaging solution. |
| Box Type | Choose a box type from the drop-down list. Choose Merchant defined box for boxes you purchase from a supplier like Uline. If the box came from a carrier (e.g., FedEx, UPS, USPS), choose the entry that most accurately describes it. Packaging solutions that use carrier sourced boxes are available only for the services offered by that carrier. Boxes intended for specific service offerings, such as flat rate shipping, are restricted to those services. |
| Interior Length | The interior length of the box in inches. |
| Interior Width | The interior width of the box in inches. |
| Interior Height | The interior height of the box in inches. |
| Exterior Length | The length of the box in inches. |
| Exterior Width | The width of the box in inches. |
| Exterior Height | The height of the box in inches. |
| Max Weight | The maximum amount the box is allowed to weigh, entered as pounds. This includes the weight of the box. |
| Box Weight | The weight of the box in pounds. |
| Box Fee | Enter the amount you want to charge, if any, for the box when it is used in the packaging solution. The amount will be included in the shipping quote. |
| Box Use | Universally available for use Select this option if the box can be used to package any product product in the product catalog, as long as the product will fit in the box. For use only with specific products
Select this option if the box should be considered only for specific products. Product Tags
This setting is relevant only when the setting For use only with specific products is enabled. Enter the product tags that will be used to identify the products for which the box will be considered. |
| Available | Check this box to make it available for the packaging solution calculations. |
9b. Items that ship as multiple packages |
Return to top. |
When you enable the Standard Box Sizes feature, a setting is available on the Product Shipping Parameters page to allow you to specify that the item ships as multiple packages. When you enable the setting, the item will appear on the Box Sizes page in the Items that ship as multiple packages section.
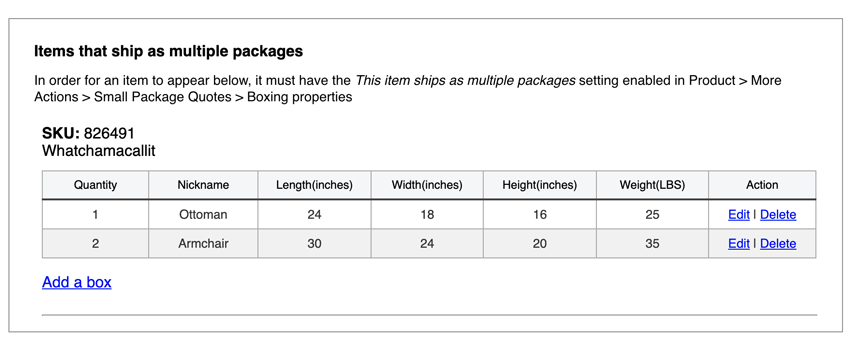
To add a box, click the Add Box button. A popup will display prompting you for the following information about the box:
| Quantity | Enter the number of boxes there are of this size. |
| Nickname | Enter a nickname for the box. The nickname will be used to identify the box in the graphical illustration of the packaging solution. |
| Length | The length of the box in inches. |
| Width | The width of the box in inches. |
| Height | The height of the box in inches. |
| Weight | The weight of the box in pounds. |
If you also have one of Eniture Technology’s LTL Freight Quotes plugins installed, it will use the Freight Class and Weight entered on the Product Shipping Parameters page when an LTL freight quote will be returned. However, if the Freight Class is set to Density Based (and the Item ships as multiple packages setting is enabled), then a freight class for the item will be calculated using the weight and dimensions of the boxes entered here.
10. Enable the Plugin (WooCommerce 3.0 or later only) |
Return to top. |
Select Settings from the WooCommerce menu.

Click on the Shipping tab and select the option for Shipping Zones.
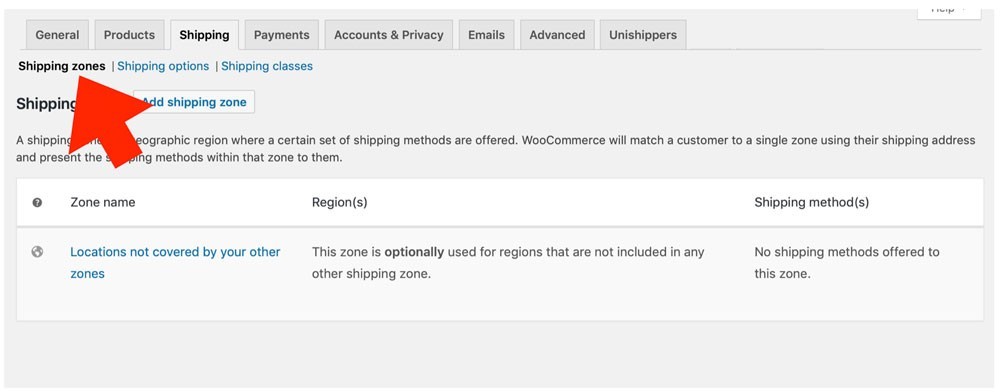
The shipping method needs to be added to a shipping zone. If an appropriate shipping zone isn’t already defined, click the Add shipping zone button and define one. If the correct one already exists, move your mouse pointer over the name of the zone to reveal the Edit link and click on it.
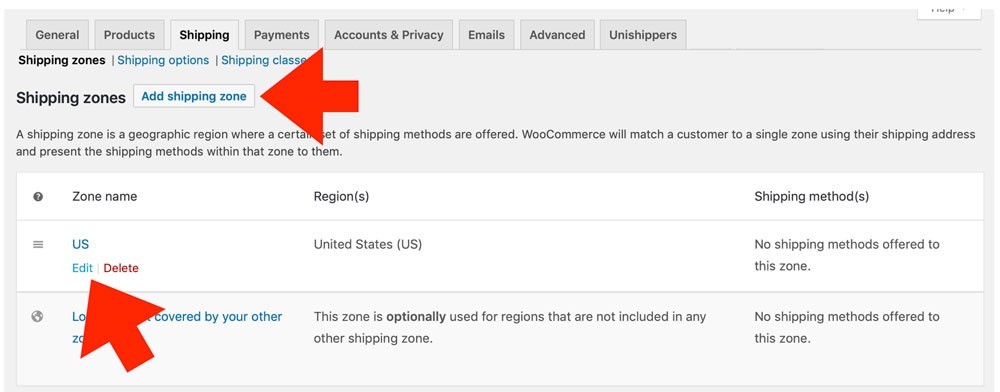
Now add the shipping method to the zone. Click on the Add shipping method button…

…select the Unishippers option from the drop down list of shipping methods…
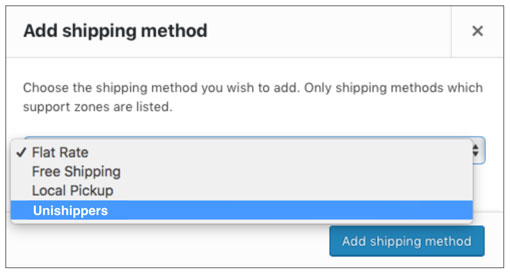
…and click on the Add shipping method button.
Repeat this process for each shipping zone you want to the app to return quotes for. You should test each zone to make sure the geography defined by the shipping zone is supported by the app.
The app will return rates for the following types of shipments:
- – US domestic shipments
- – Shipments from the US to countries to which UPS provides service.
- – Shipments to the US from countries for which UPS provides service.
11. Product Settings |
Return to top. |
The products you intend to sell and ship should have their shipping weight and dimensions recorded. Your shipping rate is based on the billable weight of the shipment, which is equal to the greater of the shipment’s actual weight or dimensional weight. The omission of weight or dimensions, or inaccuracies in the values of either, will impact the accuracy of the shipping rates displayed in the shopping cart. To learn more about determining the billable weight of a shipment refer to this year’s service guidelines at ups.com.
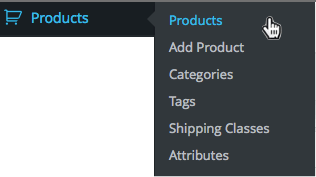
To record the weight and dimensions of a product, navigate to your product list in the WordPress Dashboard by selecting Products from the Products menu.
Select the product you want to update. Once you’re on the Edit Product page, locate the Product Data region and click on the Shipping option to access the product’s shipping characteristics.
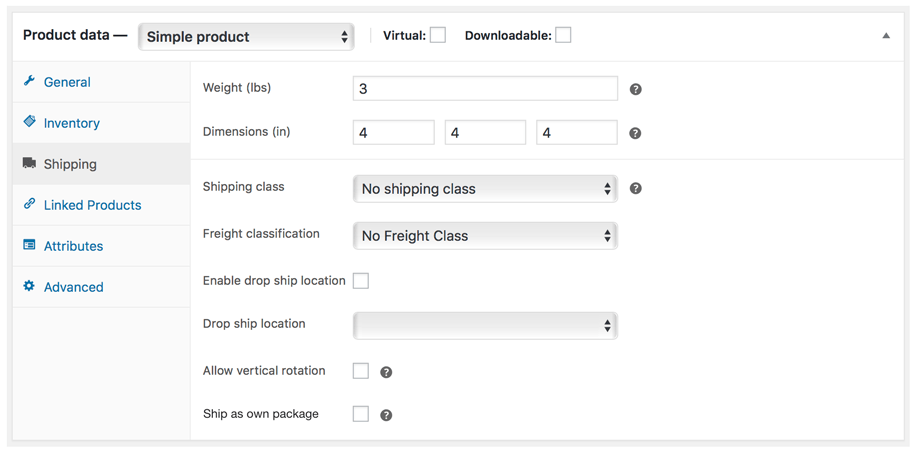
| Weight | Enter the weight of the product in pounds. |
| Dimensions | Enter the dimensions of the product in inches. |
| Shipping Class | If you have the Small Package Quotes plugin installed and you wish the product quoted as shipping parcel, select the No shipping class option.
If you have the LTL Freight Quotes plugin installed and you wish the product quoted as shipping LTL freight, select the LTL Freight option. |
| Freight Classification | This option will only be visible if the LTL Freight Quotes plugin is installed.
Select the freight class for the product from the list of options. If you utilize both small package (parcel) and LTL freight shipping methods, you should identify the freight class for all products, even those that normally ship small package (parcel). The last option in the list of freight classifications is Density Based. In most cases this is an industry accepted alternative for identifying the freight class of an item or shipment. Validate the returned quotes if using this setting. There are exceptions in the NMFC Freight Classification Directory that can render the density calculator results invalid for particular commodities. To be used successfully the product must have its weight and dimensions populated in the Shipping sub-panel. |
| Signature Required | No signature required (Default) Use this setting if collecting a signature upon delivery is not required. Signature required
Use this setting if collecting a signature upon delivery is required. Adult signature required
Use this setting if collecting an adult signature upon delivery is required. |
| Insure this item | Enable this setting if you want the quoted shipping rates to include the amount to insure the item according to the provider’s guidelines. |
| Nested item | The Advanced Plan is required to use this feature. If you aren’t on the Advanced Plan the words Advanced plan required will appear adjacent to the settings header, and the fields associated with the feature will be inaccessible.
Enable this checkbox if the item can be stacked into another identical item when it is shipped. An example would be 13 gallon trashcans or plastic cups. When this setting is enabled, the Freight Class is always Density Based. |
| Nesting percentage | This setting is only relevant if the Nested item setting is enabled.
Enter the percent of the item that can be nested inside of another identical item. For example, if an item is 10 inches in height and after stacking two together the total height is 11 inches, the stacking percentage is 90%. (11 inches = 10 inches + (10 inches x 90%)) |
| Nested dimension | This setting is only relevant if the Nested item setting is enabled.
Identify the dimension (length, width or height) on which the nesting occurs. |
| Maximum nested items | This setting is only relevant if the Nested item setting is enabled.
Enter the maximum number of items you’ll allow in a single stack of nested items. |
| Stacking property | This setting is only relevant if the Nested item setting is enabled.
Select Maximized or Evenly. If your Maximum nested items is 6, and there are 7 items in the cart, then the Maximized option will result in one stack of 6 and one of 1. If the Stacking property is set to Evenly, it will result in one stack of 4 and one of 3. |
| Enable Drop Ship Location | This option will only be visible if there are drop ship locations defined. Refer to step 7: Define Warehouse and Drop Ship Locations for instructions on how to define drop ship locations.
Check this box if this product ships from a drop ship location. |
| Drop Ship Location | This option will only be visible if there are drop ship locations defined. Refer to step 7. Define Warehouse and Drop Ship Locations for instruction on how to define drop ship locations.
If the product is drop shipped, select the drop ship location from the list of options. |
| Allow vertical rotation | This option will only be visible if Standard Box Sizes plugin is installed. Refer to step 8. Enter standard box sizes for instructions on how to identify your box sizes.
Enabling this setting allows the item to be rotated while identifying a packaging solution involving standard box sizes. This setting provides the most flexibility for arriving at a packaging solution. |
| Ship as own package | This option will only be visible if Standard Box Sizes plugin is installed. Refer to step 8. Enter standard box sizes for instructions on how to identify your box sizes.
Enabling this setting prevents the item from being combined with other items into one of the standard box sizes. The item will be included in the shipment as its own package with the weight and dimensions specified. |
| This item ships in its own packaging | This setting requires the optional Standard Box Sizes feature to be enabled. Enabling this setting prevents the item from being combined with other items into one of the standard box sizes. The item will be included in the shipment as its own package with the weight and dimensions specified.Items with this setting enabled are not fed to the Standard Box Sizes packaging algorithm and do not incur a charge. |
| This item ships as multiple packages | This setting requires the optional Standard Box Sizes feature to be enabled. When this setting is enabled, the product will be added to the Items that ship as multiple packages section of the Box Sizes page. The section appears below the list of standard box sizes. Locate the product there to record boxes that contain the materials and parts that the item is comprised of.Items with this setting enabled are not fed to the Standard Box Sizes packaging algorithm and do not incur a charge. |
| Mark Up | Increases the amount of the shipping quotes received when this item is in the Cart. The number entered will be interpreted as dollars and cents unless it is followed by a % sign. For example, entering 5.00 will cause $5.00 to be added to the quotes. Entering 5.00% will cause the mark up to be calculated as a percentage of the product’s price.
Note: The plugin has four settings that can be used to mark up shipping quotes. They are applied to shipping quotes in the following order: 1) Product-specific Mark Up (Product settings); 2) Location-specific Handling Fee / Mark Up (Warehouse settings); 3) Service-specific Mark Up (Quote settings); and 4) General Handling Fee / Mark Up (Quote settings).
|
| Hazardous Material | The Standard Plan or higher is required to use this feature. If you aren’t on the Standard Plan or higher the words Standard plan required will be displayed.
Check this checkbox if this item must be identified as hazardous material. If so, when the item is included in the cart, the hazardous material fee identified in the quote settings will be added to the rate estimate. |
| Insure this item | The Standard Plan or higher is required to use this feature. If you aren’t on the Standard Plan or higher the words Standard plan required will be displayed.
Enable this setting to have the carrier’s declared value insurance premium included in the shipping quotes when this item is in the cart. |
| Exempt from Ground Transit Time Restriction | The Quote Settings page has settings that can be used to prevent Ground service from being presented as an option when the time in transit will be greater than a specified number of days. This is a popular feature for merchants that ship perishable products. When enabled, the restriction will apply to all products in your product catalog. Enable this checkbox if you don’t want the restriction to apply in the case of this product. |
If your product is a Variable Product, be sure to set the weight and dimensions for each product variation on the Variations page.
When you are done click the Update button located in the Publish widget located at the top right of the page.
Logs |
Return to top. |
The Quote Settings page contains the Enable Logs setting. When enabled, the plugin’s navigation will include a link to the Logs page. Up to 25 of the most recent transactions will appear on the Logs page. The Response column shows the outcome of each transaction. Click on a transaction’s response result to view its details.
When viewing the transaction details, click on the “+” symbols to expand the level of detail and “–” to collapse it. A basic understanding of Application Programming Interfaces (APIs) will be useful when viewing the logs.
What Your Customer Sees |
Return to top. |
To facilitate the successful conclusion of an online purchase the plugin always attempts to return an estimate of the shipping charges. If multiple products are in the shopping cart and some are missing weight, dimensions or both, the plugin will use what is available to obtain the shipping rate estimates. For example, if you have two products in the shopping cart and the first has weight and dimensions and the second doesn’t, the shipping rate estimate will be based solely on the first product. The plugin will fail to return rate estimates if none of the products in the shopping cart have a weight or dimensions. Shipping rate estimates will be increasingly inaccurate the more omissions there are to the weight and dimensions of products in the shopping cart.
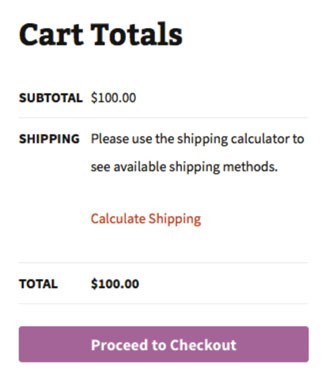
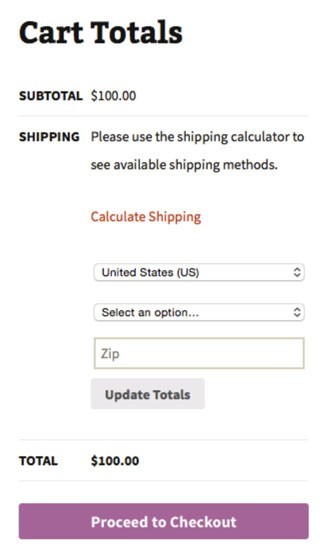
The shopping cart won’t display shipping rate estimates the first time the shopper views the shopping cart because it isn’t aware of the ship to address. The user will be prompted to click on the Calculate Shipping Cost link to provide this information.
| Appearance of shopping cart when viewed by a shopper who is not logged in to the website. | Appearance of the shopping cart after the user clicks on the Calculate Shipping link. |
 |
 |
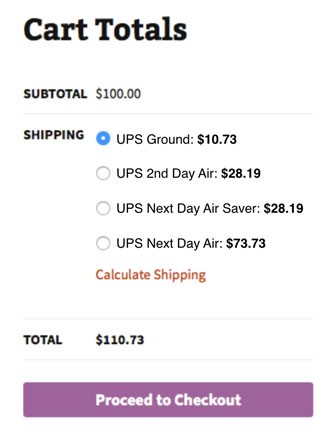
After the user provides the ship to information, the shopping cart will display the shipping rate estimates based on the settings entered in the plugin.
| Appearance of shopping cart when viewed immediately after the ship to information is provided. Not all of the available UPS service options shown. | |
 |
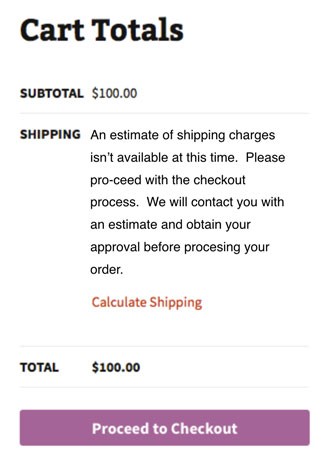
If the plugin is unable to display shipping rate estimates, the shopper will be directed to call in for a quote. Typical reasons why quotes may not be displayed include: 1) Insufficient data on the products in the shopping cart, such as weight or dimensions; 2) Invalid credentials due to a password change, an expired license, or a suspended UPS account; 3) An invalid or incomplete ship to address was provided; or 4) The carrier’s web service is not operational.
| Appearance of shopping cart when the plugin is unable to display shipping rate estimates. | |
 |
What you see. |
Return to top. |
The plugin populates shipping related information in the Additional Order Details widget on the Order Details page. The content of the widget falls into two categories: 1) Shipment Origin & Services; and 2) Shipment Content.
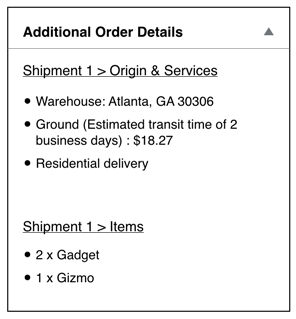
Shipment Origin & Services
This information block will identify the shipment origin, the selected carrier service and a list of any additional services (such as residential delivery) associated with the shipment. A separate Shipment Origin & Services information block will appear for each shipping location that will participate in fulfilling the order. This is particularly useful for stores with multiple warehouses and drop ship locations.
Shipment Content
A Shipment Content information block is presented beneath each Shipment Origin & Services information block. It identifies the products that were quoted as shipping from the location.
Managing Your Eniture API Key |
Return to top. |
You can manage your Eniture API Key by signing into eniture.com with the email address and password you entered when you registered for the plugin. After you sign in, My Account will be added to the navigation menu. Click on it to access the Dashboard for your account.

Use the links below to navigate to documents in the knowledge base related to common topics of interest.
Shipping with FreightDesk Online |
Return to top. |
- How capture the cost of shipping on orders placed online.
- How to ship the order, including how to create the shipping label (or Bill Of Lading in the case of LTL freight), schedule the carrier to pick up the shipment, and update the customer with the tracking number.
Quoting plugins, like this one, provide a solution for the first challenge. What are your options for the second challenge?
Option 1 – The carrier’s website: You can log into the carrier’s website and manually enter all of the relevant information. Carrier websites are free to use since the carrier makes money when you use them to deliver an order. However, if you have more than a handful of orders each day this approach is time consuming and ripe for data entry errors which can be costly to correct.
Option 2 – Use a plugin with “print-label” capabilities: It’s possible to find a plugin for certain shipping providers that will both generate quotes during the checkout process, and allow the merchant to print a shipping label. These plugins have very limited functionality and are usually an acceptable option only for merchants with very simple shipping needs and a low volume of shipments. They also require that the individuals responsible for preparing shipments have access to the ADMIN area of WooCommerce, which is not an acceptable arrangement to many merchants.
Option 3 – Cloud-based Shipping Platforms: The next step up in capability are cloud-based shipping systems that will connect to your online store and retrieve the details of your orders, thereby eliminating the need for much of the manual data entry. Many of these shipping systems have arrangements with postal and parcel carriers that can provide the merchant with significant discounts. Where these systems excel is in the efficiency of the fulfillment process. That translates in to a much higher volume of shipments per unit of time. These systems are relatively inexpensive and the reduction in the amount of labor and time it takes to ship your orders will pay dividends.
Option 4 – FreightDesk Online: FreightDesk Online (freightdesk.online) is also a cloud-based shipping system. It enjoys all of the benefits of other cloud-based offerings but expands the solution in two ways:
- It makes use of the detailed information collected by Eniture Technology’s quoting plugins (like this one) such as the packaging solution and the additional services included in the shipping option chosen when the order was placed.
- It provideds merchants access to more than two dozen LTL freight providers in addition to the typical postal and parcel integrations offered by other cloud-based solutions.
These expanded capabilities will deliver you closer to true “click-and-ship” shipping than any other alternative, whether you’re shipping with a postal carrier, a parcel carrier, or an LTL freight provider.
How to connect your WooCommerce store to FreightDesk Online |
Return to top. |
First, if you don’t already have one, register for a FreightDesk Online account (https://freightdesk.online/register). You can connect multiple online stores to FreightDesk Online, even if they use different e-commerce platforms, so you don’t have to create separate FreightDesk Online accounts for each one.
The pricing for FreightDesk Online is á la carte. You’ll be able to pick a separate plan for parcel (and postal) shipments, and for LTL freight shipments based on the anticipated volume for each type of shipping. Your monthly subscription rate will be comprised of these two selections. You can begin a 30-day trial of both types of shipping by selecting Trial in the corresponding dropdown fields on the registration form.
After you complete the registration process, log into FreightDesk Online. Navagate to Settings > Connections. On the Connections page, click on the +Add Marketplace button. A modal will appear on the right side of your screen. Click on the tile that represents WooCommerce. Enter the URL of your store and then click the Connect bottom located at the bottom of the modal.
Click the Approve button to grant the permissions requested by FreightDesk Online. You will need to log into the WordPress site if you aren’t being recognized as an authorized user.
If you aren’t redirected to the Settings > Connections page, use the navigation menu to arrive there. You should see your store listed in the list of Connected Marketplaces. Click on its Show/Edit link located in the right margin of the page. Update the marketplace’s connection settings using the instructions below.
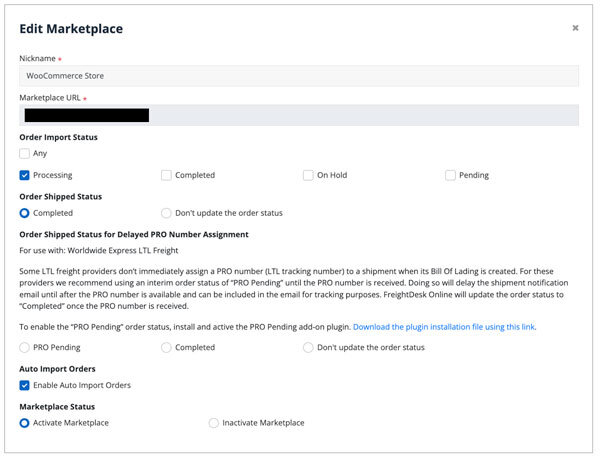
| Nickname | Enter a nickname you’d like to use to represent the connection to this store. |
| Marketplace URL | This field will be prefilled with the URL of the store you entered to initiate the connection. You can not edit this field. To disable the connection, chose the Inactive Marketplace status option at the bottom of the page. |
| Order Import Status | This setting is used to filter which orders are imported into FreightDesk Online. Processing is typically the only order status enabled. |
| Order Shipped Status | Choose Completed if you want an order status seen in WooCommerce to be automatically updated to “Completed” when the shipping label or Bill Of Lading is printed. If you’d prefer to manually update the order status in WooCommerce, choose the option Don’t update the order status. |
| Order Shipped Status for Delayed PRO Number Assignment | You can ignore this setting if you won’t be connecting Unishippers to FreightDesk Online as an LTL freight provider. If you will be, then please read the information provided on-screen and install the add-on plugin. The add-on plugin will add “PRO Pending” as an additional order status in WooCommerce and will delay the order status from being updated to “Completed” until after a PRO number becomes available for the shipment. This is usually by 10:30 AM Eastern Time the next business day. |
| Auto Import Orders | Enable this setting if you’d like newly placed orders with the status(es) you identified in the Order Import Status setting to be automatically imported in to FreightDesk Online. The alternative is to initiate the import manually each time using the |
| Marketplace Status | Select Activate Marketplace to enable the store’s connection to FreightDesk Online. To disable it, choose Inactive Marketplace. |
When you’re done editing your marketplace settings, click the Test Connection button to verify the connection to the store, and then Update to save the settings and return to the Settings > Connections page.
Now that you’ve connected FreightDesk Online, unfulfilled orders can be imported in to FreightDesk Online for processing. To view them, log into FreightDesk Online and click on Orders in the navigation menu. If you have the Enable Auto Import Orders setting enabled, your orders will populate automatically. If not use the Import Orders button to manually initiate the process.
You’ll need to connect your shipping providers before you can start shipping your orders using FreightDesk Online. Connecting your shipping providers is also done on the Settings > Connections page. You can find a quick start guide in FreightDesk Online by navigating to Help > Getting Started. Short instructional videos are also sprinkled through FreightDesk Online. Click on the movie camera icon to view the video.
Using Validate-Addresses.com |
Return to top. |
Validate-Addresses.com is a cloud-based application that validates the ship-to address on online orders. The validation happens after the order is received so there isn’t additional friction during the checkout process that could increase the Cart abandonment rate. Shipping to an invalid address is costly. Shipping providers charge hefty fees to follow up on and correct undeliverable addresses, and additional transportation charges will be incurred if the shipment has to be redirected to a different terminal for delivery. If the shipment is returned to the shipper, the transportation charges will double in addition to the fees. Validate-Addresses.com costs as little as 1¢ per order and can be the difference between making money, or losing hundreds of dollars on an order.
– Benjamin Franklin
How does Validate-Addresses.com work?
As soon as the order is placed, the order status is set to Pending Address Validation (a new order status that will be added to your store) until after Validate-Addresses.com confirms that the ship-to address is valid. If the ship-to address is valid, then the order status is changed to Processing and the order notes are updated to document that the ship-to address was good. The time between an order being placed and the validation of the ship-to address is typically 2 to 3 seconds.
Validate-Addresses.com can be configured to automatically email the customer if the order’s ship-to address is invalid, provide the customer with options on how to correct it, or the option to confirm it as entered. If the customer corrects the address, the address is rechecked. If the corrected address is valid, or if the customer confirmed the address as entered, the order status in WooCommerce is updated to Processing and the order notes are updated to document the event. The merchant’s involvement in this process is completely hands off. The order status will remain Pending Address Validation until the address is corrected or confirmed so the merchant knows not to ship the order.
There will be times when an order’s ship-to address can’t be validated and the customer fails to respond to the email notices about the invalid ship-to address. (You can configure these notices to reflect your brand and customize the message.) In these cases the merchant can contact the customer and if the outcome is favorable, override the Pending Address Validation status in Validate-Addresses.com. Afterward, the order status in WooCommerce will be updated to Processing, and the address will be added to the merchant’s address book so that future orders using the address won’t be flagged as invalid.
How to connect your WooCommerce store to Validate-Addresses.com |
Return to top. |
Register for a Validate-Addresses.com account (https://validate-addresses.com/register). You can connect multiple online stores to Validate-Addresses.com, even if they use different e-commerce platforms, so you don’t have to create separate accounts for each one.
After you complete the registration process, log into Validate-Addresses.com. Navagate to Settings > Connections. On the Connections page, click on the +Add Marketplace button. A modal will appear on the right side of your screen. Click on the tile that represents WooCommerce. Enter the URL of your store and then click the Connect bottom located at the bottom of the modal.
Click the Approve button to grant the permissions requested by Validate-Addresses.com. You’ll need to log into the WordPress site if you aren’t being recognized as an authorized user.
If you aren’t redirected to the Settings > Connections page, use the navigation menu to arrive there. You should see your store listed in the list of Connected Marketplaces. Click on its Show/Edit link located in the right margin of the page. Update the marketplace’s connection settings using the instructions below.
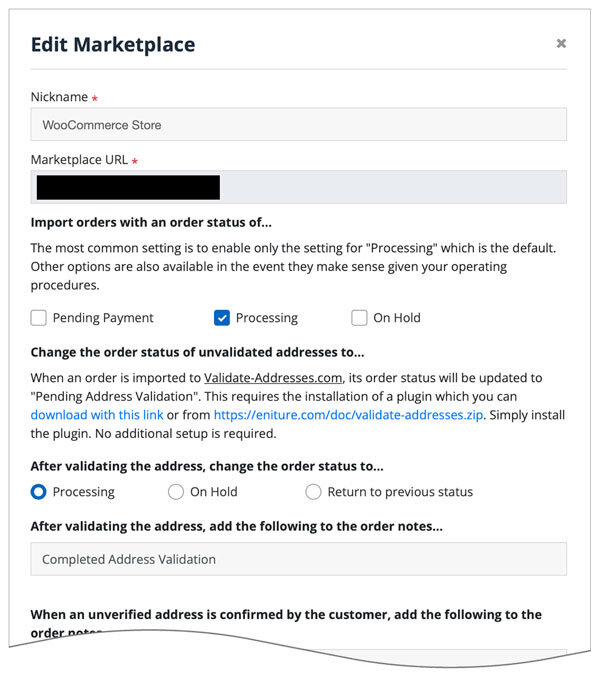
| Nickname | Enter a nickname you’d like to use to represent the connection to this store. |
| Marketplace URL | This field will be prefilled with the URL of the store you entered to initiate the connection. You can not edit this field. To disable the connection, chose the Inactive Marketplace status option at the bottom of the page. |
| Import orders with a status of… | This setting is used to identify the orders are to be imported into Validate-Addresses.com. Processing is typically the only order status enabled. |
| Change the order status of unvalidated addresses to… | The installation of a plugin is required to set an order’s status to Pending Address Validation while the validation of the ship-to address is pending. You can use this link to download the installation file or the link provided in the onscreen instructions. Simply install the plugin. No additional setup is required. |
| After validating the address, change the order staus to… | Select how the order status should be updated once the ship-to address has been validated. Processing is the most common choice. |
| After validating the address, add the following to the order notes… | Enter the text you’d like inserted into the order notes when Validate-Addresses.com succeeds at validating the address. |
| When an unverified address is confirmed by the customer, add the following to the order notes… | Enter the text you’d like inserted into the order notes when Validate-Addresses.com is unable to validate the address but the customer confirms it to be correct as entered. |
| When an unverified address is confirmed by the merchant, add the following to the order notes… | Enter the text you’d like inserted into the order notes when Validate-Addresses.com is unable to validate the address but the merchant (you) intend to ship the order to the ship-to address entered. |
| Marketplace Status | Select Activate Marketplace to enable the store’s connection to Validate-Addresses.com. To disable it, choose Inactive Marketplace. |
When you’re done editing your marketplace settings, click the Test Connection button to verify the connection to the store, and then Update to save the settings and return to the Settings > Connections page.
Now that you’ve connected Validate-Addresses.com, orders that meet your settings will automatically propagate the system. Orders that have ship-to addresses that were validated, corrected, or confirmed will appear on the Validate-Addresses.com History page and their status will appear as Processing on the WooCommerce Orders page. Orders with ship-to addresses that require attention will appear on the Validate-Addresses.com Orders page and their status on the WooCommerce Orders page will be Pending Address Validation. Use the Validate-Addresses.com Orders page to work on the ship-to address of orders that require attention.
To enable the ship-to address correction/confirmation process, which begins with an email to the customer when an invalid address is provided, you must first configure your outbound mail server settings. In Validate-Addresses.com navigate to Settings > Email Setup. Afterward, navigate to Settings > Email Template to customize the content of the email your customer will receive.

