TForce Freight, a subsidiary of Canadian transportation and logistics company TFI International, completed its acquisition of UPS Freight on April 30, 2021. This LTL Freight Quotes extension retrieves the negotiated LTL rates you have with TForce Freight, takes action on them according to the extension settings, and displays the results as shipping options on the Cart and Checkout pages.
Basic Plan
Live negotiated carrier rates returned to the checkout process.
Supported origins: Canada, United States.
Supported destinations: Canada, United States.
Customize the text used to label quotes displayed to shoppers.
Elect to display the carrier’s transit time with the rate estimate.
Option to always include the residential delivery fee.
Compatible with the Residential Address Detection plugin which automatically includes the residential address delivery fee when the Ship To address is a residence.
Option to always include the lift gate delivery fee.
Additional options for lift gate delivery are enabled with the installation of the Residential Address Detection plugin.
Assign products a freight class, weight and optionally dimensions.
Identify one warehouse and multiple drop ship locations.
Embed a handling charge in the displayed rates to recover the cost of packaging materials or other shipping related expenses.
Dynamic presentation of parcel and LTL freight rates with the installation of compatible apps from Eniture Technology.
Standard Plan
Everything in the Basic Plan, plus…
Define multiple warehouses.
The warehouse closest to the shopper is used as the shipment origin to keep shipping costs low and delivery times fast.
Support for products that ship as hazardous material.
Advanced Plan
Everything in the Standard Plan, plus…
Offer in-store pick up based on the shopper’s ZIP code or distance to the warehouse.
Offer local delivery based on the shopper’s ZIP code or distance to the warehouse.
Identify a charge for local delivery.
Current version: 1.0.0
Requirements
An installation of Magento CE (Version 2.x).
A UPS Freight account number.
Your username and password to UPS.com.
Your UPS API Access Key.
FAQ’S
How do I get a UPS Freight account number?
Call UPS at 800-333-7400, or register online.
Where do I find my UPS Freight username and password?
Contact UPS customer service or the UPS Freight account manager assigned to your account.
How do I get a license key for the extension?
You must register your installation of the extension, regardless of whether you are taking advantage of the trial period or purchased a license outright. At the conclusion of the registration process an email will be sent to you that will include the license key. You can also login to eniture.com using the username and password you created during the registration process and retrieve the license key from the My Licenses tab.
How do I change my extension license from the trial version to one of the paid subscriptions?
Login to eniture.com and navigate to the My Licenses tab. There you will be able to manage the licensing of all of your Eniture Technology extensions. Refer to the Documentation tab on this page for more thorough instructions.
How do I install the extension on another website?
The extension has a single site license. To use it on another website you’ll need to purchase an additional license. If you want to change the website to which the extension is registered, login to eniture.com and navigate to the My Licenses tab. There you’ll be able to change the domain name that is associated with the license key.
Do I have to purchase a second license for my staging or development site?
No. Each license allows you to identify one domain for your production environment and one domain for your staging or development environment. The rate estimates returned in the staging environment will have the word “Sandbox” appended to them.
Why isn’t the extension working on my other website?
If you can successfully test your credentials from the Connection Settings page (Stores > Configuration > Eniture – UPS LTL Freight Quotes > Connection Settings) then you have one or more of the following licensing issues: 1) You are using the license key on more than one domain. The licenses are for single sites. You will need to purchase an additional license. 2) Your trial period has expired. 3) Your current license has expired and we have been unable to process your form of payment to renew it. Login to eniture.com and go to the My Licenses tab to resolve any of these issues.
Why are the shipment charges I received on the invoice from UPS Freight different than what was quoted by the app?
Common reasons include a difference in the quoted versus billed shipment parameters (weight, dimensions, freight class), or additional services (such as residential delivery) were required. Compare the details of the invoice to the shipping settings on the products included in the shipment. Consider making changes as needed. Remember that the weight of the packing materials is included in the billable weight for the shipment. If you are unable to reconcile the differences call UPS Freight customer service for assistance.
Why do I sometimes get a message that a shipping rate estimate couldn’t be provided?
There are several possibilities:
The most common reason is that one or more of the products in the shopping cart did not have its shipment parameters (weight, dimensions, freight class) adequately populated. Check the settings for the products on the order and make corrections as necessary.
The city entered for the shipping address may not be valid for the postal code entered. A valid City+State+Postal Code combination is required to retrieve a rate estimate.
Your shipment exceeded constraining parameters of UPS’s web service.
The UPS web service isn’t operational.
Your UPS account has been suspended or cancelled.
There is an issue with the Eniture Technology servers.
Your subscription to the extension has expired because payment could not be processed.
There is an issue with your server.
How do I determine the freight class for my product(s)?
The easiest thing to do is to contact your UPS Freight representative and ask for assistance. However, the official source is the National Motor Freight Classification (NMFC) directory maintained by the National Motor Freight Transportation Agency (NMFTA.org). You can purchase a hard copy of the directory or obtain an online subscription to it from their web site. If you’re unfamiliar with what a freight class is, read this article from our knowledge base: What Is A Freight Class?
How does the density calculator work?
The density calculator will calculate a freight class by performing a calculation using the product weight and dimensions as inputs. In most cases the returned freight class will match the product’s (commodity’s) freight class as recorded in the National Motor Freight Classification (NMFC) directory. However, this is not always true and in the event there are differences, the freight class recorded in the National Motor Freight Classification (NMFC) directory takes precedence. An incorrectly identified freight class can result in unexpected shipping charges and even fees. You are solely responsible for accurately identifying the correct freight class for your products. If you need help doing this, contact your UPS Freight representative for assistance.
User’s Guide
If you are taking advantage of a trial subscription, the module will stop working when the trial period ends. Be sure to read the Manage Your License section to learn how to upgrade your subscription.
Overview
Setting up the module to display TForce’s LTL freight quotes consists of the steps listed below. Each step is bookmarked to the relevant section of the User’s Guide. In the heading of each section there is a Return to top link which will deliver you back to the list of steps.
- Pre-installation preparations.
- Register for the module License Key.
- Download the module installation file.
- Install the module.
- Obtain API Access Credentials.
- Enable the shipping method.
- Connection settings.
- Identify your warehouse and drop ship locations.
- Quote settings.
- Enter the product shipping parameters.
Other information contained in this guide:
1. Pre-installation Preparations |
Return to top. |
Before installing the module, make sure you’ve made the following preparations:
- Set up a server that meets the Magento 2 system requirements.
- Create the Magento file system owner.
2. Register for the module License Key |
Return to top. |

You’ll be presented with a registration form. The email address and password you enter will serve as your credentials to eniture.com. You’ll use these to gain access to the customer dashboard where you can download the module installation file, manage your license, and update your payment information.
If you’re starting with the free trial, you’ll receive a verification email. You must complete the verification step described in the email before you can access the customer dashboard. You’ll have immediate access to the customer dashboard if you choose to start with one of the paid subscriptions.
You’ll receive an email containing your license key. The license key will work for one production site and one staging site. You entered the domain for the production site when you completed the registration form. You can change the production site domain or add/update a staging site anytime from the customer dashboard.
To access the customer dashboard, login to eniture.com and click on the My Licenses tab. Click the Edit button associated with the license you want to update.

3. Download the module installation file |
Return to top. |
While logged into eniture.com with the credentials created in Step 2 (Register for the module License Key), select Downloads > Magento. Locate the module and then click the link to download the installation file. Save the file to a familiar location because you will need to navigate to it during the installation process.

4. Install the module |
Return to top. |
- Go to the magento-root/app directory using FTP.
- Create a code directory if it doesn’t exist.
- Create a Eniture directory in the magento-root/app/code directory.
- Upload the UPSLTLFreightQuotes folder retrieved in Step 3 Download the module installation file to the magento-root/app/code/Eniture directory.
- Open SSH.
- Execute the following commands:
php bin/magento setup:upgrade
- Clear the cache using the following command (or do it from the admin panel):
php bin/magento cache:flush
- Re-deploy the static contents (production mode only) by executing the following command:
php bin/magento s:s:d
5. Obtain API Access Credentials |
Return to top. |
Navigate to developer.tforcefreight.com.
Click the Log In link at the top right corner of the page and use your credentials to log in.
If your login doesn’t work you will need to sign up. The sign-up process will first prompt you to enter an email address and verify it using a link that will appear in an email in your inbox. Afterward, complete the sign-up form. Choose End User for the User Type field that appears at the end of the form.
Click the Profile link in the navigation menu.

In the “My OAuth Client” section of the page, click the Configure My Client button.

A new browser window will appear. Click the Create button to begin the process of creating your API credentials. If you created API credentials with TForce Freight in the past, the way this is presented to you may differ from the image below.

In the section titled “Your OAuth Client”, enter a Display Name. This is for your internal reference. You might, for example, enter LTL Freight Quotes for Shopify if you are using Eniture Technology’s TForce app for Shopify. Afterward, click the Update button.

On the same page, in the section titled “Application Integration”, copy and save the value that appears for the Client ID. You will need it to connect to the TForce Freight API.

On the same page, in the section titled “Add a Client Secret”, enter a Description (you are the only one that will see this), and modify the Expires date if you wish. Afterward, click the Create button.

Copy and save the Client Secret from the Value field in the section titled “OAuth Client Secrets.” You will need it to connect to the TForce Freight API.
This is the only time the Client Secret will be visible. Be sure to copy it to somewhere safe before leaving this page.

At this point, you should have your Client ID and Client Secret. Next, you will use them to update the Connection Settings.
6. Enable the shipping method |
Return to top. |
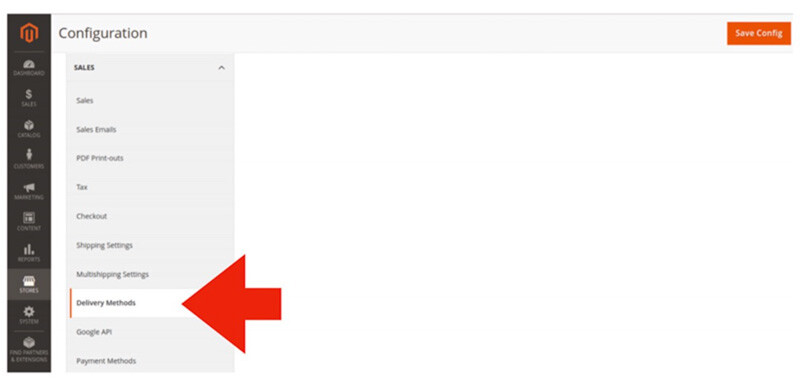
Navigate to Stores > Configuration.
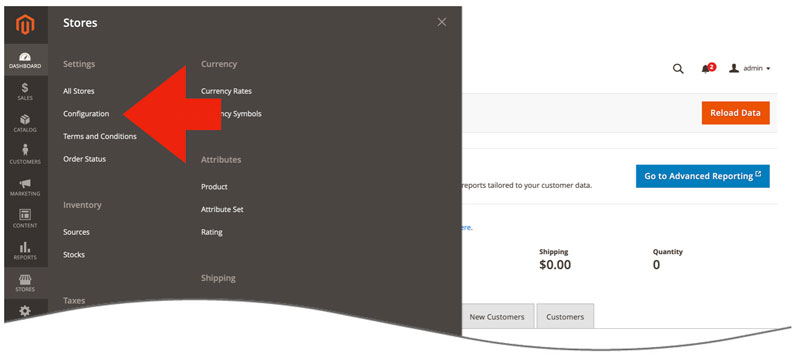
Click on Sales > Delivery Methods.
Select Yes to allow the module to display TForce shipping rate estimates.
7. Connection Settings |
Return to top. |
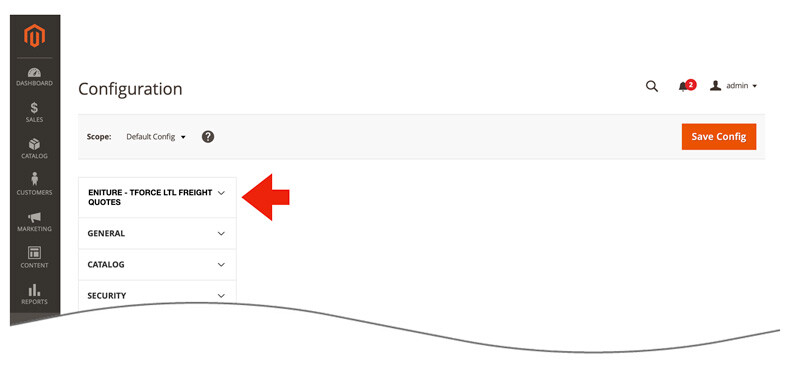
Navigate to Stores > Configuration

Click on the TForce LTL Freight Quotes entry on the left side of the page.
Click on the link for Connection Settings and enter the connection information.
| Which API Will You Connect To? | Select the option for the New API. |
| Client ID | Enter the Client ID you obtained from TForce. |
| Client Secret | Enter the Client Secret you obtained from TForce |
| Username | The username you use to sign into tforcefreight.com. |
| Password | The password associate with the provided username. |
| Plugin License Key | The plugin license key is issued by Eniture Technology to registered users only. If you don’t have a plugin license key, click the link to the right of this field to obtain one. |
| T-Force rates my freight based on weight and… | Choose Freight class (default) or Dimensions according to how T-Force rates your LTL freight. |
When you’re done save your connection settings and then test them by clicking on the Test Connection button at the bottom of the page. A message will display at the top of the page letting you know if the plugin succeeded in establishing a connection to the TForce Freight servers. If you receive an error, confirm the values you entered and try again. Be particularly attentive to capitalization. Most of the information you enter on this page is case sensitive.The extension’s License Key will be tied to a subscription. The Trial Plan will give you 15 days of free access to the Basic Plan. Two other plans are available; the Standard Plan and the Advanced Plan. The features associated with each plan are listed on the Features tab of this web page. Each plan is available for a monthly or yearly subscription rate. To manage your License Key, including which plan is associated with it, see the section titled Managing your license. at the end of this User’s Guide.
8. Identify your warehouse and drop ship locations |
Return to top. |
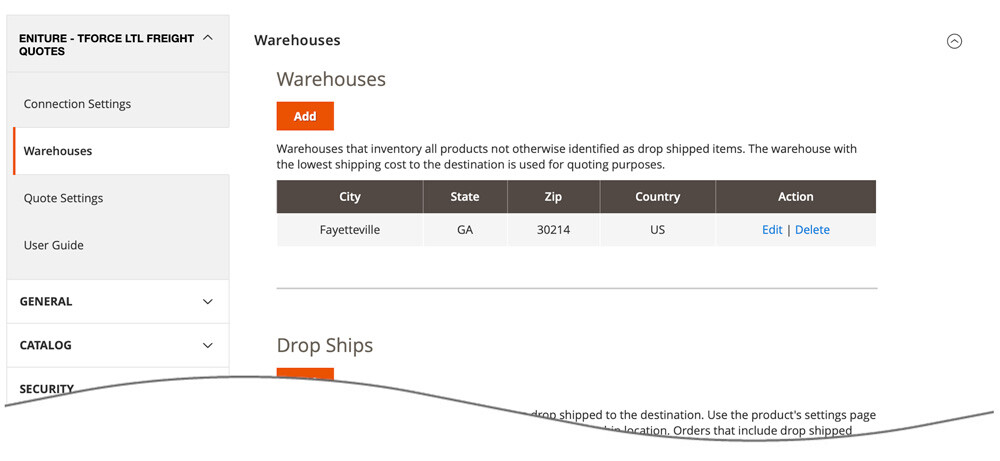
Click the Add button in the appropriate sections to add warehouse and drop ship locations.
If you ship products from only one location, add the location as a warehouse and proceed to the next step.
If you ship from more than one location, then you need to understand the distinction the programming makes between warehouses and drop ship locations.
Warehouses are understood to have a complete inventory of all products not otherwise assigned to a drop ship location. If you have more than one warehouse defined, the warehouse closest to the shopper will be used to retrieve the shipping rate estimates. When you have more than one warehouse defined, the relationship between a product (that is not assigned to a drop ship location) and warehouses is one-to-many.
Drop ship locations usually represent vendors that supply items that you don’t inventory. These items are shipped directly to your customer on your behalf. Items that ship from a drop ship location are assigned to the drop ship location in the product settings. The item is understood to only ship from that location. The relationship between a product assigned to a drop ship location and the drop ship location is one-to-one.
If you have only drop ship locations (no warehouses), a recommended best practice is to define the drop ship location that sources most of your orders as a warehouse instead of a drop ship location. This insures that quotes will be returned in the event you forget to assign a product to a drop ship location.
When an order includes drop shipped items the shopping cart will display a single figure for the shipping rate estimate that is equal to the sum of the cheapest option for each shipment required to fulfill the order.
Warehouses vs. Drop Ship Locations
How the Plugin Presents Quotes with Multiple Shipment Origins
9. Quote settings |
Return to top. |
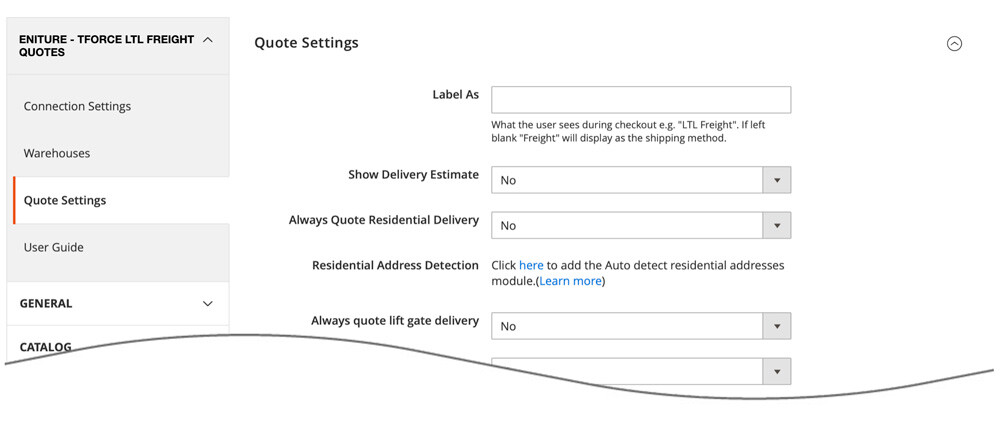
Click on the link for Quote Settings and make your selections.
| Label As | Identify how you want the quote labeled in the checkout process. A common choice for this field is “LTL Freight” or “Freight”. |
| Show Delivery Estimate | When checked, the carrier’s estimated transit time will be displayed. |
| Always quote residential delivery | When checked, the quotes returned will always include the carrier’s residential delivery fee. |
| Auto-detect residential addresses | Through the use of an add-on extension titled Residential Address Detection, Ship To addresses are checked against database records from the USPS. When the address is identified as residential, the residential delivery fee is included in the rate estimates. If the message “Click here to add the Residential Address Detection module.” is present, then the add-on extension isn’t installed. Click on the link to install it if you’d like to use this feature. (Learn more) |
| Auto-renew | Displays only if the Residential Address Detection extension is installed. Choose a plan that best meets your needs. The credit card associated with the quote extension license will be billed immediately and the plan will become your current plan. Your choice will be retained for the auto-renew option. You can change your auto-renew selection at any time. Plans automatically renew at the end of every monthly billing cycle or upon the depletion of the current plan. To prevent a renewal, choose Disable from the list of options. |
| Current plan | Displays only if the Residential Address Detection extension is installed. Displays information about the current plan and the start and end dates of the current subscription period. |
| Current usage | Displays only if the Residential Address Detection plugin is installed. Displays information about the consumption of the current plan. The date shown is the UTC timestamp of the last time a residential address detection event occured. |
| Suspend use | Displays only if the Residential Address Detection extension is installed. Checking this box temporarily suspends the Residential Address Detection extension. It does not permanently disable it and if the current monthly billing cycle expires, a new plan will be activated. To disable the extension, deactivate it or choose Disable from the Auto-renew drop down. |
| Always quote lift gate delivery | When checked, the returned quotes will include each carrier’s lift gate delivery fee. |
| Offer lift gate delivery as an option | An additional option for LTL freight will be offered that includes the lift gate delivery fee. |
| Always include lift gate delivery when a residential address is detected | Displays only if the Residential Address Detection extension is installed. When enabled, if a residential delivery address is detected the lift gate delivery fee will be included in the shipping rate estimate. In such cases, the option to Offer lift gate delivery as an option will be suppressed, even if enabled. Enabling both the Offer lift gate delivery as an option setting and the Always include lift gate delivery when a residential address is detected setting allows commercial customers to choose whether or not lift gate service is needed while always requiring it for residential customers. |
| Weight of Handling Unit | Enter in pounds the weight of your pallet, skid, crate or other type of handling unit you use. The amount entered will be added to shipment weight prior to requesting a quote. |
| Maximum Weight per Handling Unit | Enter in pounds the maximum weight that can be placed on the handling unit. If the total weight of the cart exceeds this value, the weight of additional handling units will be added as needed. For example, if the maximum weight is 500 LBS, and the total weight of the cart is 1200 LBS, the weight of the handling units added to the shipment shall be 3 times the weight entered in the Weight of Handling Unit field. (=roundup(1200/500,0)*Weight of Handling Unit) |
| Handling Fee / Mark Up | Increases the amount of the returned quote by a specified amount prior to displaying it in the shopping cart. Enter an amount and use the field below to identify the unit of measure. A “5.0” entered with a unit of measure of “percent (%)” will mark up the rate by 5 percent . A “5.0” entered with a unit of measure of “flat rate” will mark the rate up by $5.00. |
| Relationship To Shipper | Select how you identify yourself when getting quotes on tforcefreight.com. (Default is Shipper) |
| Third Party Country or Territory | This setting is visible only when the Relationship To Shipper is set to Third Party. Select the appropriate country from the dropdown list. |
| Third Party Postal Code | This setting is visible only when the Relationship To Shipper is set to Third Party. Enter the associated third party postal code. Use only 5 digits for postal codes in the United States. |
| Return TForce Freight quotes when an order’s parcel shipment weight exceeds 150 LBS | When checked, the LTL Freight Quote plugin will return quotes when an order’s total weight exceeds 150 lbs, even if none of the products have settings to indicate that it will ship LTL. To increase the accuracy of the returned quote(s), all products should have accurate weights and dimensions. |
10. Product Settings |
Return to top. |
Now that the application settings have been established, it’s time enter the product settings. Repeat these instructions for every product that you want to ship via TForce Freight. Select Catalog > Products from Magento Admin Panel menu. Locate the product on the list you’d like to update and click on it. You’ll be delivered to the Product Details Page.
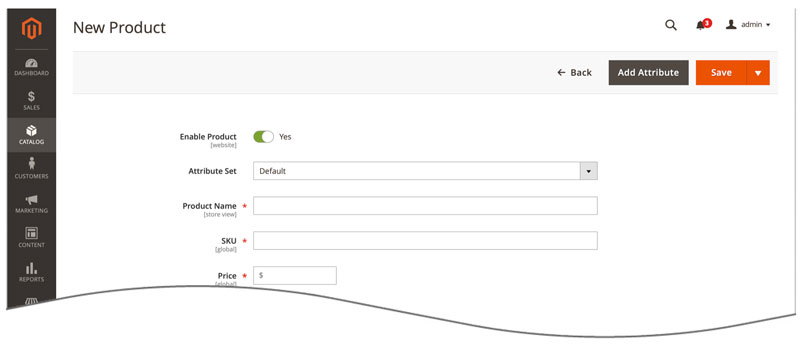
Not all the settings on this page relate to the module. The instructions below pertain only to those fields that are relevant to the TForce LTL Freight Quotes extension.
| Weight | Enter the weight of the product in pounds. It should include the weight of any packaging materials that may be required to ship the product, such as cardboard, bubble wrap and styrofoam peanuts. |
| Ship Via LTL Freight | Select Yes to default the item’s shipping method to LTL freight. |
| Freight Class | Select the freight class for the product from the list of options. If you utilize both small package (parcel) and LTL freight shipping methods, you should identify the freight class for all products, even those that normally ship small package (parcel).
The last option in the list of freight classifications is Density Based. In most cases this is an industry accepted alternative for identifying the freight class of an item or shipment. Validate the returned quotes if using this setting. There are exceptions in the NMFC Freight Classification Directory that can render the density calculator results invalid for particular commodities. To be used successfully the product must have its weight and dimensions populated in the Shipping sub-panel. |
| Enable Drop Ship | Select Yes if the item will ship from a drop ship location. |
| Drop Ship Location | Select the drop ship location from which the item will ship. This setting is only active if the Enable Drop Ship location is set to Yes. |
| Hazardous Material | The Standard Plan or higher is required to use this feature. If you aren’t on the Standard Plan or higher the words Standard plan required will be displayed. Click on the Standard plan required text to upgrade your plan and gain access to the feature.
Select Yes if the item ships as hazardous material. |
What your shopper sees |
Return to top. |
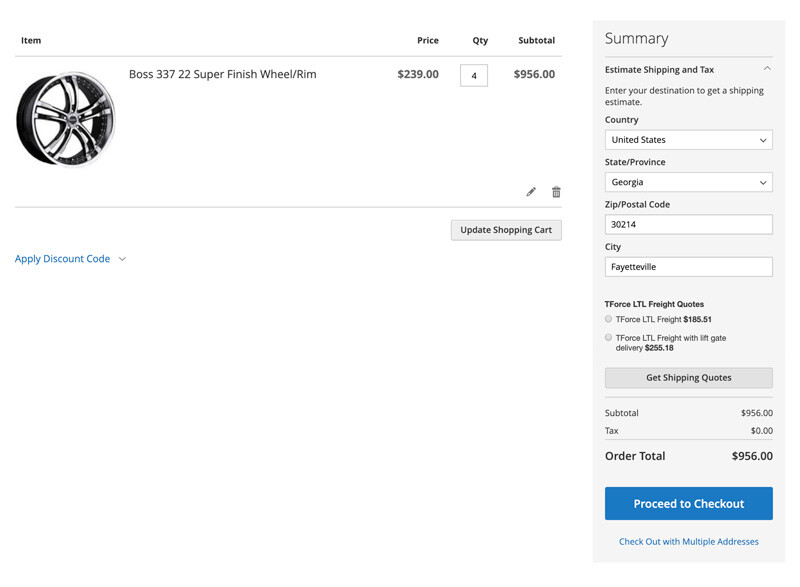
Once you’ve completed the preceding steps, your Magento store is ready to begin quoting TForce LTL Freight services. The exact presentation of the rates in the checkout process will depend on the options selected in the Quote Settings. The illustration below shows an example with multiple service options enabled.
What you see |
Return to top. |
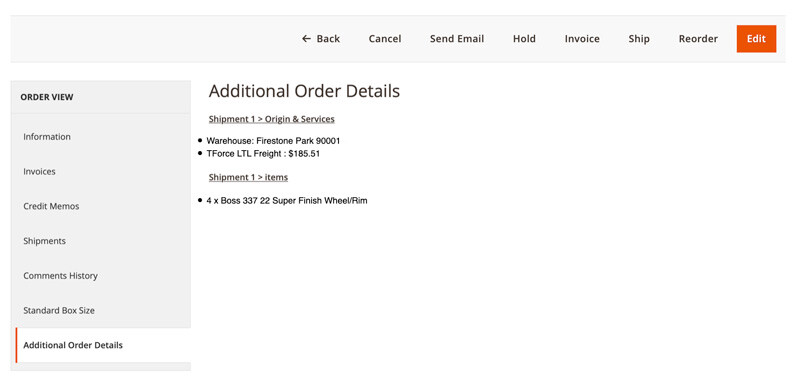
When an order is placed, the quote details are available to you on the Order View page. The shipping method chosen by the customer is shown in the Payment & Shipping Method section of the Information page.

The Additional Order Details page will contain information related how the quote was obtained. Identified will be the shipment origin, the shipping method, any additional pertinent information, and a list of items shipping from that location. If more than one stocking location was required to obtain the quote, each location and its associated data will be listed in succession.
Managing Your License |
Return to top. |
You can manage your license by signing into eniture.com with the email address and password you entered when you registered for the extension. After you sign in, My Account will be added to the navigation menu. Click on it to access the Dashboard for your account.

Use the links below to navigate to documents in the knowledge base related to common topics of interest.

