
 |
Real Time Shipping Quotes for WixMulti-carrier Edition
 |
 |
The Real Time Shipping Quotes app for Wix retrieves your negotiated shipping rates, takes action on them according to the app settings, and displays the results as shipping options during checkout. The app can be configured to quote parcel and LTL freight shipments. See the Providers tab below for a list of supported shipping companies.
SETUP TUTORIAL & DEMO (5:29 min)
Basic Plan $30/month
Enable one shipping provider.
Features Unique to LTL Freight Providers
Retrieves your negotiated LTL freight rates for the enabled LTL freight provider.
Supported origins: United States and/or Canada depending on the capabilities of the enabled LTL freight provider.
Supported destinations: United States and/or Canada depending on the capabilities of the enabled LTL freight provider.
Customize the text used to label LTL freight quotes displayed to shoppers.
Options for how to offer lift gate delivery including an option to require lift gate delivery when the address type is identified as residential.
Specify the weight of your handling unit (e.g. pallet) so that it is accounted for in the shipping quote.
Identify the maximum weight per handling unit to extrapolate the number of handling units to account for in the shipping quote.
Features Unique to Parcel Shipping Providers
Retrieves your negotiated parcel rates for the enabled parcel shipping provider.
Supported origins: United States and/or Canada depending on the capability of the enabled provider.
Supported destinations: Any country that Fedex, Purolator, or UPS provide service to. Some UPS resellers available in the app will not return a quote to destinations outside the United States.
Select which services to offer to your shoppers.
Mark up or mark down individual services by a dollar amount or percentage.
Retrieve hyper-accurate parcel quotes even when charges are based on dimensional weight when using the built in packaging algorithm. Use of the optional Standard Box Sizes feature required.
Elect to include insurance in the shipping quotes when specific products are in the shopping cart.
Features Common to LTL Freight and Parcel Shipping Providers
Elect to display the carrier’s transit time or estimated delivery date with the rate estimate.
Define multiple warehouse locations.
Identify products that drop ship from vendors.
Always quote shipments as going to commercial or residential addresses or have the app automatically detect the address type to dynamically include the residential delivery fee in the shipping quotes.
Choose not display shipping quotes if a post office box is detected.
Mark up quotes by a dollar amount or percentage.
Support for products that ship hazardous material.
Offer an option for in-store pick up based on the customer’s distance from your warehouse.
Offer local delivery based on the customer’s distance from your warehouse.
Charge a fee for local delivery.
Dynamic presentation of LTL freight and parcel rates when both types of providers are enabled.
Standard Plan $55/month
Enable up to three shipping providers.
Advanced Plan $75/month
Enable up to five shipping providers.
Enterprise Plan $90/month
Enable up to eight shipping providers.
LTL Freight Providers
FedEx Freight (Origins: Canada, USA | Destinations: Canada, USA)
GlobalTranz/WWEX Group (Origins: USA | Destinations: Canada, USA)
TForce (Origins: Canada, USA | Destinations: Canada, USA)
Unishippers/WWEX Group (Origins: USA | Destinations: Canada, USA)
Worldwide Express/WWEX Group (Origins: USA | Destinations: Canada, USA)
Parcel Shipment Providers
Unishippers (Origins: Canada, USA | Destinations: Any country serviced by UPS)
UPS (Origins: Canada, USA | Destinations: Any country serviced by UPS)
Worldwide Express (Origins: Canada, USA | Destinations: Any country serviced by UPS)
Current version: 1.0
Requirements
A WiX website with WiX Stores installed and configured.
An established account with the shipping company or companies you intend to enable in the app.
FAQs
How do I get support for this application?
The knowledge base is the best 24/7 resource for support. Click here to go to the knowledge base. You can open a support ticket by emailing support@eniture.com. Customer support can also be contacted by phone at 404-369-0680 x2 on business days between 9:00 AM and 5:00 PM Eastern Time. If you get voicemail, leave a message and we will return your call.
How do I get an account?
Instructions for how to obtain an account with a shipping provider is available in the app. Follow the steps to enable the shipping provider to see the instructions for that provider.
Why are the shipment charges I received on the invoices from my carriers different than what was quoted by the plugin?
Common reasons include a difference in the quoted versus billed shipment parameters (weight, dimensions, freight class), or additional services (such as residential delivery) were required. Compare the details of the invoice to the shipping settings on the products included in the shipment. Consider making changes as needed. Remember that the weight of the packing materials is included in the billable weight for the shipment. If you are unable to reconcile the differences call the freight carrier for assistance.
Why do I sometimes get a message that a shipping rate estimate couldn’t be provided?
There are several possibilities:
The most common reason is that one or more of the products in the shopping cart didn’t have its shipment parameters (weight, dimensions, freight class) adequately populated. Check the settings for the products on the order and make corrections as necessary.
The city entered for the shipping address may not be valid for the postal code entered. A valid City+State+Postal Code combination is required to retrieve a rate estimate.
Your shipment exceeded constraining parameters of the provider’s web service.
The shipment destination isn’t serviced by the provider.
The provider’s web service isn’t operational.
Your account with the provider has been suspended or cancelled.
There is an issue with the Eniture Technology servers.
There is an issue WiX’s servers.
How do I determine the freight class for my product(s)?
The easiest thing to do is to contact your provider and ask for assistance. However, the official source is the National Motor Freight Classification (NMFC) directory maintained by the National Motor Freight Transportation Agency (NMFTA.org). You can purchase a hard copy of the directory or obtain an online subscription to it from their web site.
How does the density calculator work?
The density calculator will calculate a freight class by performing a calculation using the product weight and dimensions as inputs. In most cases the returned freight class will match the product’s (commodity’s) freight class as recorded in the National Motor Freight Classification (NMFC) directory. However, this is not always true and in the event there are differences, the freight class recorded in the National Motor Freight Classification (NMFC) directory takes precedence. An incorrectly identified freight class can result in unexpected shipping charges and even fees. You are solely responsible for accurately identifying the correct freight class for your products. If you need help doing this, contact your LTL freight provider for assistance.
User’s Guide
To install this app you must be logged into Wix. Locate the app in the Wix App Market and initiate the installation process by clicking on the Add to Site button. Once the app is installed, any user can follow these instructions to enable the app to return shipping quotes. Setting up the app consists of the following steps:
Other information contained in this guide:
1. Prepare Wix to use the application. |
Return to top. |
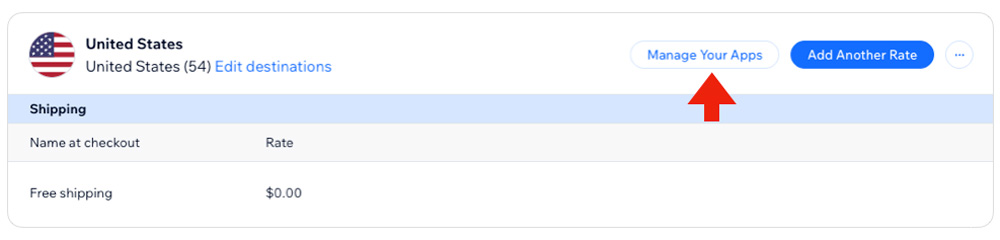
After installing the app from the Wix App Marketplace, navigate to the Settings>Shipping, Delivery & Fulfillment. Click the Manage Your Apps button for the desired shipping region.
Use the toggle switch to enable the Real Time Shipping Quotes app in the shipping region.
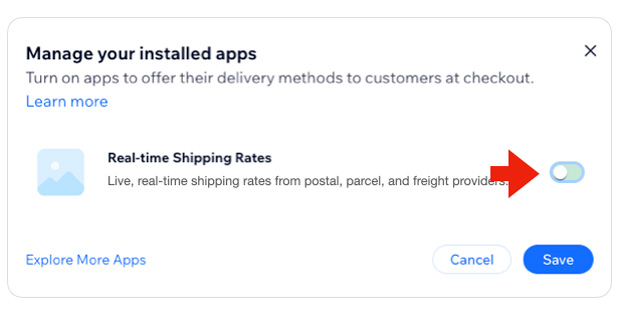
Save the changes.
2. Choose the desired plan. |
Return to top. |
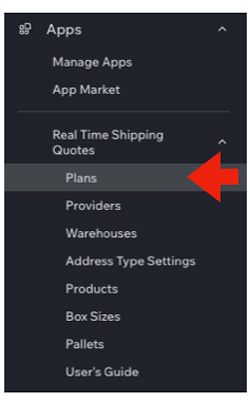
Select Apps from the Wix admin menu, and then the entry for Real Time Shipping Quotes. Using the app’s menu, select Plans. Choose a plan that meets your needs. The distinguishing feature for each plan is the number of providers that can be in use. Otherwise, the features are the same. At the conclusion of the trial period, the selected plan will become the active paid subscription.
Below the list of core plans are two optional usage-based features.
The merits of these features will be discussed in the relevant sections of this User’s Guide. If you are setting up the app for the first time, we recommend leaving them disabled until after the core app is presenting shipping rates on the checkout page.
3. Add Shipping Providers. |
Return to top. |
Using the app’s navigation menu, click on Providers. The Providers page is where you’ll enable the shipping providers that will present rates on the checkout page. The number of providers that can be enabled will depend on the subscription plan selected in the previous step.
Click on the All Available Providers link at the top of the page.
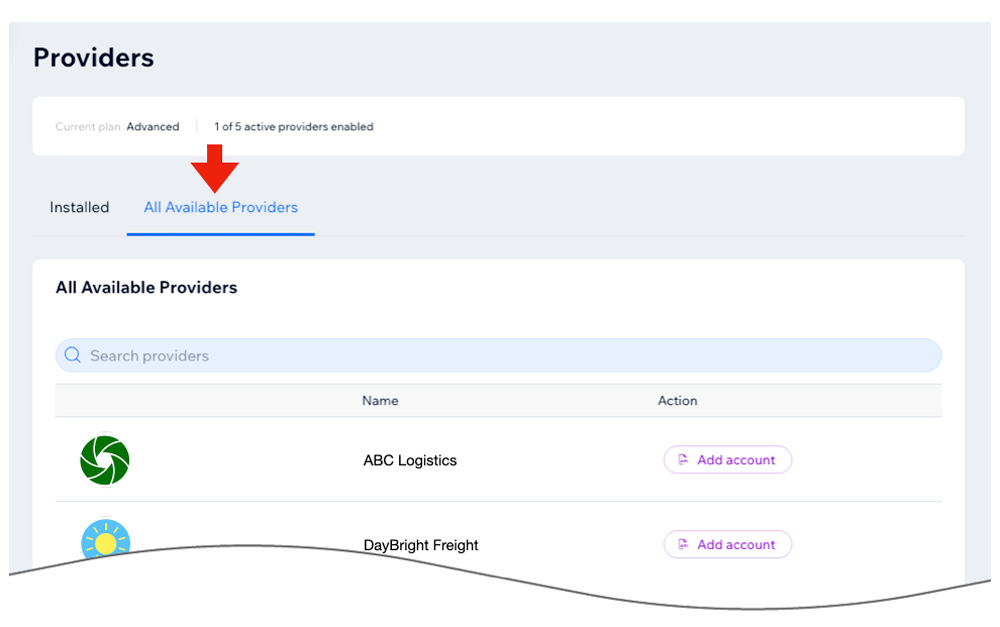
Locate the shipping provider you want to activate, and click on the Add account button.
Afterward adding the provider, it will appear in the list of Installed Providers.
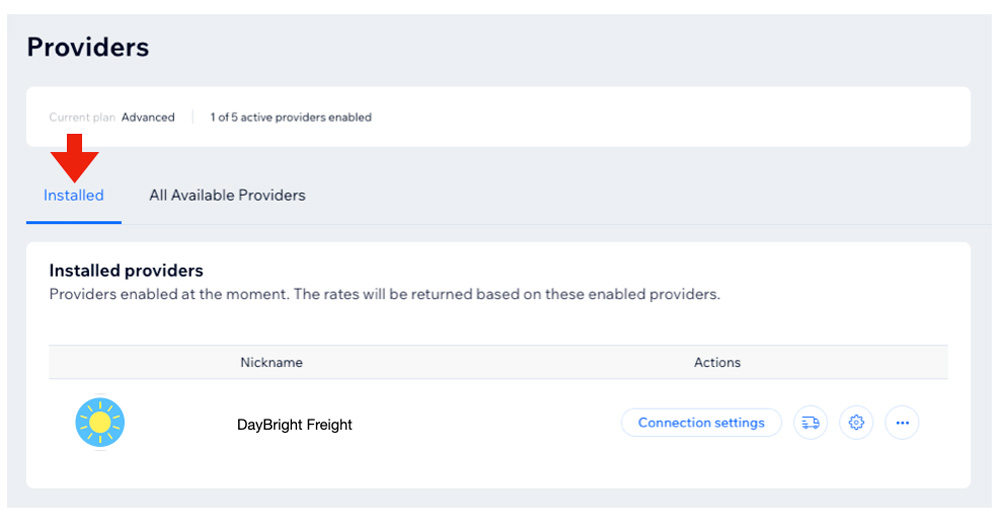
Repeat this step for each provider you want shipping quotes from.
4. Connect To The Provider’s API. |
Return to top. |
Now connect to the provider’s API (Application Programming Interface). Click on its Connection settings button.
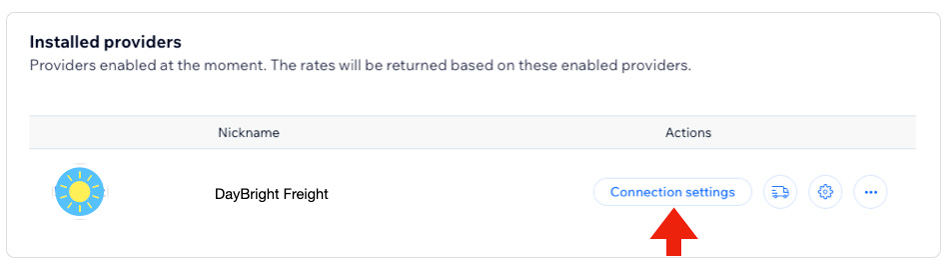
Click on the link for the provider in the list below for provider-specific instructions. The instructions will load in a new tab in your browser. Repeat this step for each provider you want to activate. After successfully connecting to the provider(s), return to these instructions and continue to the next step.
List of supported providers
5. Carriers Selection Settings. |
Return to top. |
Third-party logistics providers, abbreviated 3PLs, don’t have their own vehicles. Instead, 3PLs have contracts with asset-based providers (usually many of them) that do. If your account relationship is with a 3PL, then you can get shipping rates for all of the asset-based LTL freight providers the 3PL has enabled for your account. When utilizing a 3PL, to enjoy a rate quoted by an asset-based carrier, you must process the shipment though the 3PL.
If the LTL freight provider you enabled is a 3PL, use the Carriers icon the Carriers Selection Settings page.
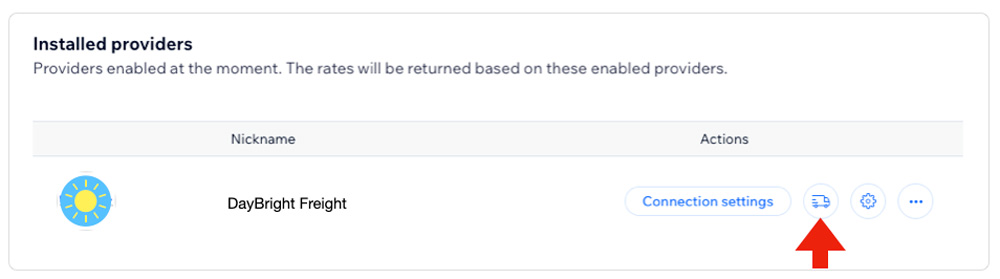
The page lists all of the asset-based freight providers that the 3PL is capable of providing rates for.
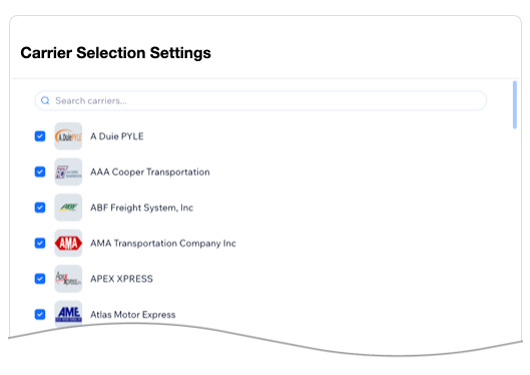
Carriers enabled on this list are used to filter the response from your 3PL. For example, assuming that no other settings in the app are influencing the outcome of what is presented on the checkout page…
• FedEx Freight is enabled in the list, and
• FedEx Freight is in the 3PLs API response
→ FedEx Freight will be considered by the app for inclusion on the checkout page.
• FedEx Freight is disabled in the list, but
• FedEx Freight is in the 3PLs API response
→ The app will not consider FedEx Freight for inclusion on the checkout page.
• FedEx Freight is enabled in the list, but
• FedEx Freight is not in the 3PLs API response
→ FedEx Freight is not available to be considered by the app for inclusion on the checkout page.
To take full advantage of the value proposition that 3PLs have to offer, you should enable all of the carriers on the list. Disable only those that you are strongly disposed against.
6. Choose The Quote Settings. |
Return to top. |
A shipping provider’s quote settings determine the unique behavior of its integration. The Quote Settings for a given provider apply only to that provider although other providers can have similar settings. For example, all of the providers have a setting for Handling fee / markup. A handling fee entered for Provider A will have no effect on Provider B. To access the Quote Settings page, use the WiX ADMIN navigation menu to navigate to Apps > Real Time Shipping Quotes. Using the app’s menu, click on Providers. On the Providers page, locate the shipping provider on the Installed Providers list and click on its Quote Settings icon.
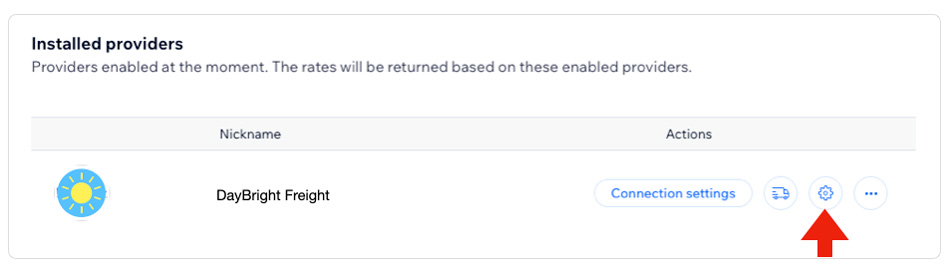
Click on the link for the provider in the list below for provider-specific instructions. The instructions will load in a new tab in your browser. Repeat this step for each provider you want to activate. Afterward, return to these instructions and continue to the next step.
List of supported providers
7. Identify Warehouse and Drop Ship Locations. |
Return to top. |
Select Warehouses from the app’s navigation menu.
The app allows for two types of shipping origins:
- Warehouses
- Drop Ship Locations
Warehouses are stocking locations that contain everything in your product catalog that are not otherwise assigned to a drop ship location. When multiple warehouses exist, the location closest in proximity to the ship-to address will be used for the shipping origin. You should define at least one warehouse, even if all of your products are drop shipped. This insures that quotes will be returned in the event the drop ship location was overlooked when the product entry was created.
Drop ship locations usually represent vendors that supply items that you don’t inventory. Items assigned to a drop ship location are always quoted as shipping from that location. Items are assigned to a drop ship location using its product-level shipping parameters.
Use the Add warehouse or Add drop ship buttons to create a shipping origin. Use the instructions below to complete the form.
Warehouses vs. Drop Ship Locations
How the Plugin Presents Quotes with Multiple Shipment Origins
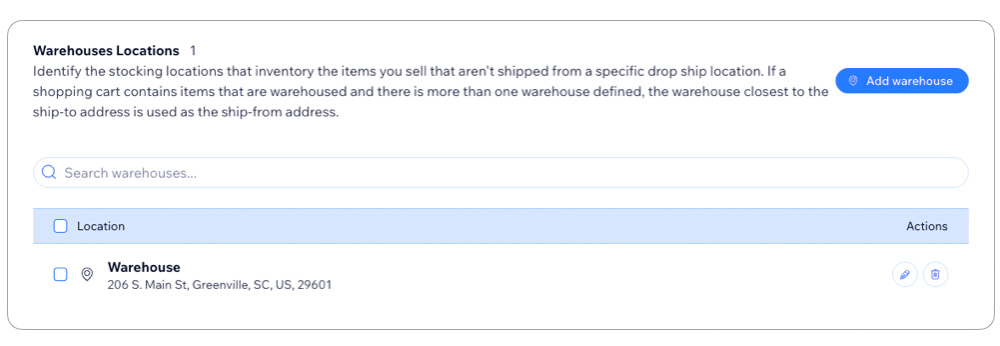
| Nickname | Enter a nickname for the location. It will only be seen in the app settings. |
| Street Address | Enter the street address for the location. This is important for features in the app that need to know the distance between the location and the ship-to address. Examples are the In-store pick up and Local Delivery features. |
| Postal Code | Enter the postal code for the location. Enter only the five digit ZIP Code for US addresses. |
| City | The app will attempt to prefill the City based on the postal code. Edit it if the prefilled value is incorrect. |
| State | The app will attempt to prefill the State based on the postal code. Edit it if the prefilled value is incorrect. |
| Country | The app will attempt to prefill the Country based on the postal code. Edit it if the prefilled value is incorrect. Use only the two character standardized country code. |
| Handling Fee / Markup | Increases the amount of the quote received for this location by a specified amount prior to displaying it/them in the shopping cart. The number entered will be interpreted as dollars and cents unless it is followed by a % sign. For example, entering 5.00 will cause $5.00 to be added to the quotes. Entering 5.00% will cause each quote to be multiplied by 1.05 (= 1 + 5%).
Note: The app has four different settings that can be used to mark up shipping quotes. They are applied to shipping quotes in the following order: 1) Product-specific Mark Up (Product settings); 2) Location-specific Handling Fee / Mark Up (Warehouse settings); 3) Service-specific Mark Up (Quote settings); and 4) General Handling Fee / Mark Up (Quote settings).
|
8. Address Type Settings. |
Return to top. |
Select Address Type Settings from the app’s navigation menu.
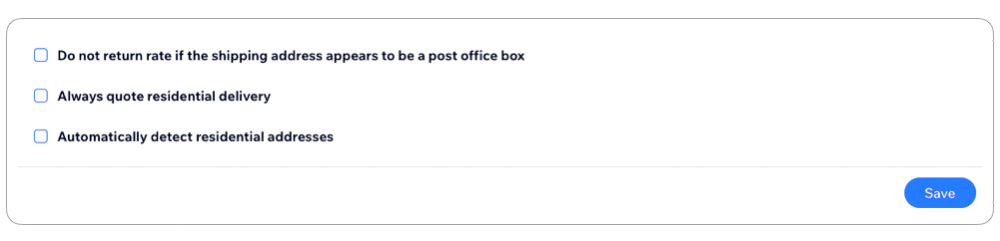
Detecting the address type (commercial vs. residential) is limited to the United States, Canada, Australia, Belgium, and Great Britain. The address type can have a significant impact on shipping rate estimates.
| Do not return a rate if the shipping address appears to be a post office box | When checked, quotes will not be returned if the address as a post office box. |
| Always quote residential delivery | When checked, quotes will always include the carrier’s residential delivery fee. |
| Automatically detect residential addresses | When enabled, the ship-to address is checked against a source database to determine if it is a residential address. If it is, the shipping quote will automatically include the carrier’s residential delivery fee.
Default unconfirmed address types to:
Select Commercial or Residential. In rare cases the app may be unable to confirm the address type. This occurs when a match for the address can’t be found in the source database. Invalid ship-to addresses are the most common reason for this. In extremely rare cases an address may be valid, but the match found in the database has a low confidence metric. Choose what you want the address type to be in these cases. Default addresses missing a street address to:
Select Commercial or Residential. Identifies the address type to use for the shipping rate estimate when a street address is not provided, as is commonly the case when shipping rate estimates are retrieved on pages other than the checkout page. |
9. Product Settings |
Return to top. |
Select Product Settings from the app’s navigation menu.
The Product Settings page is used to enter or edit the shipping parameters of the products in your store catalog.
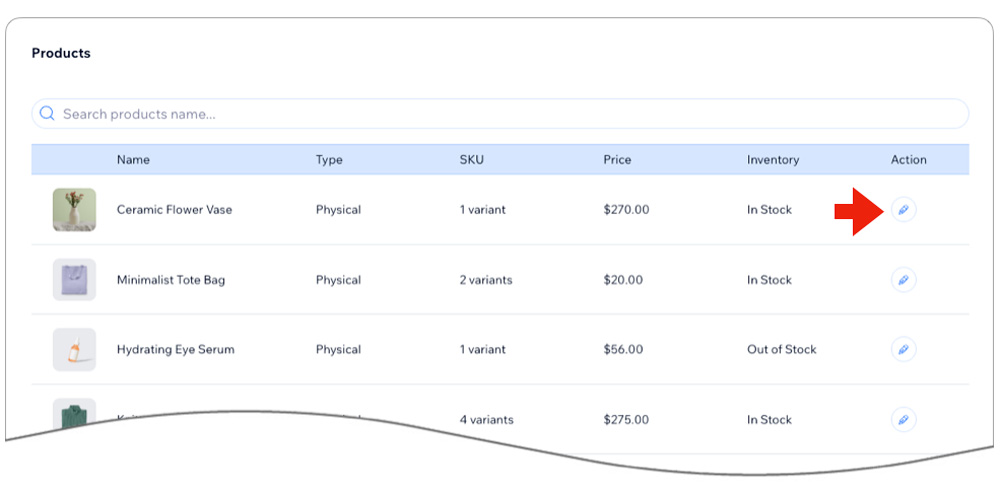
Click on the Edit symbol to access a product’s shipping parameters using the user interface. Enter the information prompted for and then click the Save button to return to the list of products.
| Default shipping method | One of these checkboxes must be enabled for the app to return shipping rates during the checkout process.
Quote as a parcel shipment
Enable this checkbox if the item would ship via a parcel carrier if it is the only thing in the Cart with a quantity of one. It’s possible for products that have the Quote as a parcel shipment setting enabled to also receive LTL freight quotes on the checkout page. In certain cases, it is also possible for only only LTL freight rates to be presented. Learn more. Quote as an LTL shipment
Enable this checkbox if the item would ship via an LTL carrier if it is the only thing in the Cart with a quantity of one. |
| Weight | Required. Enter the weight of the product in pounds. You can enter weights out to three decimal places. Consider including the weight of any packaging materials that may be required to ship the product, such as cardboard, pallets and shrink wrap. |
| Freight Class | Required for LTL freight. Recommended for products with the Quote as an parcel shipment setting enabled if one of the LTL freight providers is also enabled in the app.
Select the product’s freight class from the drop down list. You may also select Density Based from the list, which will calculate a freight class on the fly using the product’s weight and dimensions. Although the density based calculation will return a freight class, selecting the actual freight class for the product is recommended since density is only one of four factors that the National Motor Freight Transportation Agency (NMFTA.org) evaluates when identifying a commodity’s freight class. You are solely responsible to identify the correct freight class of your product(s). If you need assistance, start by checking out this resource for some useful tips: Learn more about Freight Classes |
| NMFC | NMFC numbers are not typically required to obtain a shipping rate estimate for LTL freight. Unless your LTL freight provider requires it, leave this setting blank. |
| Length | Required for parcel quotes if the Standard Box Sizes feature is in use. Not required for LTL freight quotes, but if the item would be subject to the LTL carrier’s overlength fee (also called the excessive length fee) you should populate the length field.
Enter the length of the product in inches. You can enter up to three digits to the right of the decimal point. Include any incremental inches added by packaging materials that may be required to ship the product. |
| Width | Required for parcel quotes if the Standard Box Sizes feature is in use. Not required for LTL freight quotes.
Enter the width of the product in inches. You can enter up to three digits to the right of the decimal point. Include any incremental inches added by packaging materials that may be required to ship the product. |
| Height | Required for parcel quotes if the Standard Box Sizes feature is in use. Not required for LTL freight quotes.
Enter the height of the product in inches. You can enter up to three digits to the right of the decimal point. Include any incremental inches added by packaging materials that may be required to ship the product. |
| Boxing Properties | Allow item to be rotated vertically when placing it in a box Enable the setting to allow the packaging algorithm to rotate the item for ideal placement in a box. If the checkbox is left unchecked, the packaging algorithm will position the item in the box “standing up”. This item ships as its own package
Enable the setting if the item ships as its own package and should never be packaged in a box with other items that are in the cart. When enabled, the dimensions entered for the product will be used as the dimensions of the shipping unit. |
| Pallet Properties | Allow vertical rotation on pallet Enable the setting to allow the packaging algorithm to rotate the item for ideal placement on a pallet. If the checkbox is left unchecked, the packaging algorithm will position the item on the pallet “standing up”. Ship as own handling unit
Enable the setting if the item ships as its own handling unit (e.g. pallet or crate). When enabled, the dimensions entered for the product will be used as the dimensions of the shipping unit. |
| Markup | Enter a dollar amount (e.g. 5.00 for $5.00) or a percentage (e.g. 5.0% for five percent) to mark up the shipping charges when this item is in the cart. Leave this field blank if you don’t want the inclusion of this product in the cart to be the reason why the shipping quotes that are returned by the carrier are modified.
A dollar amount will be multiplied by the quantity of the item that is in the cart and the result added to the shipping quotes that are returned from the carrier before any markups on the Quote Settings page are applied. A percentage will be applied to the total value of the item in the cart (price x quantity x (1 + markup percentage)) and the result added to the shipping quotes that are returned from the carrier before any markups on the Quote Settings page are applied. |
| Drop ship this product | Check this box if this item is drop shipped from a location other than your warehouse. When enabled, a dropdown will appear. Use it to identify the drop ship location.
Drop ship location
A drop down field will display when the Drop ship this product setting is enabled. Select the drop ship location from the drop down. These locations are defined on the Warehouses page in the app settings that was described in the section titled Warehouses. |
| Hazardous material | Enable this setting if the product is subject to hazardous materials restrictions and fees. |
10. Box Sizes |
Return to top. |
The Box Sizes feature is optional and will allow you to retrieve hyper-accurate shipping rate estimates. With the Box Sizes feature enabled, you can identify:
- The sizes of the boxes you inventory.
- The rotational property of items that can be packed in a box with other items.
- Items that ship as their own package (Can’t be packed in a box with other items).
When items in the cart can be packaged together, the app will identify the best box(es) to use for the order and send the packaging solution to the carrier when requesting rates. The packaging solution is saved as a step-by-step graphical illustration which you can access from the Order Details page. Use the step-by-step instructions to pack the order exactly as it was quoted.
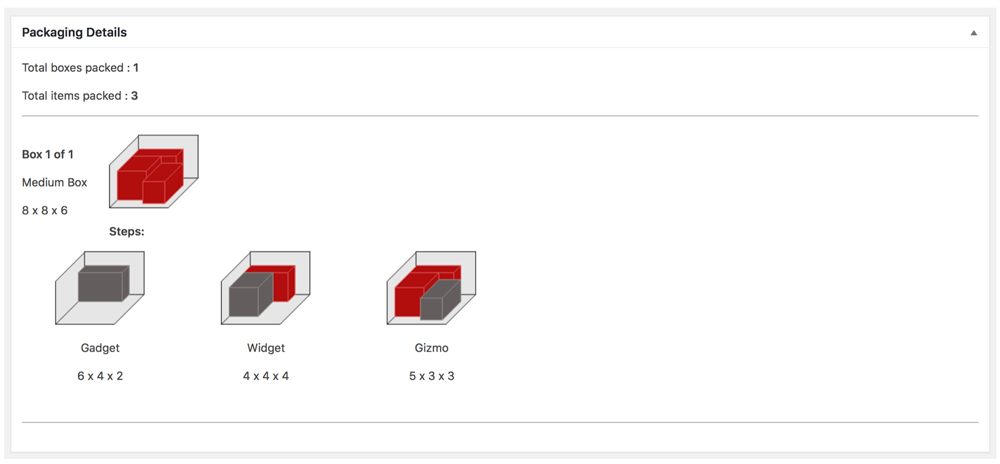
If you elect not to use the Box Sizes feature, other packaging settings are available. They may result in higher or lower rate estimates depending upon how closely they resemble your actual packaging procedures when shipping an order.
Dimensional weight is an extremely important factor when calculating rates for parcel services. Have a clear understanding of the topic when deciding whether or not to use the Box Sizes feature. (Learn more about dimensional weight)
10a. Box Sizes Settings |
Return to top. |
Select Box Sizes from the app’s navigation menu.
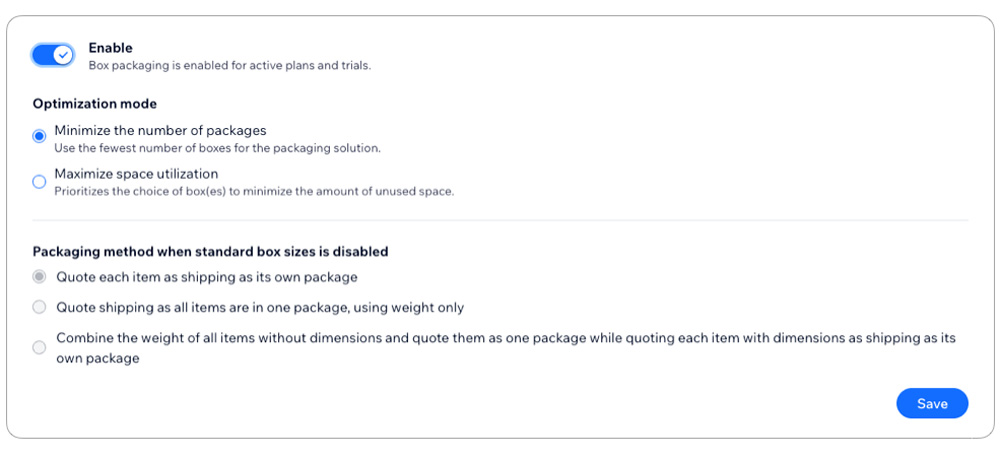
Follow the instructions below.
| Enable | Enable the toggle to use the standard box sizes feature. While enabled a charge of 3¢ for each calculated packaging solution will be incurred unless the capped amount for the billing cycle has been reached. If the capped amount has been reached you can re-enable the feature by increasing the capped amount. (Learn more about usage charges and capped amount in the Shopify Help Center.) |
| Usage statistics and info | Current usage Shows the usage of the feature at the time the page loads. Capped amount
The amount entered into this field is the maximum you can be charged for the standard box size feature in a billing cycle. If this amount is reached the feature will stop working and the optimal packaging solution algorithm will be used instead. This may effect the accuracy of your shipping rates. You can increase the capped amount to re-enable the feature. Notification email address
An email will be sent to the email address entered when the usage of the standard box sizes feature is 80% of the capped amount. Taking action to increase the capped amount immediately after receiving the email will mitigate the risk of the feature being disabled which can otherwise lead to less accurate shipping quotes. |
| Optimization mode | Minimize the number of packages Recommended for most merchants. Choose this setting if you want the packaging algorithm to prioritize the fewest number of boxes used for the packaging solution. Maximize space utilization
Choose this setting if you want the packaging algorithm to prioritize the amount of space used in each box. For example, two boxes may be selected for the packaging solution if they have a higher utilization percentage than using a single, larger box. |
| Packaging method when standard box sizes is disabled | Select the method you want the app to use to rate shipments if you choose not to enable the Standard Box Sizes feature.
Quote each item as shipping as its own package
Each item in the Cart will be quoted as shipping as its own package. Unless orders are shipped this way, the shipping rate estimates using this method will tend to be high. Quote shipping as all items are in one package
All the items in the Cart will be quoted as shipping in one box and the shipping rate estimates will be based on weight only. If the total weight of the Cart exceeds 150 pounds, the total weight will be divided in to multiple packages of equal weight. Shipping rate estimates using this method will tend to be low. Combine the weight of all items without dimensions and quote them as one package while quoting each item with dimensions as shipping as its own package
A hybrid of the other two options. Shipping rate estimates may be higher or lower than the actual shipping charges depending on the contents of the Cart. |
| Save button | Clicking the save button will save changes made to the fields located above the button provided the changes pass the field level validation. |
10b. Identify Your Boxes |
Return to top. |
If you enabled the Box Sizes feature, you must identify the boxes to be used by the packaging algorithm. Only boxes that are used to containerize items need to be identified. Items that ship pre-packaged should not have be included here. To add a box, click the + Add box button. Follow the instructions below to identify the box characteristics.
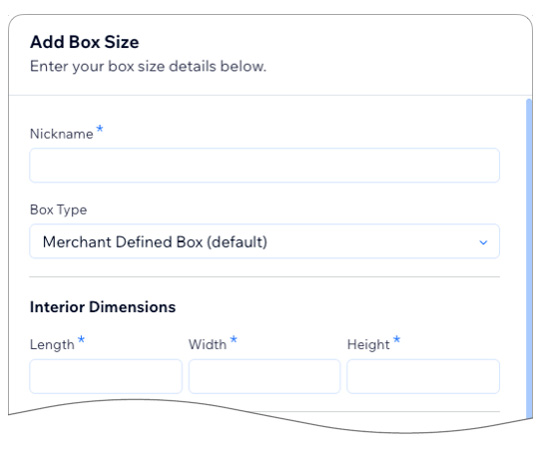
| Nickname | Enter a nickname for the box. This will be used to identify the box in the graphical representation of the packaging solution. |
| Box type | Select the box type. Special services like One Rate from FedEx and Flat Rate from the USPS require the use of their provided packaging. If you will be using one of these services, be sure to select the type of provider supplied box you will be using. |
| Interior Dimensions | Enter the interior dimensions of the box. The interior dimensions are of special importance if they differ significantly from the exterior dimensions, which is common for shipments requiring think insulation or cooling packs. When left blank, the packaging algorithm will use the exterior dimensions for the dimensional constraints.
Length
Enter the length in inches. The measurement can be carried out to three significant digits. (E.g. 0.001) Width
Enter the width in inches. The measurement can be carried out to three significant digits. (E.g. 0.001) Height
Enter the height in inches. The measurement can be carried out to three significant digits. (E.g. 0.001) |
| Exterior Dimensions | Enter the exterior dimensions of the box. These are the dimensions that will be provided to the parcel carrier for rating purposes.
Length
Enter the length in inches. The measurement can be carried out to three significant digits. (E.g. 0.001) Width
Enter the width in inches. The measurement can be carried out to three significant digits. (E.g. 0.001) Height
Enter the height in inches. The measurement can be carried out to three significant digits. (E.g. 0.001) |
| Max Weight | Enter the maximum weight, in pounds, that the box can weigh. This includes the weight of the box. The weight can be carried out to three significant digits. (E.g. 0.001) |
| Box Weight | Enter the weight of the box in pounds.The weight can be carried out to three significant digits. (E.g. 0.001) |
| Box fee | Enter an amount to charge a fee for the box. The fee will be added to the shipping quotes after the service level markup and the general markup/handling fee (found on the Quote Settings page) are applied. Leave the field blank if no fee is to be collected. |
| Available | Select this checkbox to make the box available to the algorithm that calculates the packaging solution. |
11. Identify Pallet Sizes |
Return to top. |
The Pallets tab will allow you to identify the sizes of pallets or handling units that you have on hand. You don’t need to enable this optional, usage-based feature if your pricing tariff is based exclusively on traditional freight classes. However, if your pricing tariff requires that your shipments be dimensionally rated then you will need to enable this feature.
Product dimensions are required for this feature to work. For more information on entering product dimensions, see the section on Product Shipping Parameters.
When enabled, the packaging algorithm will select the smallest pallet possible from your list of identified pallets. The selected pallet will be the one with a width or length greater but closest in size to the item in the cart with the largest dimension. If there is more than one possibility, the pallet with the smallest square area (length x width) will be chosen. This ensures the greatest edge-to-edge coverage on the pallet and therefore the lowest shipping costs when shipments will be dimensionally rated.
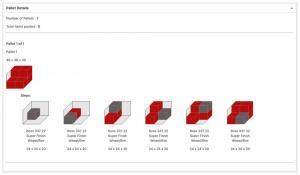
When the Pallet Packaging feature is enabled, the packaging solution is saved as a step-by-step graphical illustration which you can access from the Order Details page. Use the step-by-step instructions to pack the order exactly as it was quoted.
11a. Enable the pallet packaging feature. |
Return to top. |
Select Pallets from the app’s navigation menu.
Follow the instructions below.
| Enable | Enable the toggle to use the standard box sizes feature. While enabled a charge of 3¢ for each calculated packaging solution will be incurred unless the capped amount for the billing cycle has been reached. If the capped amount has been reached you can re-enable the feature by increasing the capped amount. (Learn more about usage charges and capped amount in the Shopify Help Center.) |
| Usage statistics and info | Current usage Shows the usage of the feature at the time the page loads. Capped amount
The amount entered into this field is the maximum you can be charged for the standard box size feature in a billing cycle. If this amount is reached the feature will stop working and the optimal packaging solution algorithm will be used instead. This may effect the accuracy of your shipping rates. You can increase the capped amount to re-enable the feature. Notification email address
An email will be sent to the email address entered when the usage of the standard box sizes feature is 80% of the capped amount. Taking action to increase the capped amount immediately after receiving the email will mitigate the risk of the feature being disabled which can otherwise lead to less accurate shipping quotes. |
11b. Identify your pallets or handling units. |
Return to top. |
To add a pallet, click the + Add Pallet button.
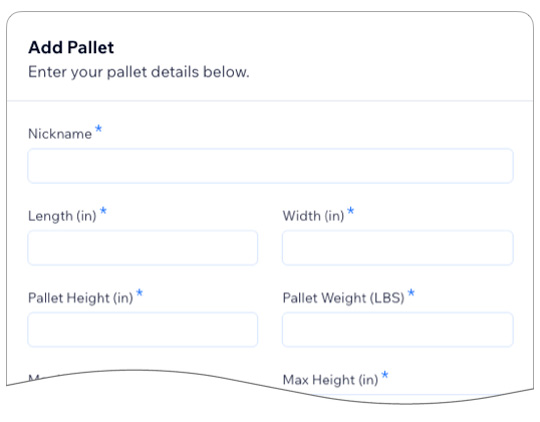
Follow the instructions below. Repeat for each pallet or handling unit that you stock.
| Nickname | Enter a nickname for the pallet. This will be used to identify the pallet in the graphical representation of the packaging solution that can be viewed on the Order Detail page. The nickname is not visible to shoppers. |
| Length | Enter the length of the pallet in inches. |
| Width | Enter the width of the pallet in inches. |
| Pallet Height | Enter the height of the pallet in inches. This is the height of the pallet without anything on it. |
| Pallet Weight | Enter the weight of the pallet in pounds. This is the weight of the pallet without anything on it. |
| Max Weight | Enter in pounds the maximum weight that you are willing to allow the pallet to reach as items are placed on it. |
| Max Height | Enter in inches the maximum height that you are willing to allow the pallet to reach as items are placed on it. |
| Available | Enable this checkbox to make the pallet available to the algorithm that determines the packaging solution. |
What your customer sees. |
Return to top. |
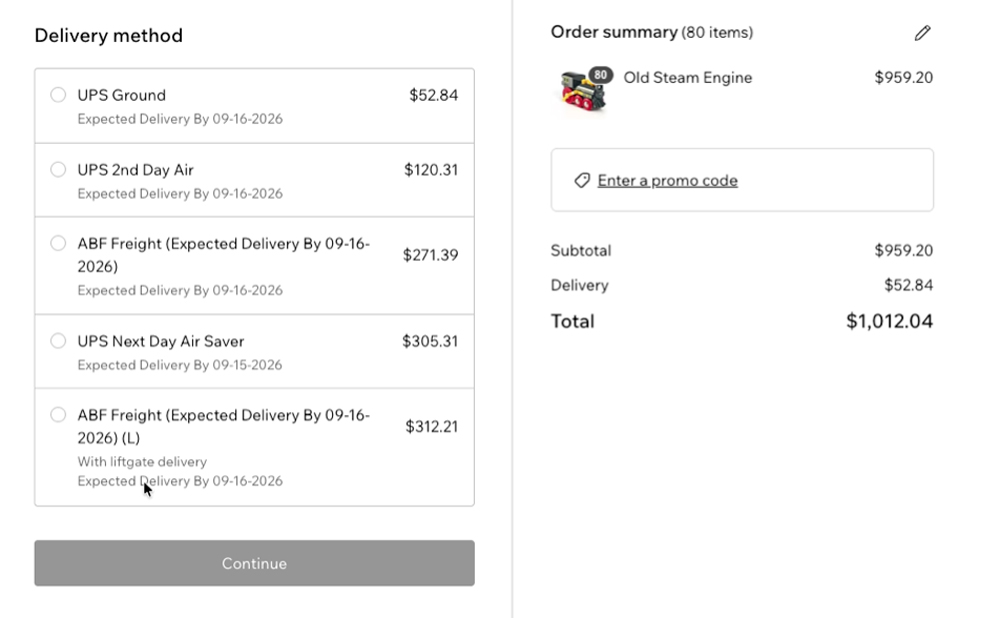
Once you’ve completed the preceding steps, your WiX store is ready to offer real time shipping quotes. The rates your visitors see will depend on the providers you’ve enabled and the settings you’ve chosen. Below is an example of the checkout page when an LTL freight provider, and a parcel provider are enabled, and the settings dictate that shipping rates are presented for both.
What you see. |
Return to top. |
The app identifies the shipping option selected by the customer in WiX’s Order info region.
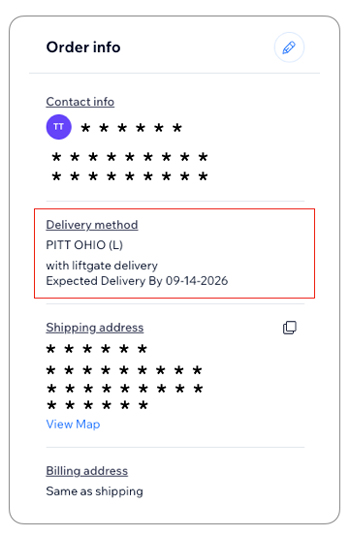
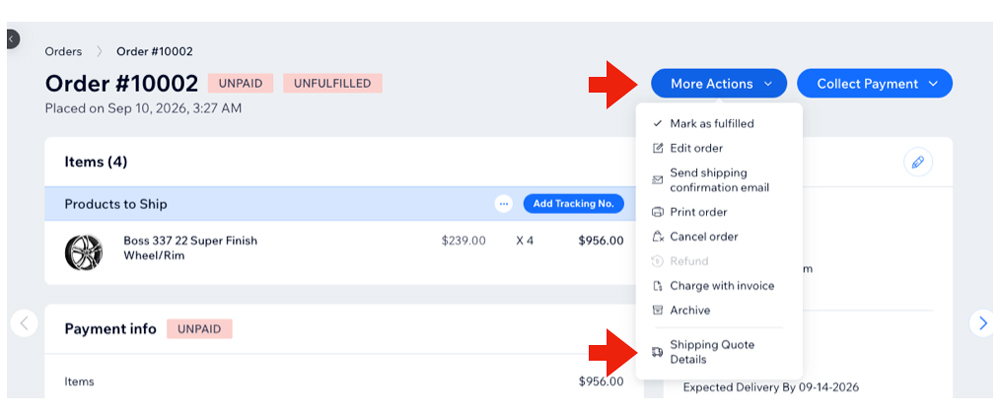
You can see more details about how shipping was quoted for the order by selecting Shipping Quote Details from the More Actions menu at the top of the Order Details page.
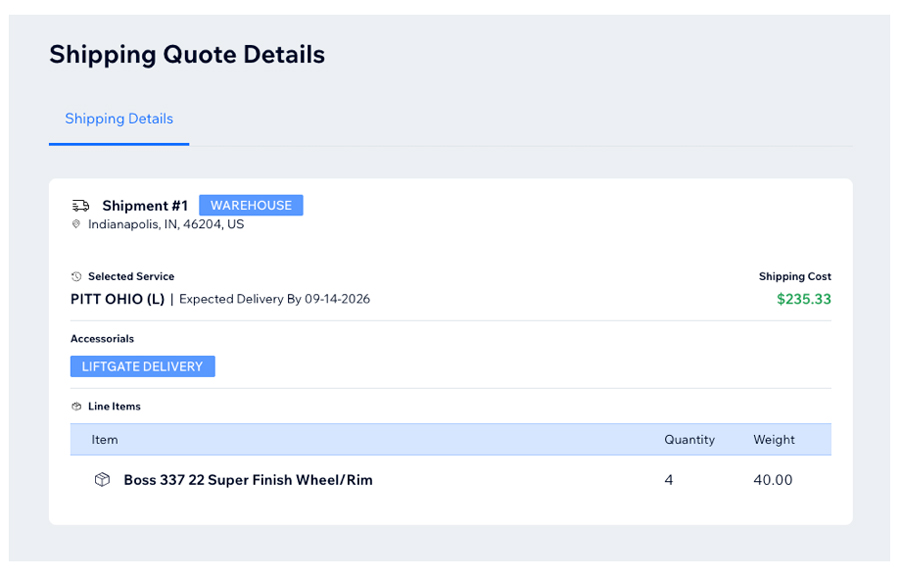
The Shipping Quote Details page will provide a comprehensive look at how the shipping rate was compiled for the order, including the shipment origin, the shipping provider, the additional services, and the list of products on the shipment. If there was more than one shipment involved for the order, the details for each shipment will be listed.
Shipping with FreightDesk Online |
Return to top. |
- How capture the cost of shipping on orders placed online.
- How to ship the order, including how to create the shipping label (or Bill Of Lading in the case of LTL freight), schedule the carrier to pick up the shipment, and update the customer with the tracking number.
Quoting apps, like this one, provide a solution for the first challenge. What are your options for the second challenge?
Option 1 – The carrier’s website: You can log into the carrier’s website and manually enter all of the relevant information. Carrier websites are free to use since the carrier makes money when you use them to deliver an order. However, if you have more than a handful of orders each day this approach is time consuming and ripe for data entry errors which can be costly to correct.
Option 2 – Wix Shipping: Wix Shipping allows you to purchase and print shipping labels directly from the Orders page for postal services such as USPS and parcel carriers including DHL, FedEx, and UPS. Shipping charges are paid when each label is created. Because Wix Shipping is accessed through the store’s Admin area, personnel responsible for shipping must be given appropriate access to the Wix dashboard. Depending on the permissions required, this may be a concern because of the sensitive information available in the Admin area and the potential for inadvertent changes that could affect store operations. If you ship with an unsupported provider, have established payment terms with your shipping providers, or process more than a low-to-moderate number of shipments each day, a dedicated shipping solution may provide a more efficient workflow.
Option 3 – Cloud-based Shipping Platforms: The next step up in capability are cloud-based shipping systems that will connect to your online store and retrieve the details of your orders, thereby eliminating the need for much of the manual data entry. Many of these shipping systems have arrangements with postal and parcel carriers that are on par if not better than the options available through Wix Shipping. Where these systems excel is in the efficiency of the fulfillment process. That translates in to a much higher volume of shipments per unit of time. These systems are relatively inexpensive and the reduction in the amount of labor and time it takes to ship your orders will pay dividends.
Option 4 – FreightDesk Online: FreightDesk Online (freightdesk.online) is also a cloud-based shipping system. It enjoys all of the benefits of other cloud-based offerings but expands the solution in two ways:
- It makes use of the detailed information collected by Eniture Technology’s quoting apps (like this one) such as the packaging solution and the additional services included in the shipping option chosen when the order was placed.
- It provides merchants access to more than two dozen LTL freight providers in addition to the typical postal and parcel integrations offered by other cloud-based solutions.
These expanded capabilities deliver you closer to true “click-and-ship” shipping than any other alternative, whether you’re shipping with a postal carrier, a parcel carrier, or an LTL freight provider.
How to connect your Wix store to FreightDesk Online |
Return to top. |
First, if you don’t already have one, register for a FreightDesk Online account (https://freightdesk.online/register). You can connect multiple online stores to FreightDesk Online, so you don’t have to create separate accounts for each one.
The pricing for FreightDesk Online is á la carte. You’ll be able to pick a separate plan for parcel (and postal) shipments, and for LTL freight shipments based on the anticipated volume for each type of shipping. Your monthly subscription rate will be comprised of these two selections. You can begin a 30-day trial of both types of shipping by selecting Trial in the corresponding dropdown fields on the registration form.
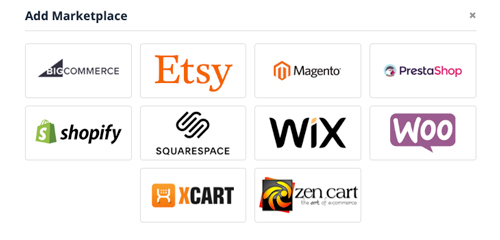
After you complete the registration process, log into FreightDesk Online. Navigate to Settings > Connections. Click the + Add Marketplace button located at the top right corner of the Connected Marketplaces section. Select the Wix product tile from the Add Marketplace modal.
Enter the connection settings for your Wix store using the instructions below:
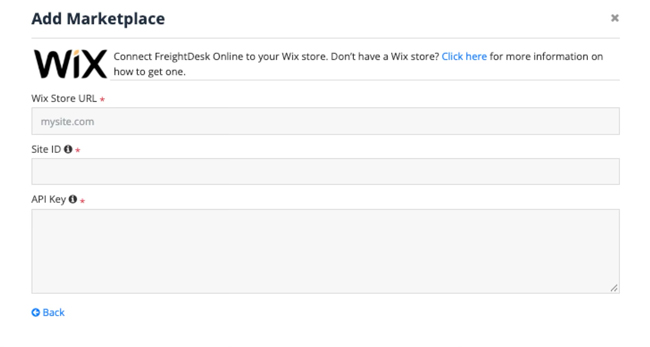
| Wix Store URL | Enter the URL for your Wix store. |
| Site ID | Enter the Site ID for your store. To locate it, navigate to the Home page using the Wix navigation menu. Locate /dashboard/. Your Site ID appears after /dashboard/ and before the next forward / is your Site ID. |
| API Key | To create an API Key, you need to be viewing your Wix account-level dashboard, and logged in as the owner or co-owner. Use the Wix Admin menu to navigate to Settings > API Keys. Click the + Generate API Keys button.
Key details – Name
Enter FreightDesk Online. Sites
Select Specific sites and then choose the specific store you want to connect to FreightDesk Online. Permissions
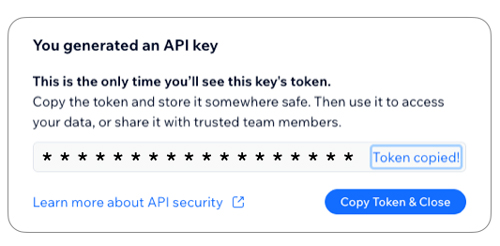
Enable the box for All permissions. Click the Generate Key button. Wix may send an email for multi-factor authentication. After completing that step, you will be able to copy the token and paste it into the FreightDesk Online Wix API Key field. Do not close the API Key popup until after you have successfully copied and pasted it into your FreightDesk Online – Wix connection settings. You will not have another opportunity to copy it without generating a new API Key.
 |
After saving the Wix credentials, locate the store in your list of connected marketplaces and click on its Show/Edit link.
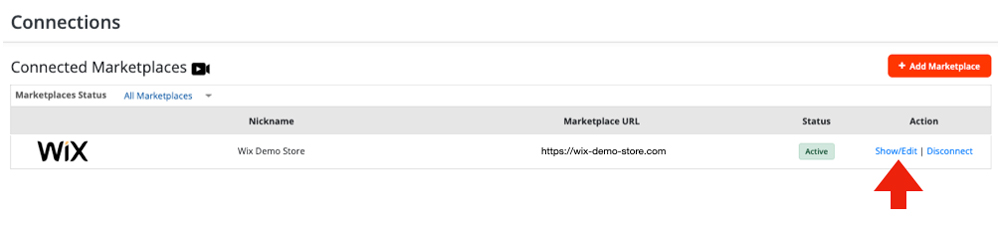
Confirm the connection to Wix by clicking the Test Connection button. Afterward, choose the settings according to your preferences. The most popular settings are identified below.
| Order Import Status | Most FreightDesk Online users will select Unfulfilled. Orders that have an order status of Unfulfilled will be automatically imported into FreightDesk Online for processing. |
| Order Shipped Status | Most FreightDesk Online users will select Fulfilled. When the shipment is created in FreightDesk Online, which culminates with the printing of a shipping label for parcel, or a bill of lading for freight, the order’s status is marked as Fulfilled in Wix, and the shipment tracking information is written back to Wix. |
| Default Shipping Accounts | If you’ve already connected your parcel and LTL freight accounts, use these fields to identify which ones will be used by default. You can change the desired shipping account when preparing the shipment. This settings merely identifies which accounts will be preselected for the fulfillment process. |
| Marketplace Status | Select Active Marketplace maintain a live connection to the store. Selecting Inactive Marketplace will suspend the connection to the store. |
Now that you’ve connected FreightDesk Online, unfulfilled orders will automatically appear in FreightDesk Online. To view them, log into FreightDesk Online and click on Orders in the navigation menu. You’ll need to connect your shipping providers before you can start shipping. You can find a quick start guide in FreightDesk Online by navigating to Help > Getting Started.