 | Standard Box Sizesfor Magento 1.x |
The Standard Box Sizes plugin is designed exclusively for use with Eniture Technology’s Small Package Quotes extensions. The plugin allows merchants to record standard box sizes which are subsequently used to identify a packaging solution prior to obtaining shipping rate estimates. The packaging solution is saved with orders as a step-by-step graphical illustration that the merchant can refer to during fulfillment. The result is the most accurate shipping rate estimates possible. The Small Package Quotes extension is available for FedEx and UPS reseller Worldwide Express.
Features
Define standard box sizes.
Automate the identification of the most efficient packaging solution.
Refer to a step-by-step graphical illustration of the packaging solution during fulfillment.
Record the weight of each box so the weight of the packaging solution is precise.
Specify the maximum weight capacity of each box.
Stipulate whether individual products can be rotated for placement in a box.
Identify which products ship as their own package and should not be boxed with other items.
Current version: 1.0
Requirements
WooCommerce 3.0 or newer.
The installation of at least one of Eniture Technology’s Small Package Quotes plugins.
FAQ’S
How is the packaging solution identified if this plugin add on isn’t installed?
The standard plugin uses a virtual box packaging algorithm that assumes an infinite number of box sizes which may be sufficient for some merchants. The virtual boxes identified by the default algorithm will most likely differ from what is used during the fulfillment process, so there is an opportunity for the billed charges to differ from that what was collected on the order. The Standard Box Sizes plugin identifies packaging solutions using the merchant’s standard box sizes so the shipping rate estimates are obtained using the same shipping parameters that will be encountered during the fulfillment process.
How does the Standard Box Sizes plugin work?
The plugin uses a highly complex algorithm to consider the constraints of the defined boxes, the physical characteristics of the items in the shopping cart, and the governing settings to identify the packaging solution. The algorithm’s goal is to minimize the number of boxes required for the packaging solution which minimizes the cost of shipping.
What does it cost to use this plugin?
A transaction fee is charged per packaging solution. The smallest plan equates to 3 cents per packaging solution if fully consumed. The cost per transaction gets progressively cheaper the larger the monthly plan. A packaging solution is calculated for every shipment origin point involved for a particular shopping cart. A potential order with only one warehouse will require one packaging solution each time shipping rates are retrieved. A potential order with one warehouse and two drop ship locations will require three.
Installation & User’s Guide
Overview
1. Install the plugin |
Return to top. |
Download the plugin installation file. Be sure to save it to a familiar location so you can navigate to it during the installation process.
Login to the WordPress dashboard as the website administrator. In the left sidebar, hover your mouse over the Plugins menu to display the sub-menu options. Select Add New from the sub-menu options. The Add Plugins page will load.
At the top of the Add Plugins page, click on the Upload Plugin button.

Controls will appear in the middle of page that will allow you to choose and install the plugin application. Click the Choose File button, navigate to the location where you saved the installation file and select it.

Click the Install Now button.
WordPress will display information about the installation progress at the bottom of the page. The plugin has been installed once the message Plugin installed successfully is displayed.
2. Activate the Plugin |
Return to top. |
Once the plugin has been installed, it must be activated. If you are still on the same page that you were on at the end of Step 2, you can click the Activate Plugin button.

If you’ve already navigated away from that page, select Installed Plugins from the Plugins menu.

Locate the Standard Box Sizes plugin on the list and click the Activate link.

3. Configure the plugin |
Return to top. |
Select Settings from the WooCommerce menu.
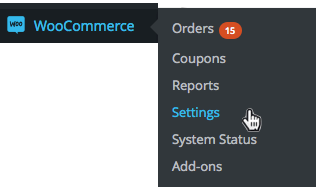
Click on the tab that corresponds to the Small Package Quotes plugin you have installed. It will be labeled FedEx, Purolator, UPS or Speedship (Worldwide Express). Click on the Box Sizes link to access the plugin settings.

3a. Enter box sizes | Return to top. |
Begin by entering your box sizes. Click the Add Box button.
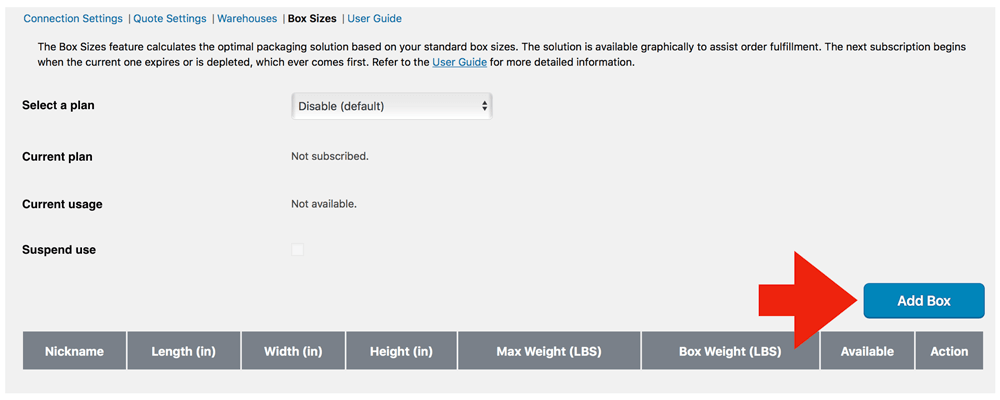
Use the popup to enter the box parameters. Repeat this for each of your standard boxes.

| Nickname | Enter a nickname for the box. The nickname will be used to identify the box in the graphical illustration of the packaging solution. |
| Length | The length of the box in inches. |
| Width | The width of the box in inches. |
| Height | The height of the box in inches. |
| Max Weight | The maximum weight the box is rated to contain, entered as pounds. |
| Box Weight | The weight of the box in pounds. |
| Available | Check this box to make it available for the packaging solution calculations. |
3b. Choose a plan | Return to top. |
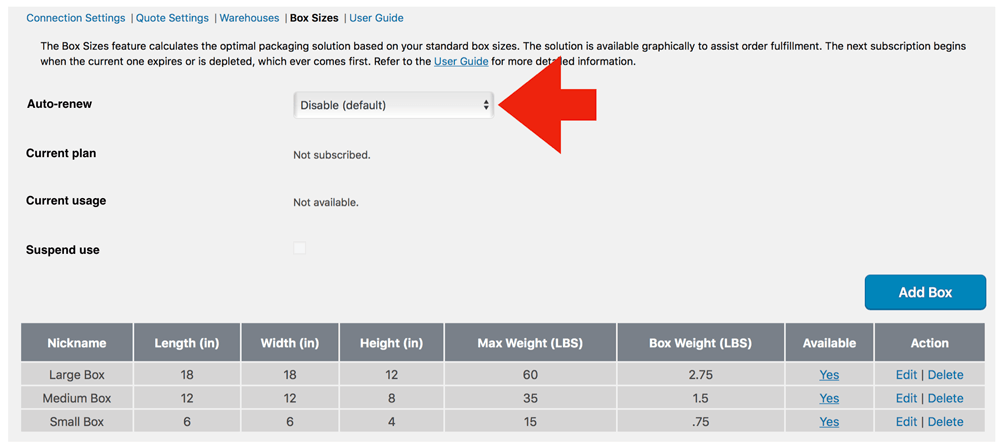
| Auto-renew | Choose a plan that best meets your needs. The credit card associated with quote plugin license will be billed immediately and the plan will become your current plan. Your choice will be retained for the auto-renew option. You can change your auto-renew selection at any time. Plans automatically renew at the end of every monthly billing cycle or upon the depletion of the current plan. To prevent a renewal, choose Disable from the list of options. |
| Current plan | Displays information about the current plan and the start and end dates of the current subscription period. |
| Current usage | Displays information about the consumption of the current plan. The date shown is the UTC timestamp of the last time a packaging solution was identified. |
| Suspend use | Checking this box temporarily suspends the Standard Box Sizes plugin. It does not permanently disable the feature and if the current monthly billing cycle expires, a new plan will be activated. To disable the plugin, deactivate it or choose Disable from the Auto-renew drop down. |
4. Product boxing properties |
Return to top. |

When the plugin is installed two new options are added to the product shipping parameters.
| Allow vertical rotation | Allows the product to be rotated for the purpose of arriving at a packaging solution. If left unchecked, the product can only be placed in a box in its upright orientation. |
| Ship as own package | When checked, the item is prevented from being placed in a box with other items. The packaging solution will represent it as its own package. |
5. Viewing the packaging solution |
Return to top. |
When the plugin is installed and enabled, the packaging solution is saved graphically with each order. To view it, navigate to WooCommerce > Orders and select an order. Scroll down the Order Details page until the Packaging Details section is located.
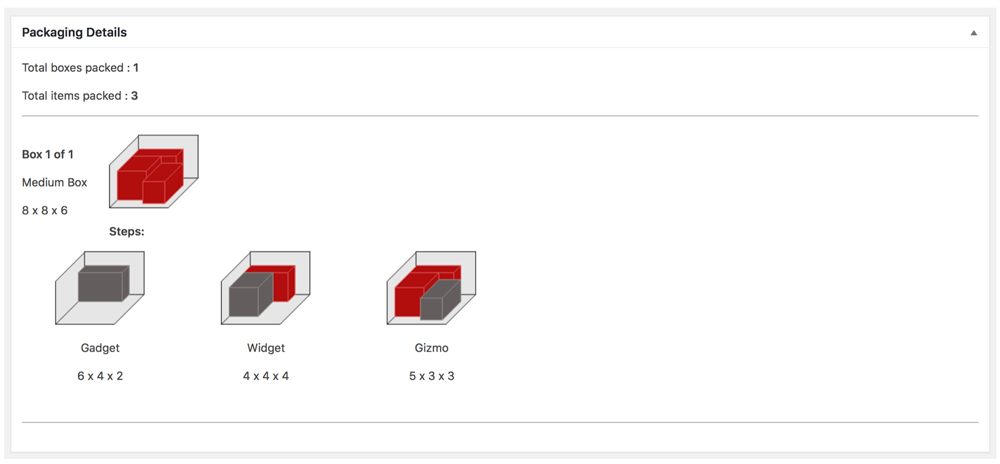
The illustration shows the boxes required to ship the order. Each box is identified by its nickname and dimensions. To the right of the nickname is an image of the box completely packed. Beneath it are a series of images providing step-by-step directions on how to pack the box. Below each step’s image is the name and dimensions of the item that is the focus of that step. If more than one warehouse or drop ship location is required to fulfill the order, the packaging solution for each location will be presented in succession.
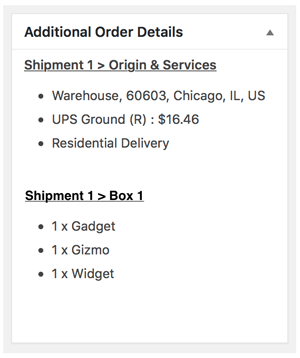
To further assist you, the Additional Order Details widget will contain information about the shipment(s) required to fulfill the order.
